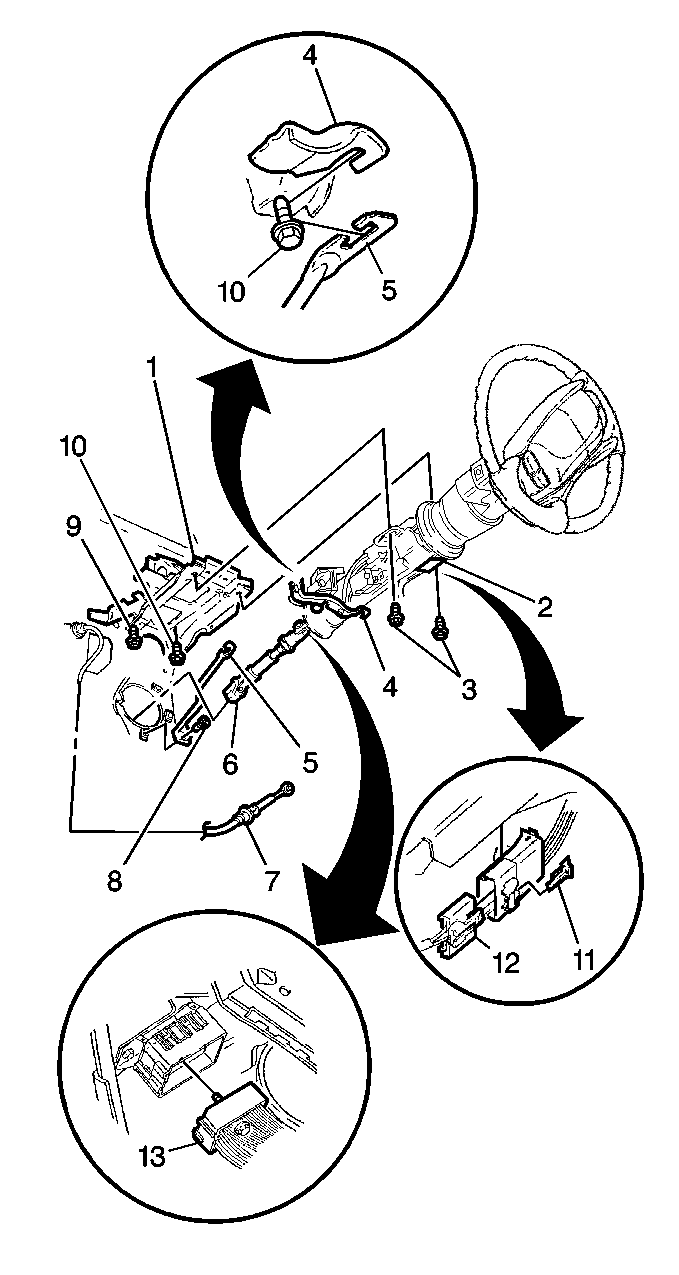
Removal Procedure
- Disable the SIR system. Refer to Disabling the SIR System in SIR.
- Disconnect the negative battery cable.
- If disassembling the column is necessary, remove the Inflatable Restraint Steering Wheel Module from the SIR connector. Refer to Inflatable Restraint Steering Wheel Module Replacement in SIR.
- If disassembling the column is necessary, remove the steering wheel. Refer to Steering Wheel Replacement .
- Remove the left I/P sound insulator.
- Remove the trim plate.
- Remove the knee bolster deflector. Refer to Instrument Panel Knee Bolster in Instrument Panel, Gauges and Console.
- For vehicles with column shift, remove the shift indicator cable.
- Loosen the bolts (3,9,10).
- Remove the bolt (8).
- Remove the brace (5).
- Disconnect the steering wiring harness connector (13) from main body wiring harness.
- Support the column.
- Remove the 2 bolts (3).
- For vehicles with a column shift, complete the following steps:
- For vehicle with a console shift, remove the park lock cable from the ignition switch inhibitor. Refer to Park Lock Cable Replacement in Automatic Transaxle - 4T65-E.
- Remove the steering column shaft from the intermediate steering shaft (6), positioning the seal as needed.
- Loosen or remove the upper intermediate steering shaft pinch bolt.
- Remove the steering column from the vehicle.
Caution: Unless directed otherwise, the ignition and start switch must be in the OFF or LOCK position, and all electrical loads must be OFF before servicing any electrical component. Disconnect the negative battery cable to prevent an electrical spark should a tool or equipment come in contact with an exposed electrical terminal. Failure to follow these precautions may result in personal injury and/or damage to the vehicle or its components.

| 15.1. | Remove the shift control cable (7) from the actuator. |
| 15.2. | Remove the shift control cable (7) from the slot in the lower column bracket, if necessary. |
If the steering column is partially collapsed, refer to Steering Column Accident Damage Inspection - Off Vehicle .
Installation Procedure
- Hand start 1 bolt (10) into steering column support bracket (2) at the lower right position.
- Position the steering column into the vehicle.
- Install the support column.
- Insert the intermediate steering shaft (6) through the seal from the front.
- Install the shaft (6) to the column with the pinch bolt.
- With the column shift control cable (7) at the actuator, snap the cable onto the range selector pin on the column.
- Secure the cable fitting into the slot in the lower column bracket. Ensure that both fitting ears fully expand in order to retain the cable in the bracket.
- With the console shift, install the park lock cable to the ignition switch inhibitor. Snap the cable into place.
- Install the support column.
- Guide the lower support slotted hole onto the bolt.
- Install the 2 bolts (3) through the upper support bracket into the steering column support bracket (1).
- Install the bolt (9) into the steering column support bracket (1).
- Install the brace (5) onto the bolt (10).
- Install the bolt (8) through the brace (5).
- Move the seal into position.
- Center the column in the steering column opening.
- Tighten the 3 bolts (3,9).
- For vehicles with a column shift, install the shift indicator cable.
- Install the IP sound insulator.
- Install the trim plate.
- Install the knee bolster deflector. Refer to Instrument Panel Knee Bolster in Instrument Panel, Gauges, and Console.
- Install the steering wheel if previously removed. Refer to Steering Wheel Replacement .
- Install the inflator module, if previously removed. Refer to Inflatable Restraint Steering Wheel Module Replacement in SIR.
- Connect the negative battery cable.
- Enable the SIR system. Refer to Enabling the SIR System in SIR.
- Inspect the steering for proper operation.

Notice: The steering column should never be supported only by the lower support bracket. Damage to the lower bearing could result.
Important:
• When installing the steering column, install the fasteners needed
for completing each step of the installation. Do not tighten the fasteners
until the procedure indicates to do so. • In order to ensure the column's energy-absorption action, use
only the specified screws, bolts, and nuts. Tighten to the specified torque.
Notice: Use the correct fastener in the correct location. Replacement fasteners must be the correct part number for that application. Fasteners requiring replacement or fasteners requiring the use of thread locking compound or sealant are identified in the service procedure. Do not use paints, lubricants, or corrosion inhibitors on fasteners or fastener joint surfaces unless specified. These coatings affect fastener torque and joint clamping force and may damage the fastener. Use the correct tightening sequence and specifications when installing fasteners in order to avoid damage to parts and systems.
Tighten
Tighten the pinch bolt to 47 N·m (35 lb ft).
Do not torque at this time.
Tighten
Tighten the bolt to 27 N·m (84 lb in).
Tighten
Tighten the bolt (8) to 9.5 N·m (84 lb in).
Tighten
Tighten the bolts (3,9) to 27 N·m (20 lb ft).
