Lower Intake Manifold Replacement L36
Removal Procedure
- Remove the upper intake manifold. Refer to Upper Intake Manifold Replacement .
- Remove the thermostat housing. Refer to Engine Coolant Thermostat Replacement in Engine Cooling.
- Disconnect the electrical connector from the ECT.
- Remove the drive belt tensioner. Refer to Drive Belt Tensioner Replacement .
- Remove the EGR valve outlet pipe. Refer to Exhaust Gas Recirculation Outlet Pipe Replacement in Engine Controls-3.8L.
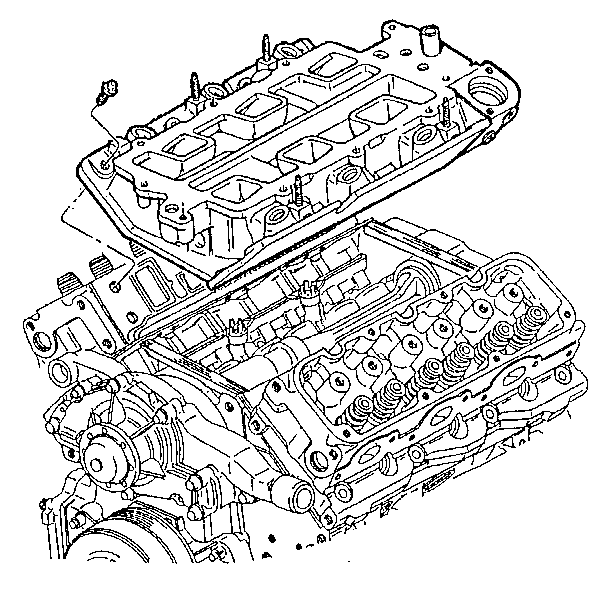
- Remove the lower intake manifold bolts.
- Remove the lower intake manifold.
- Clean and inspect the lower intake manifold. Refer to Lower Intake Manifold Cleaning and Inspection in the Engine Mechanical-3.8L Unit Repair.
Installation Procedure
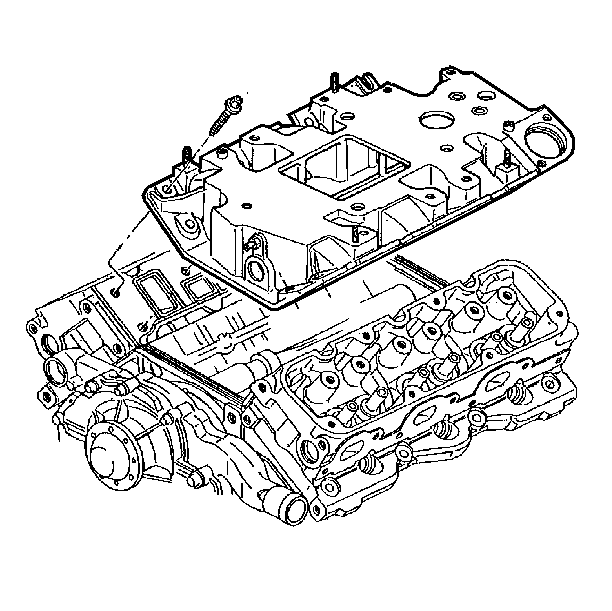
- Install the lower intake manifold gasket.
- Install the lower intake manifold.
- Apply Threadlocker 272 GM P/N 12345493 (Canadian P/N 10953488) to the bolt threads.
- Install the lower intake manifold bolts.
- Install the EGR valve outlet pipe. Refer to Exhaust Gas Recirculation Outlet Pipe Replacement in Engine Controls-3.8L.
- Install the drive belt tensioner. Refer to Drive Belt Tensioner Replacement .
- Connect the electrical connector from the ECT.
- Install the thermostat housing. Refer to Engine Coolant Thermostat Replacement in Engine Cooling.
- Install the upper intake manifold. Refer to Upper Intake Manifold Replacement .
Important: In order to install the manifold, complete the following steps:
• Clean the cylinder block, heads and the intake manifold sealing surface
of all oil with a suitable solvent. • Apply a GM approved sealer to the ends of the intake manifold seals. • Clean any adhesive compound from the intake manifold bolts and the
bolt holes. • Apply thread locking compound GM P/N 12345739 (Canadian P/N 10953541)
or equivalent to the intake manifold bolt threads before assembly.
Notice: Use the correct fastener in the correct location. Replacement fasteners must be the correct part number for that application. Fasteners requiring replacement or fasteners requiring the use of thread locking compound or sealant are identified in the service procedure. Do not use paints, lubricants, or corrosion inhibitors on fasteners or fastener joint surfaces unless specified. These coatings affect fastener torque and joint clamping force and may damage the fastener. Use the correct tightening sequence and specifications when installing fasteners in order to avoid damage to parts and systems.
Tighten
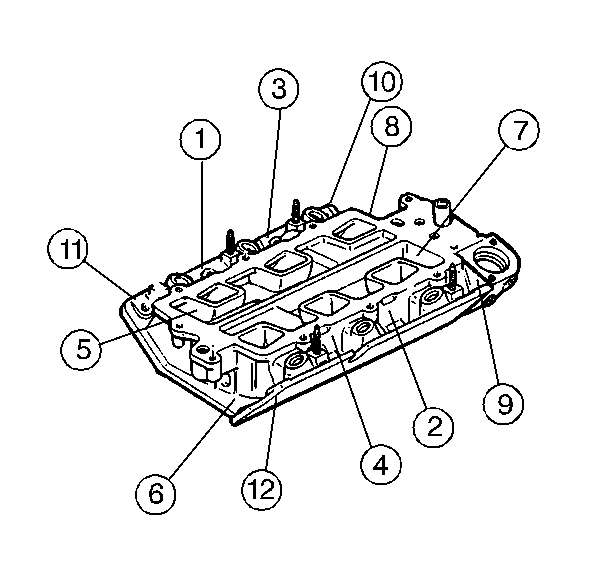
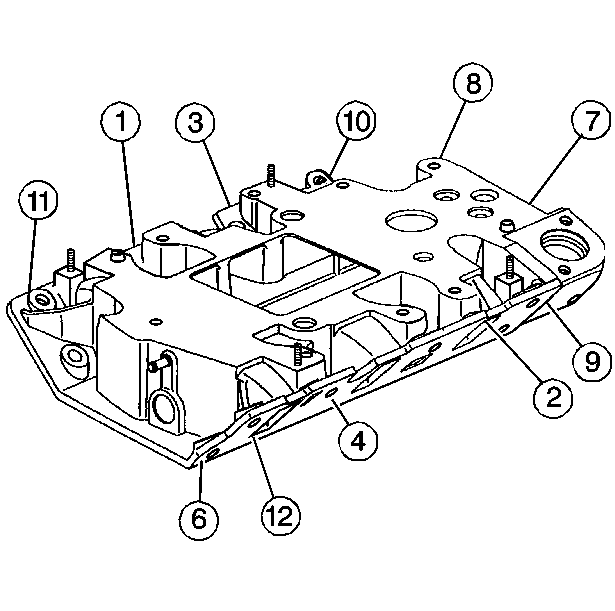
Tighten the lower intake manifold bolts in sequence (1-10) to
15 N·m (11 lb ft).
Lower Intake Manifold Replacement L67
Removal Procedure
- Remove the supercharger. Refer to Supercharger Replacement .
- Remove the thermostat housing. Refer to Engine Coolant Thermostat Replacement in Engine Cooling.
- Disconnect the electrical connector from the ECT.
- Remove the drive belt tensioner. Refer to Drive Belt Tensioner Replacement .
- Remove the EGR valve outlet pipe. Refer to Exhaust Gas Recirculation Outlet Pipe Replacement in Engine Controls-3.8L.
- Disconnect the electrical connection at the temperature sensor.
- Remove the lower intake manifold bolts.
- Remove the lower intake manifold.
- Clean and inspect the lower intake manifold. Refer to Lower Intake Manifold Cleaning and Inspection in the Engine Mechanical-3.8L Unit Repair.
Installation Procedure
Important: In order to install the manifold, complete the following steps:
• Clean the cylinder block, heads and the intake manifold sealing surface
of all oil with a suitable solvent. • Apply a GM approved sealer to the ends of the intake manifold seals. • Clean any adhesive compound from the intake manifold bolts and the
bolt holes. • Apply thread locking compound GM P/N 12345739 (Canadian P/N 10953541)
or equivalent to the intake manifold bolts.
- Install the lower intake manifold gasket.
- Install the lower intake manifold.
- Apply Threadlocker 272 GM P/N 12345493 (Canadian P/N 10953488) to the bolt threads.
- Install the lower intake manifold bolts including the 2 hidden bolts.
- Install the EGR valve outlet pipe. Refer to Exhaust Gas Recirculation Outlet Pipe Replacement in Engine Controls-3.8L.
- Install the drive belt tensioner. Refer to Drive Belt Tensioner Replacement .
- Connect the electrical connector from the ECT.
- Install the thermostat housing. Refer to Engine Coolant Thermostat Replacement in Engine Cooling.
- Install the supercharger. Refer to Supercharger Replacement .
Notice: Use the correct fastener in the correct location. Replacement fasteners must be the correct part number for that application. Fasteners requiring replacement or fasteners requiring the use of thread locking compound or sealant are identified in the service procedure. Do not use paints, lubricants, or corrosion inhibitors on fasteners or fastener joint surfaces unless specified. These coatings affect fastener torque and joint clamping force and may damage the fastener. Use the correct tightening sequence and specifications when installing fasteners in order to avoid damage to parts and systems.
Tighten
Tighten the lower intake manifold bolts in sequence (1-12) to
15 N·m (11 lb ft).
