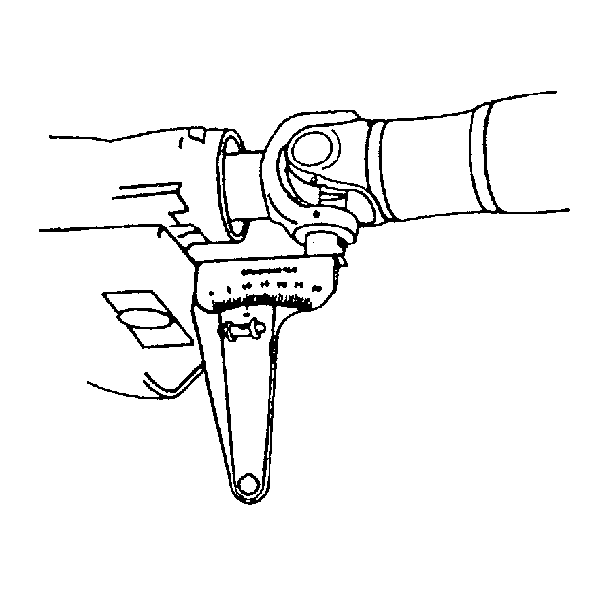
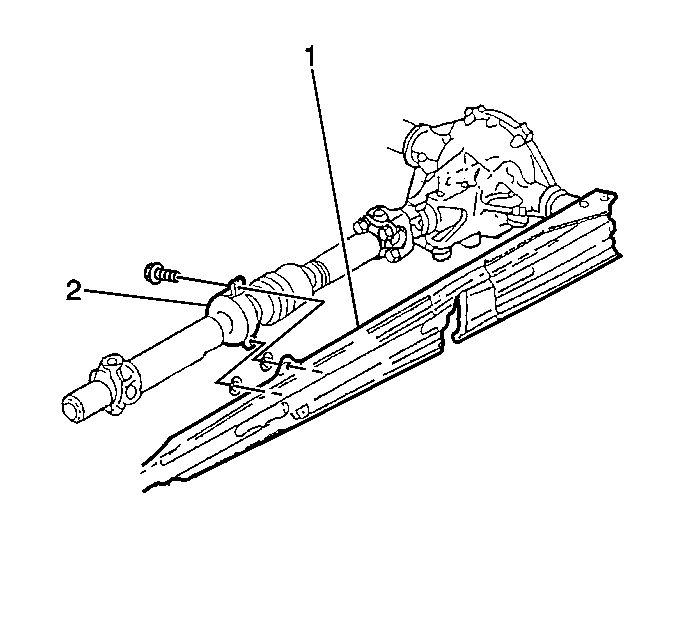
Driveline Working Angles Measurement One-Piece
Tools Required
J 23498-A Driveshaft Inclinometer
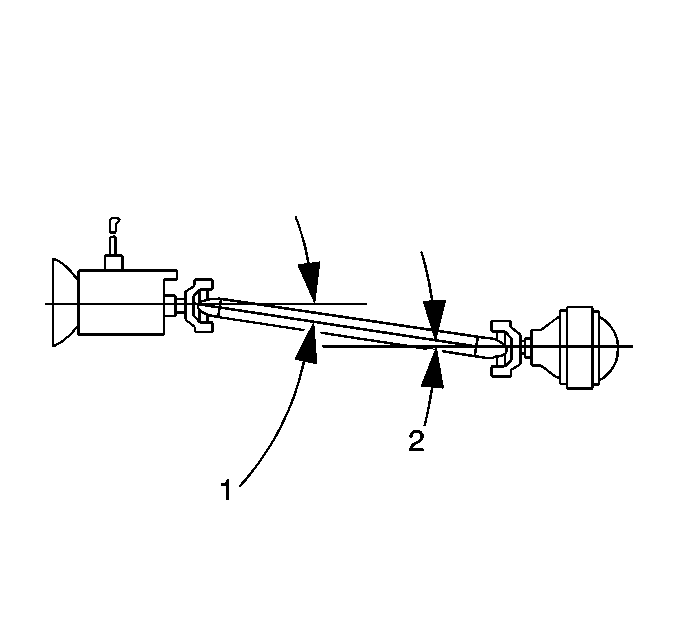
Driveline working angle does not refer to the angle of any one shaft, but to the angle that is formed by the intersection of 2 shafts. This intersection may be formed by a propeller shaft to a pinion shaft, or a propeller shaft to another propeller shaft, etc.
In a one-piece propeller shaft system, the angle formed by the propeller shaft and the transmission output shaft form the front working angle (1). The angle formed by the propeller shaft and the drive axle pinion form the rear working angle (2).
- Raise and support the vehicle; ensure that the drive axle is supported at ride height - vehicle body supported by suspension components - with the wheels free to rotate. Refer to Lifting and Jacking the Vehicle in General Information.
- Place the transmission in NEUTRAL.
- Ensure that the vehicle fuel tank is full of fuel or that the equivalent amount of weight is added to the rear of the vehicle to simulate a full tank of fuel.
- Verify that the U-joint bearing caps are free of corrosion or foreign material in order to ensure accurate readings of the driveline angles. Remove any snap rings that may interfere with the correct placement of the J 23498-A . Reinstall the snap rings after you take the measurements.
- Position the J 23498-A onto the propeller shaft front bearing cap so that the J 23498-A is parallel to the shaft.
- Ensure that the propeller shaft bearing caps are straight up and down in order to obtain an accurate measurement.
- Center the bubble in the sight glass.
- Record the angle measurement.
- Rotate the propeller shaft 90 degrees; ensure that the transmission output shaft yoke bearing caps are straight up and down in order to obtain an accurate measurement.
- Position the J 23498-A onto the transmission output shaft yoke bearing cap so that the J 23498-A is parallel to the propeller shaft.
- Center the bubble in the sight glass.
- Record the angle measurement.
- Subtract the smaller angle reading from the larger angle reading in order to obtain the front U-joint working angle.
- Position the J 23498-A onto the propeller shaft rear bearing cap so that the J 23498-A is parallel to the shaft.
- Ensure that the propeller shaft bearing caps are straight up and down in order to obtain an accurate measurement.
- Center the bubble in the sight glass.
- Record the angle measurement.
- Rotate the propeller shaft 90 degrees; ensure that the drive axle pinion flange bearing caps are straight up and down in order to obtain an accurate measurement.
- Position the J 23498-A onto the drive axle pinion flange bearing cap so that the J 23498-A is parallel to the propeller shaft.
- Center the bubble in the sight glass.
- Record the angle measurement.
- Subtract the smaller angle reading from the larger angle reading in order to obtain the rear U-joint working angle.
- Compare the front and rear working angles. The angles should be equal to each other within ½ degree to provide effective cancellation of the U-joints.
- If the difference between the front and rear working angles exceeds ½ degree, the angles require adjustment. Refer to Driveline Working Angles Adjustment .
- If the working angles are equal to zero, the angles require adjustment. 0 degree working angles will cause premature U-joint wear due to lack of rotation of the U-joint bearings. Refer to Driveline Working Angles Adjustment .
- If the working angles exceed 4 degrees, the angles require adjustment. Refer to Driveline Working Angles Adjustment .
The weight of 3.8 liters (1 gallon) of gasoline is approximately 2.8 kg (6.2 lb).

Driveline Working Angles Measurement Two-Piece
Tools Required
J 23498-A Driveshaft Inclinometer
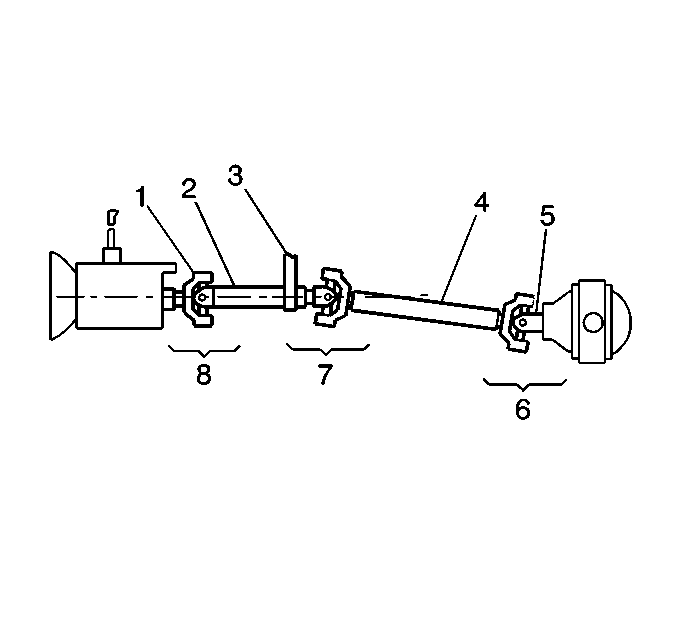
Driveline working angle does not refer to the angle of any one shaft, but to the angle that is formed by the intersection of 2 shafts. This intersection may be formed by a propeller shaft to a pinion shaft, or a propeller shaft to another propeller shaft, etc.
In a two-piece propeller shaft system, the angle formed by the front propeller shaft (2) and the transmission output shaft form the front working angle (8). The angle formed by the front propeller shaft (2) and the rear propeller shaft (4) form the middle working angle (7). The angle formed by the rear propeller shaft (4) and the drive axle pinion form the rear working angle (6).
- Raise and support the vehicle; ensure that the drive axle is supported at ride height - vehicle body supported by suspension components - with the wheels free to rotate. Refer to Lifting and Jacking the Vehicle in General Information.
- Place the transmission in NEUTRAL.
- Ensure that the vehicle fuel tank is full of fuel or that the equivalent amount of weight is added to the rear of the vehicle to simulate a full tank of fuel.
- Verify that the U-joint bearing caps are free of corrosion or foreign material in order to ensure accurate readings of the driveline angles. Remove any snap rings that may interfere with the correct placement of the J 23498-A . Reinstall the snap rings after you take the measurements.
- Position the J 23498-A onto the front propeller shaft bearing cap so that the J 23498-A is parallel to the shaft.
- Ensure that the propeller shaft bearing caps are straight up and down in order to obtain an accurate measurement.
- Center the bubble in the sight glass.
- Record the angle measurement.
- Rotate the propeller shaft 90 degrees; ensure that the transmission output shaft yoke bearing caps are straight up and down in order to obtain an accurate measurement.
- Position the J 23498-A onto the transmission output shaft yoke bearing cap so that the J 23498-A is parallel to the propeller shaft.
- Center the bubble in the sight glass.
- Record the angle measurement.
- Subtract the smaller angle reading from the larger angle reading in order to obtain the front U-joint working angle.
- Inspect the front propeller shaft support bearing assembly (2) for damaged rubber components, worn bearings, or a damaged/cracked bracket which could be affecting the angles of the propeller shafts.
- If the support bearing assembly exhibited any of these conditions, it requires replacement before proceeding.
- Inspect the propeller shaft support bearing assembly (2) for loose or missing shims/washers, if equipped. Reinstall correctly or replace any shims/washers as necessary to ensure proper alignment of the support bearing assembly.
- Position the J 23498-A onto the rear propeller shaft bearing cap so that the J 23498-A is parallel to the shaft.
- Ensure that the propeller shaft bearing caps are straight up and down in order to obtain an accurate measurement.
- Center the bubble in the sight glass.
- Record the angle measurement.
- Rotate the propeller shaft 90 degrees; ensure that the drive axle pinion flange bearing caps are straight up and down in order to obtain an accurate measurement.
- Position the J 23498-A onto the drive axle pinion flange bearing cap so that the J 23498-A is parallel to the propeller shaft.
- Center the bubble in the sight glass.
- Record the angle measurement.
- Subtract the smaller angle reading from the larger angle reading in order to obtain the rear U-joint working angle.
- If either of the working angles are equal to zero, the angles require adjustment. 0 degree working angles will cause premature U-joint wear due to lack of rotation of the U-joint bearings). Refer to Driveline Working Angles Adjustment .
- If either of the working angles exceed 4 degrees, the angles require adjustment. Refer to Driveline Working Angles Adjustment .
The weight of 3.8 liters (1 gallon) of gasoline is approximately 2.8 kg (6.2 lb).
