For 1990-2009 cars only
Removal Procedure
- Remove the inside door handle. Refer to Door Inside Handle Replacement .
- Remove the door lock rod knob. Refer to Door Lock Rod Knob Replacement .
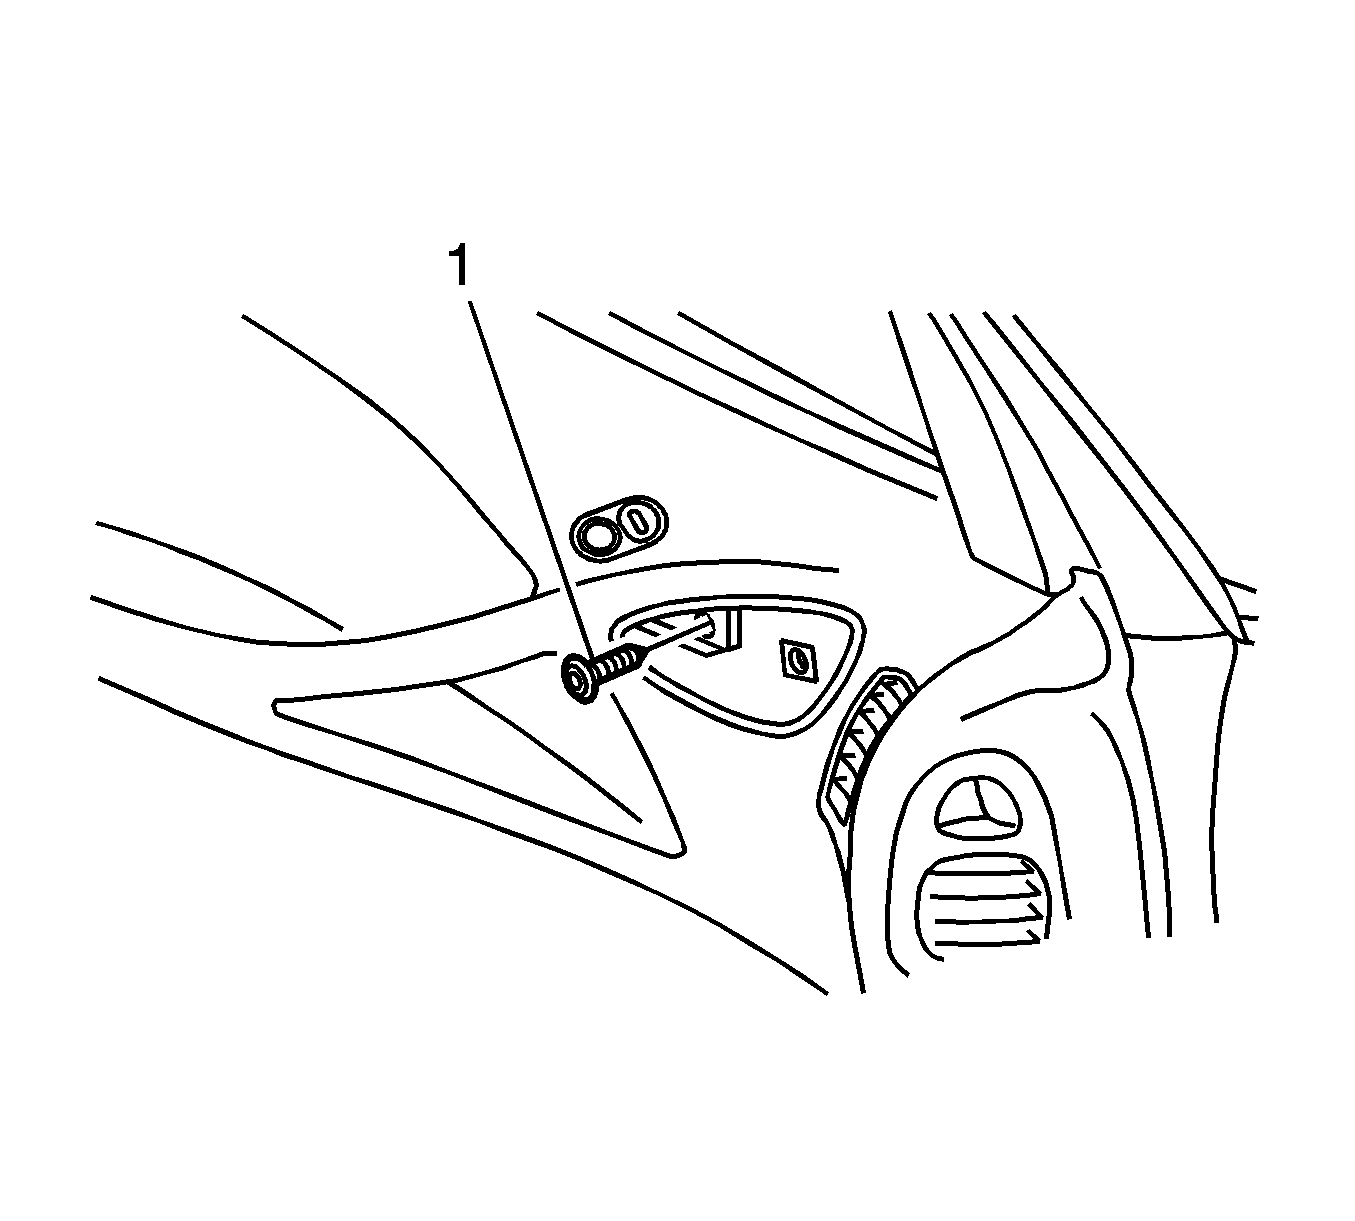
- Remove the door trim retaining screw (1) from the handle assembly aperture.
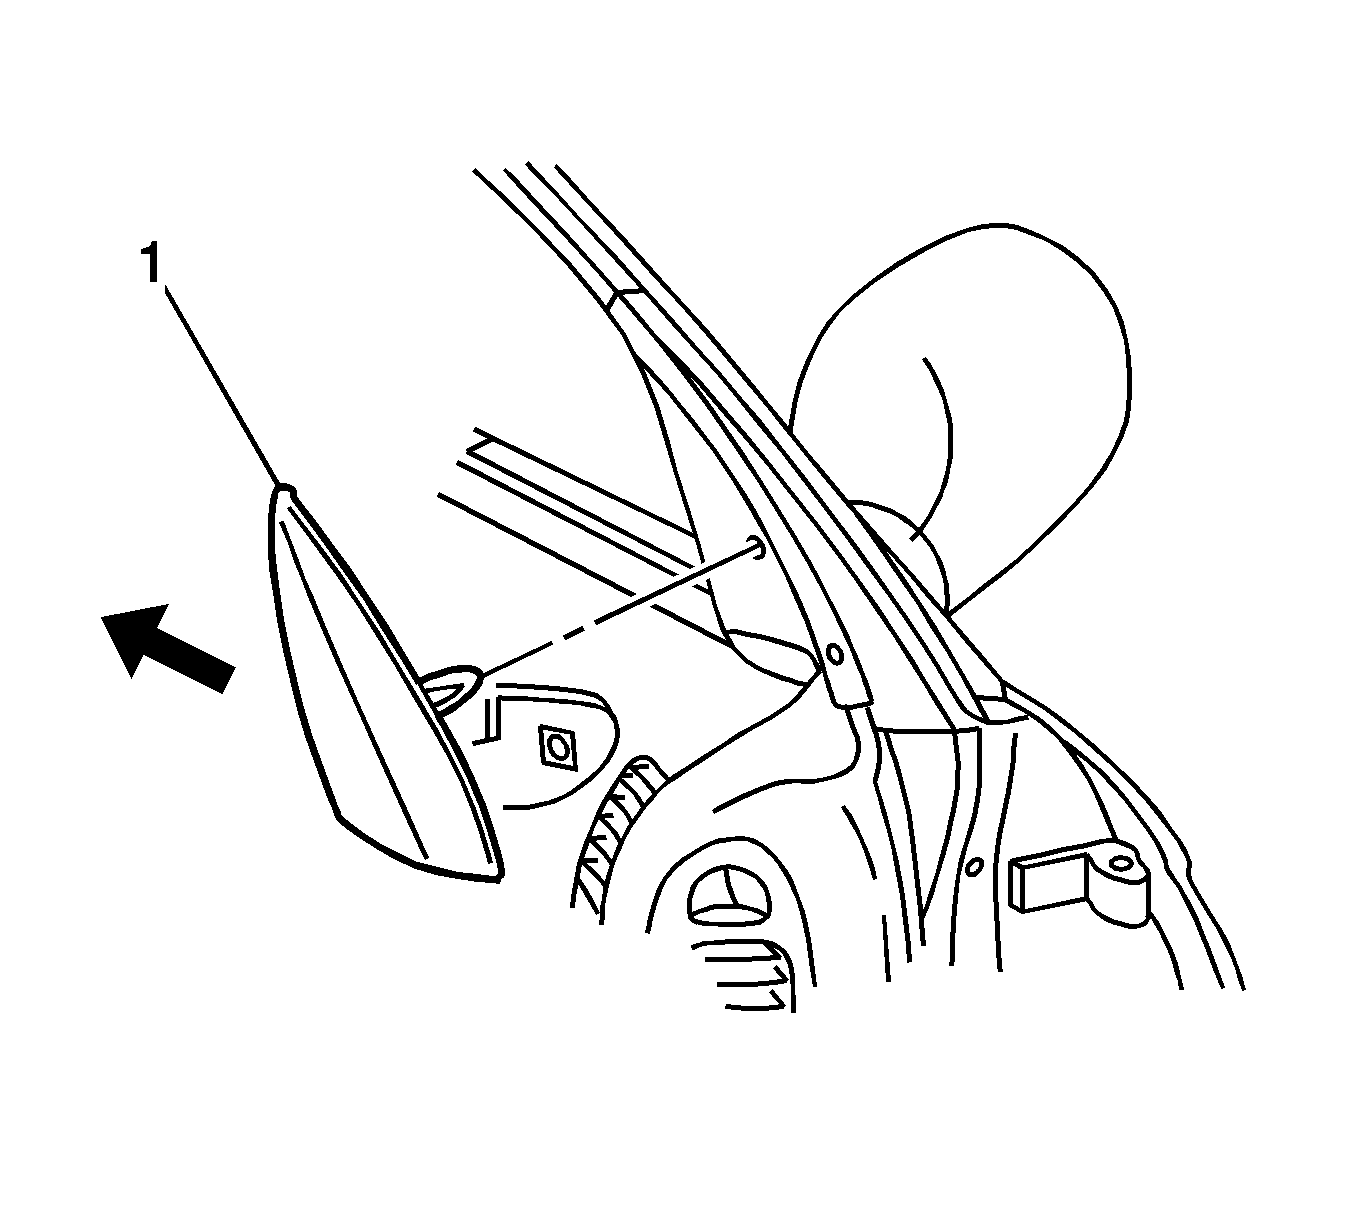
- Gently pull the front edge of the side window outlet defogger (1) out and remove to the rear.
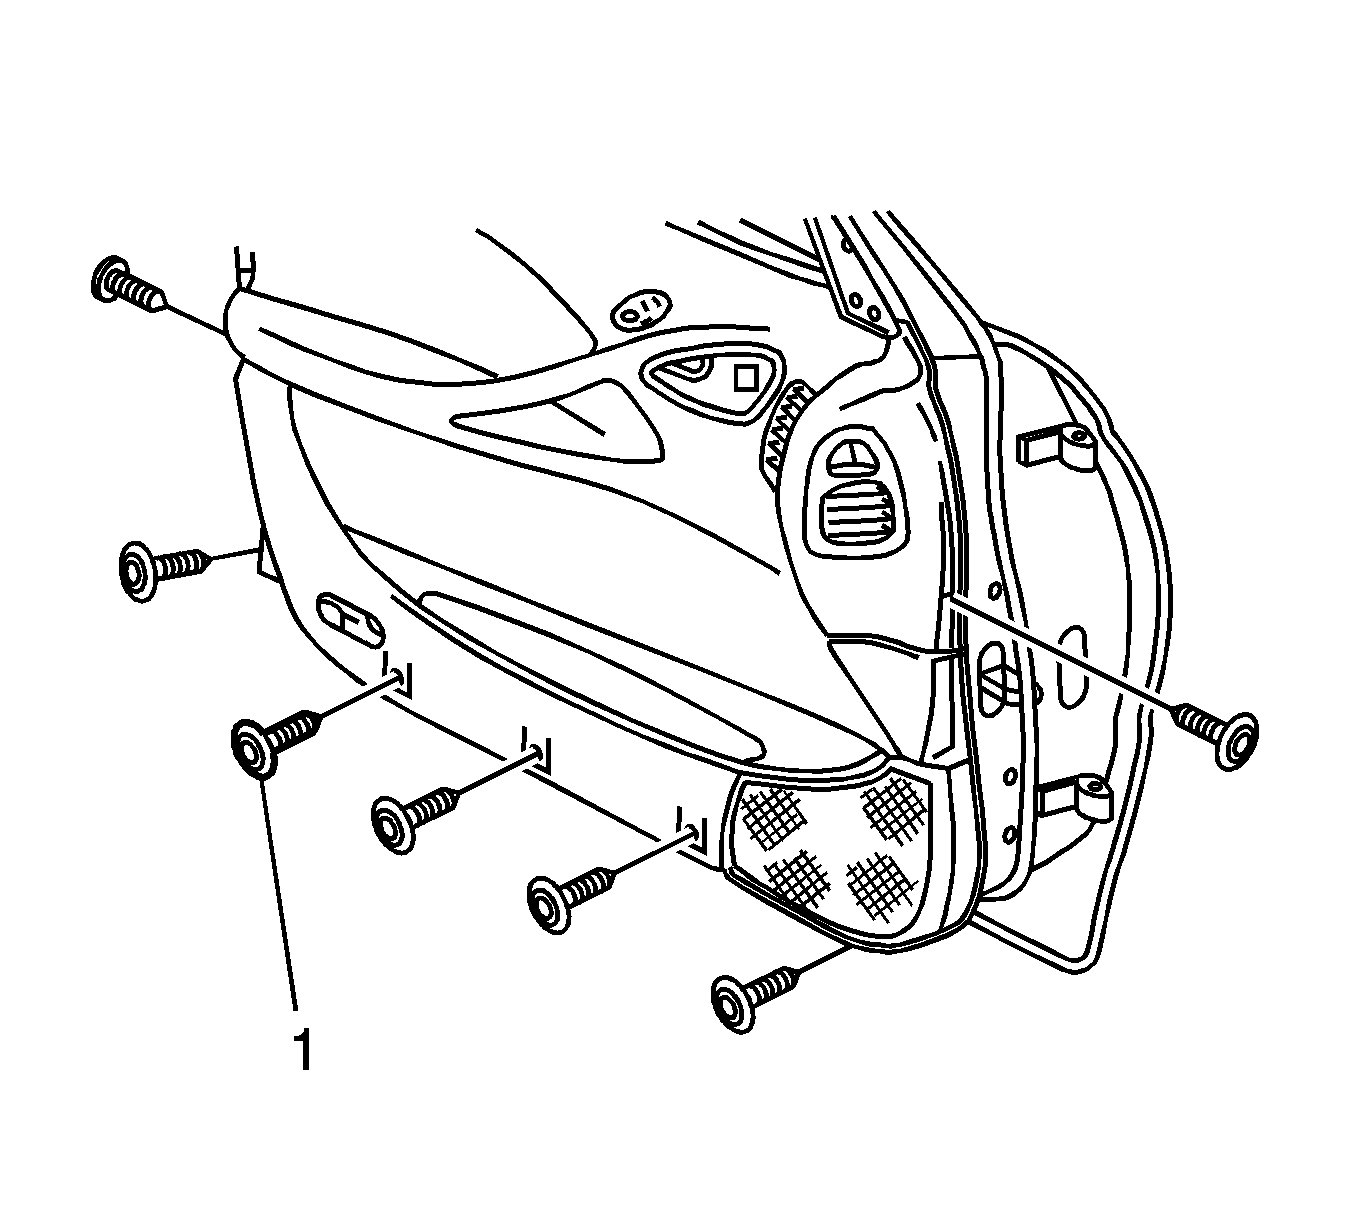
- Remove the 7 screws (1) securing the door trim panel assembly to the inner door panel.
- Lift the top of the panel assembly up and out of the door inner channel.
- Remove the door trim panel from the vehicle.
- Remove the rear view mirror switch, if necessary. Refer to Power Mirror Switch Replacement .
- Remove the speaker grille, if necessary. Refer to Radio Front Side Door Speaker Grille Replacement in Entertainment.
- Remove the sound insulator, if necessary. Refer to Front Side Door Insulator Replacement .
- Remove the energy absorber pad, if necessary. Refer to Energy Absorber Pad Replacement .
- Remove the door storage bin, if necessary. Refer to Front Door Storage Bin Replacement .
- Remove the door armrest, if necessary. Refer to Armrest Replacement .
- Remove the door inside handle bracket, if necessary. Refer to Door Inside Handle Bracket Replacement .
- Remove the window air defogger duct, if necessary. Refer to Side Window Defogger Outlet Duct Replacement - Left Side or Side Window Defogger Outlet Duct Replacement - Right Side in Heating, Ventilation and Air Conditioning.
- Remove the door air outlet assembly, if necessary. Refer to Instrument Panel Outer Air Outlet Replacement - Left Side and Instrument Panel Outer Air Outlet Replacement - Right Side in Heating, Ventilation and Air Conditioning.
- Remove the door air duct assembly, if necessary. Refer to Side Window Defogger Outlet Duct Replacement - Left Side and Side Window Defogger Outlet Duct Replacement - Right Side in Heating, Ventilation and Air Conditioning.
- Remove the inner belt sealing strip, if necessary. Refer to Front Side Door Window Belt Inner Sealing Strip Replacement .
- Remove the door courtesy lamp, if necessary. Refer to Door Courtesy Lamp and Reflector Replacement in Lighting Systems.


Important: Support the front door trim panel until the wiring harness connectors are disconnected.
Installation Procedure
- Install the door courtesy lamp, if removed. Refer to Door Courtesy Lamp and Reflector Replacement in Lighting Systems.
- Install the inner belt sealing strip, if removed. Refer to Front Side Door Window Belt Inner Sealing Strip Replacement .
- Install the door air duct assembly, if removed. Refer to Side Window Defogger Outlet Duct Replacement - Left Side and Side Window Defogger Outlet Duct Replacement - Right Side in Heating, Ventilation and Air Conditioning.
- Install the door air outlet assembly, if removed. Refer to Instrument Panel Outer Air Outlet Replacement - Left Side and Instrument Panel Outer Air Outlet Replacement - Right Side in Heating, Ventilation and Air Conditioning.
- Install the window air defogger duct, if removed. Refer to Side Window Defogger Outlet Duct Replacement - Left Side or Side Window Defogger Outlet Duct Replacement - Right Side in Heating, Ventilation and Air Conditioning.
- Install the door inside handle bracket, if removed. Refer to Door Inside Handle Bracket Replacement .
- Install the door armrest, if removed. Refer to Armrest Replacement .
- Install the door storage bin, if removed. Refer to Front Door Storage Bin Replacement .
- Install the energy absorber pad, if removed. Refer to Energy Absorber Pad Replacement .
- Install the sound insulator, if removed. Refer to Front Side Door Insulator Replacement .
- Install the speaker grille, if removed. Refer to Radio Front Side Door Speaker Grille Replacement in Entertainment.
- Install the rear view power mirror switch, if removed. Refer to Power Mirror Switch Replacement .
- Position the door trim panel to the door and connect the wire harness connectors.
- Install the door trim panel to the door.
- Install the 7 screws (1) securing the door trim panel assembly to the inner door panel.
- Reposition and fasten the side window outlet defogger (1) to the door trim.
- Install the door trim retaining screw (1) to the handle assembly aperture.
- Install the door lock rod knob. Refer to Door Lock Rod Knob Replacement .
- Install the inside door handle. Refer to Door Inside Handle Replacement .
Notice: Refer to Fastener Notice in the Preface section.

Tighten
Tighten the screws to the door trim panel to 2 N·m
(18 lb in).


Tighten
Tighten the screw to 2 N·m (18 lb in).
