For 1990-2009 cars only
Instrument Panel Trim Pad Replacement Chevrolet
Removal Procedure
- Disable the SIR system. Refer to SIR Disabling and Enabling and SIR Disabling and Enabling in SIR.
- Remove the defroster grille screw.
- With a flat-bladed tool disengage the defroster grille from the instrument panel (I/P) trim pad.
- With a flat-bladed tool disengage the outer trim covers from the I/P carrier.
- Open the I/P compartment.
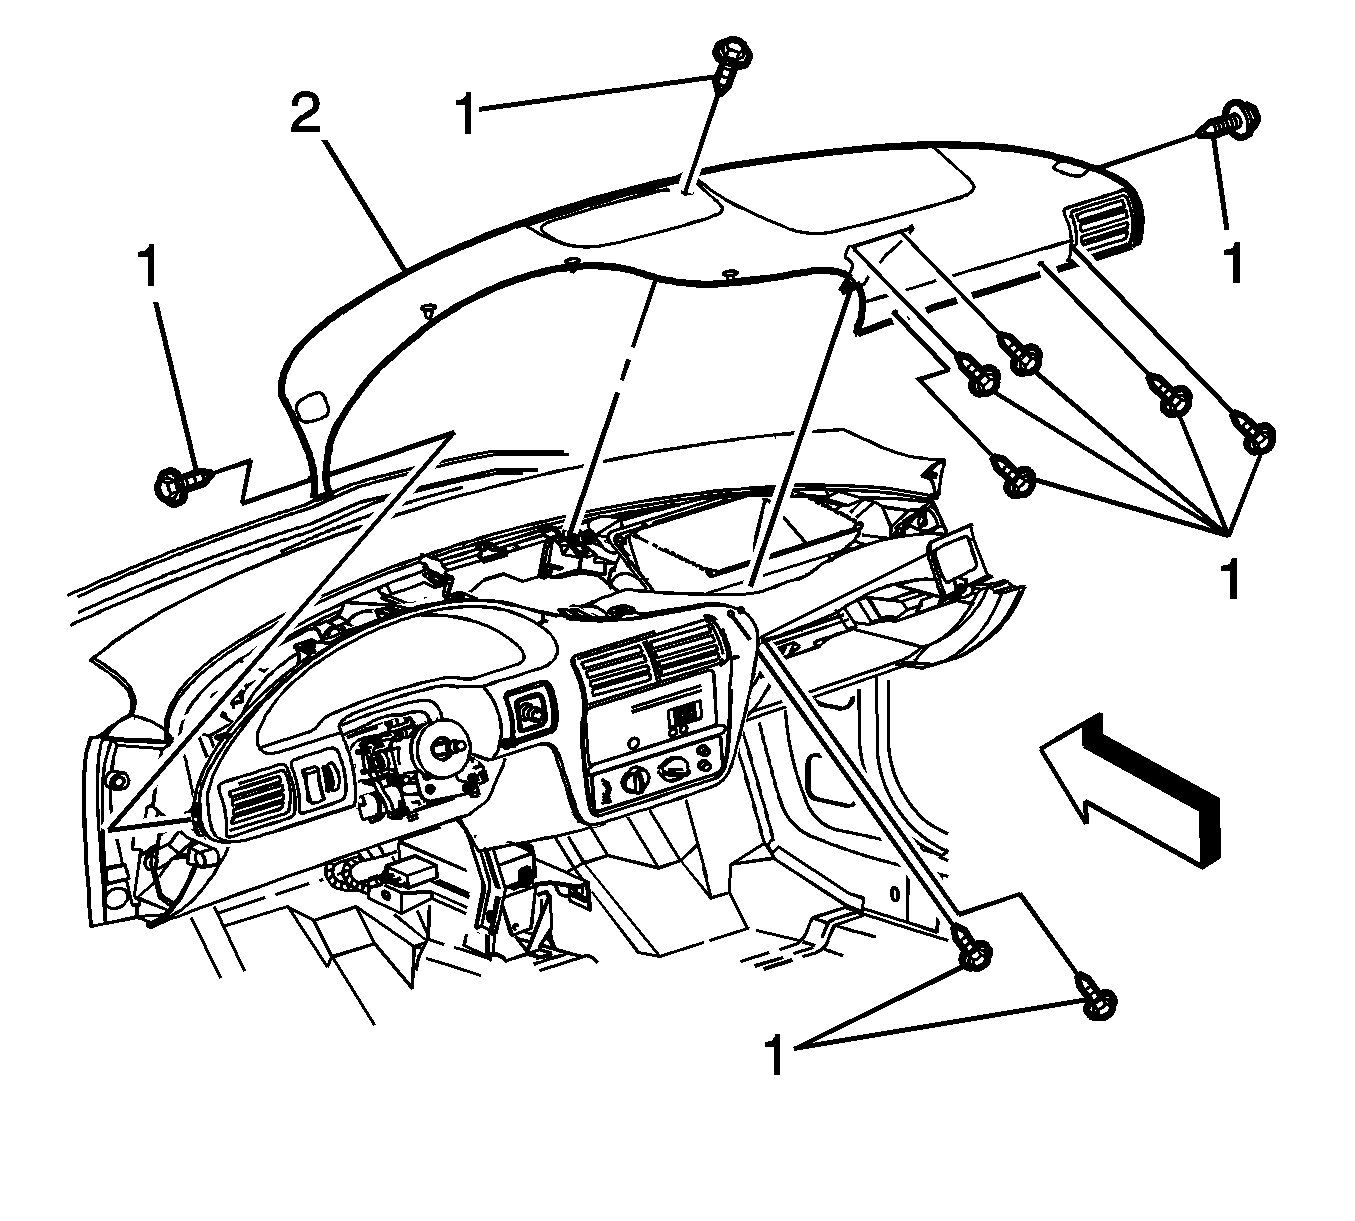
- Remove the I/P trim pad screws (1).
- Remove the I/P trim pad (2) from the I/P carrier.
Caution: Refer to SIR Caution in the Preface section.

Pull the cover rearward to disengage the locating tabs from I/P carrier.
Installation Procedure
- Install the I/P trim pad (2) to the I/P carrier.
- Install the I/P trim pad screws (1).
- Close the I/P compartment door.
- Align the outer trim covers locating tabs into the I/P carrier.
- Install the defroster grille to the I/P trim pad.
- Install the defroster grille screw.
- Enable the SIR system. Refer to SIR Disabling and Enabling and SIR Disabling and Enabling in SIR.

Notice: Refer to Fastener Notice in the Preface section.
Tighten
Tighten the screws to 2.3 N·m (20 lb in).
Press the cover into the I/P carrier until fully engaged.
Tighten
Tighten the screw to 2.3 N·m (20 lb in).
Instrument Panel Trim Pad Replacement Pontiac
Removal Procedure
- Disable the SIR system. Refer to SIR Disabling and Enabling and SIR Disabling and Enabling in SIR.
- With a flat-bladed tool, remove the defroster grille from the instrument panel (I/P) trim pad. Refer to Defroster Grille Replacement .
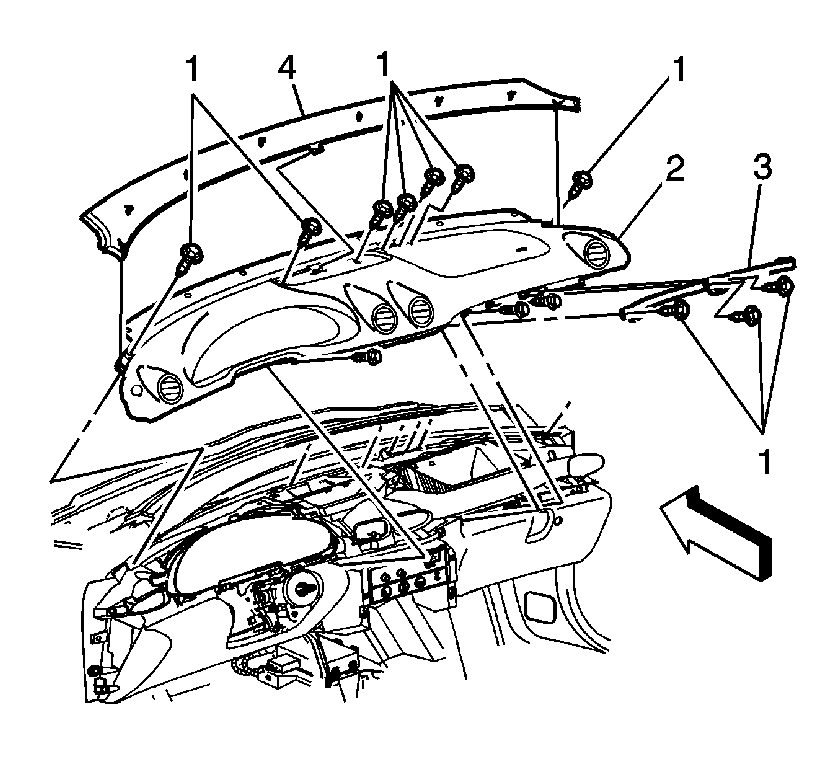
- Remove the I/P upper trim panel (4) by lifting upward to release the retainers.
- Remove the screws from the I/P outer trim cover.
- Remove the I/P outer trim covers.
- Remove the I/P accessory trim plate. Refer to Instrument Panel Accessory Trim Plate Replacement .
- Remove the screws (1) from the right I/P trim panel.
- Remove the right I/P trim panel (3).
- Remove the screws (1) attaching the I/P trim pad (2).
- Remove the I/P trim pad (2) from the I/P carrier.
Caution: Refer to SIR Caution in the Preface section.

Installation Procedure
- Install the I/P trim pad (2) to the I/P carrier.
- Install the screws (1) attaching the I/P trim pad (2) to the I/P carrier.
- Install the right I/P trim panel (3).
- Install the screws to the right I/P trim panel (1).
- Install the I/P accessory trim plate. Refer to Instrument Panel Accessory Trim Plate Replacement .
- Install the I/P outer trim covers.
- Install the screws to the I/P outer trim cover.
- Install the I/P upper trim panel (4) by pushing downward until the retainers are fully seated.
- Install the defroster grille to the I/P carrier. Refer to Defroster Grille Replacement .
- Enable the SIR system. Refer to SIR Disabling and Enabling and SIR Disabling and Enabling in SIR.

Notice: Refer to Fastener Notice in the Preface section.
Tighten
Tighten the screws to 2.3 N·m (20 lb in).
Tighten
Tighten the screws to 2.3 N·m (20 lb in).
Tighten
Tighten the screws to 2 N·m (18 lb in).
Press the defroster grille into the I/P carrier until the retaining tabs are secured.
