Removal Procedure
Caution: Do not attempt to repair or alter the head impact energy-absorbing material
glued to the headliner or to the garnish trims. If the material is damaged, replace
the headliner and/or the garnish trim. Failure to do so could result in personal injury.
- Remove the sunshades. Refer to
Sunshade Replacement
.
- Remove the coat hooks. Refer to
Coat Hook Replacement
.
- Remove the windshield upper garnish moldings. Refer to
Windshield Pillar Garnish Molding Replacement
.
- On the sedan perform the following procedures:
- On the coupe remove the rear quarter trim panel. Refer to
Rear Quarter Trim Panel Replacement
.
- Remove the finish lace from the sunroof opening trim, if equipped. Refer
to
Sunroof Opening Trim Finish Lace Replacement
in Roof.
- Remove the sunroof power switch, if equipped. Refer to
Sunroof Switch Replacement
in Roof.
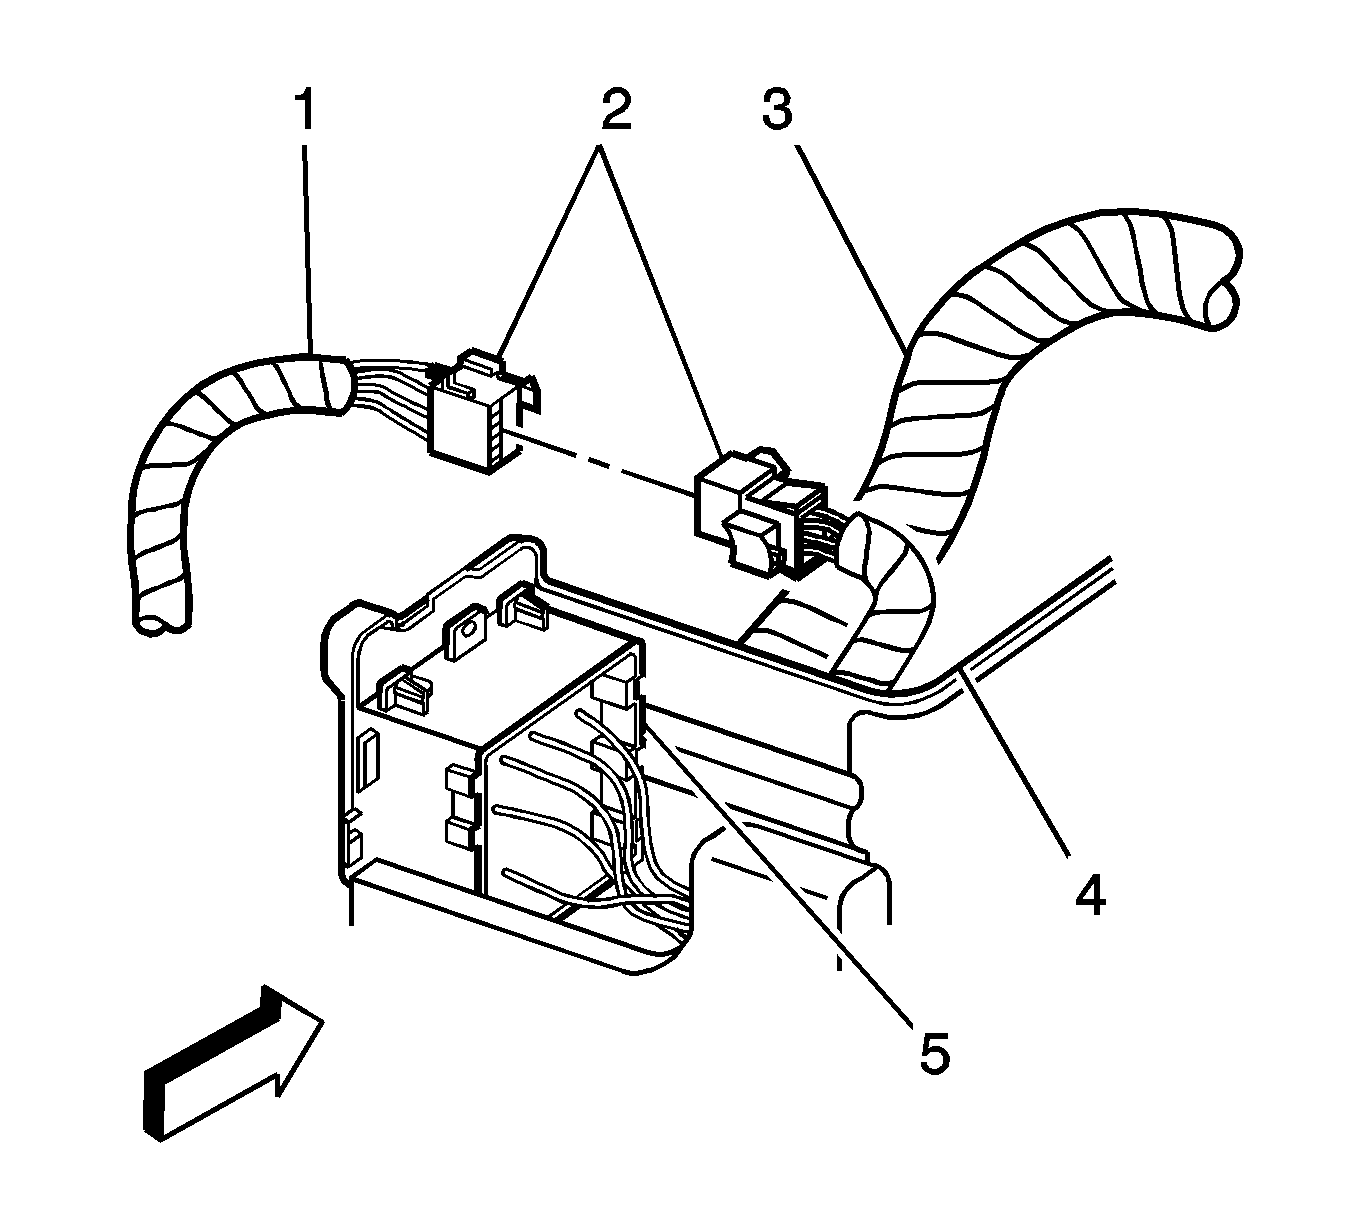
- Disconnect the electrical connector (2)
for the dome lamp wire harness (1) located on the instrument panel (I/P) lower
tie bar (4) by the body control module (BCM).
- Remove the rosebud clips retaining the dome
lamp wire harness (6) from the windshield pillar.
- Route the dome lamp wire harness (6) through the opening along
the windshield pillar.
On the Cavalier remove enough of the I/P carrier to route the dome lamp wire
harness (6) through the opening along the windshield pillar. Refer to
Instrument Panel Carrier Replacement
in Instrument
Panel, Gages, and Console.
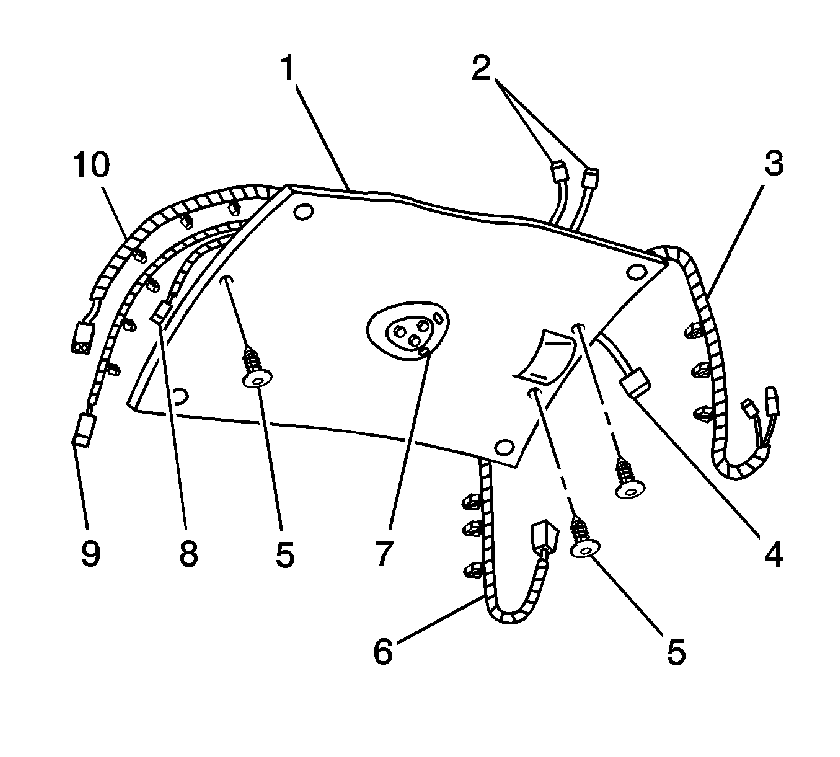
- Disconnect the electrical connector (4) for the rear view mirror,
if required.
- If equipped with OnStar® perform the following procedures:
| 12.1. | Disconnect the coaxial cable connectors from the OnStar® module. |
| 12.2. | Remove the rosebud clips retaining the OnStar® coaxial cable harness (3)
windshield pillar. |
| 12.3. | Route the OnStar® coaxial cable harness (3) through the opening
along the windshield pillar. |
| 12.4. | Disconnect the coaxial cable connector (8) for the OnStar®
cellular antenna. |
- If the vehicle is equipped with a digital radio, perform the following
procedures:
| 13.1. | Disconnect the coaxial cable connector from the digital radio receiver |
| 13.2. | Remove the rosebud clips retaining the coaxial cable harness (10)
to the upper rear quarter panel and the rear shelf. |
- If the vehicle is equipped with a GPS sensor, perform the following procedure:
| 14.1. | Disconnect the coaxial cable electrical connector for the GPS sensor. |
| 14.2. | Remove the rosebud clips retaining the GPS sensor coaxial cable harness (9)
from the upper rear quarter panel. |
- Remove the push-in retainers (5) from the headliner (1).
- Lower the headliner (1).
- Disconnect the coaxial cable connectors (2) form the digital radio
antenna, if equipped.
- Remove the headliner (1) from the vehicle.
- Remove the dome lamp assembly (7) from the headliner (1),
if required.
Installation Procedure
Notice: Use care when removing and installing the headliner. If reusing the headliner lay the headliner down flat on a clean surface. Excessive bending will
damage the headliner.
- Install the dome lamp assembly (7) to the headliner (1),
if required.
- Position the headliner (1) in the vehicle.
- Connect the coaxial cable connectors (2) to the digital
radio antenna, if equipped.
- Position the headliner (1) to the vehicle roof.
- Install the push-in retainers (5) to the headliner (1).
- If the vehicle is equipped with a GPS sensor, perform the following procedure:
| 6.1. | Connect the coaxial cable connector to the GPS sensor. |
| 6.2. | Install the rosebud clips retaining the GPS sensor coaxial cable harness (9)
to the upper rear quarter panel. |
- If the vehicle is equipped with a digital radio, perform the following
procedure:
| 7.1. | Connect the coaxial cable connector to the digital radio receiver. |
| 7.2. | Install the rosebud clips retaining the coaxial cable harness (10)
to the upper rear quarter panel and the rear shelf. |
- Connect the electrical connector (4) for the rear view mirror,
if required.
- If equipped with OnStar® perform the following procedure:
| 9.1. | Connect the coaxial cable connector (8) for the OnStar® cellular
antenna. |
| 9.2. | Route the OnStar® coaxial cable harness (3) through the opening
along the windshield pillar. |
| 9.3. | Install the rosebud clips retaining the OnStar® coaxial cable harness (3)
to the windshield pillar. |
| 9.4. | Connect the coaxial cable connectors to the OnStar® module. |
- Route the dome lamp wire harness (6) through the opening in the
windshield pillar.
On the Cavalier install the I/P carrier . Refer to
Instrument Panel Carrier Replacement
in Instrument Panel, Gages,
and Console.
- Install the rosebud clips retaining the dome lamp wire harness (6)
to the windshield pillar.
- Connect the electrical connector (2)
for the dome lamp wire harness (1) located on the I/P lower tie bar (4)
by the BCM.
- Install the sunroof power switch, if equipped. Refer to
Sunroof Switch Replacement
in Roof.
- Install the finish lace to the sunroof opening trim, if equipped. Refer
to
Sunroof Opening Trim Finish Lace Replacement
.
- On the coupe install the rear quarter trim panel. Refer to
Rear Quarter Trim Panel Replacement
.
- On the sedan perform the following procedure:
- Install the windshield upper garnish molding. Refer to
Windshield Pillar Garnish Molding Replacement
.
- Install the coat hooks. Refer to
Coat Hook Replacement
.
- Install the sunshades. Refer to
Sunshade Replacement
.
