Parking Brake Adjustment Check
- Raise the vehicle on a hoist so the wheels spin freely. Refer to Lifting and Jacking the Vehicle in General Information.
- There should be no drag at the rear wheels with the park brake lever in the rest position.
- Pull the park brake lever to the third click. There should be heavy brake drag to no rotation at both rear wheels when turned by hand.
- Adjust if necessary. Refer to Park Brake Adjustment .
- Lower the vehicle from the hoist.
Caution: Refer to Vehicle Lifting Caution in the Preface section.
Notice: On new vehicles (less than 50 miles) and on vehicles which have just had the rear brake serviced, before performing Park Brake Adjustment procedures, apply and release the brake pedal 20 times. This allows the adjuster to position the brake linings and prevents premature wear of the brake linings due to improper park brake adjustment.
Important: If both rear wheels do not exhibit similar drag in step 3, check for damaged or incorrectly installed rear disc or drum brake assembly installation of drum assembly components, park brake cables, and/or park brake lever assembly. The park brake is adjusted correctly if it meets the specifications explained in steps 2 and 3.
Parking Brake Adjustment Drum Brakes
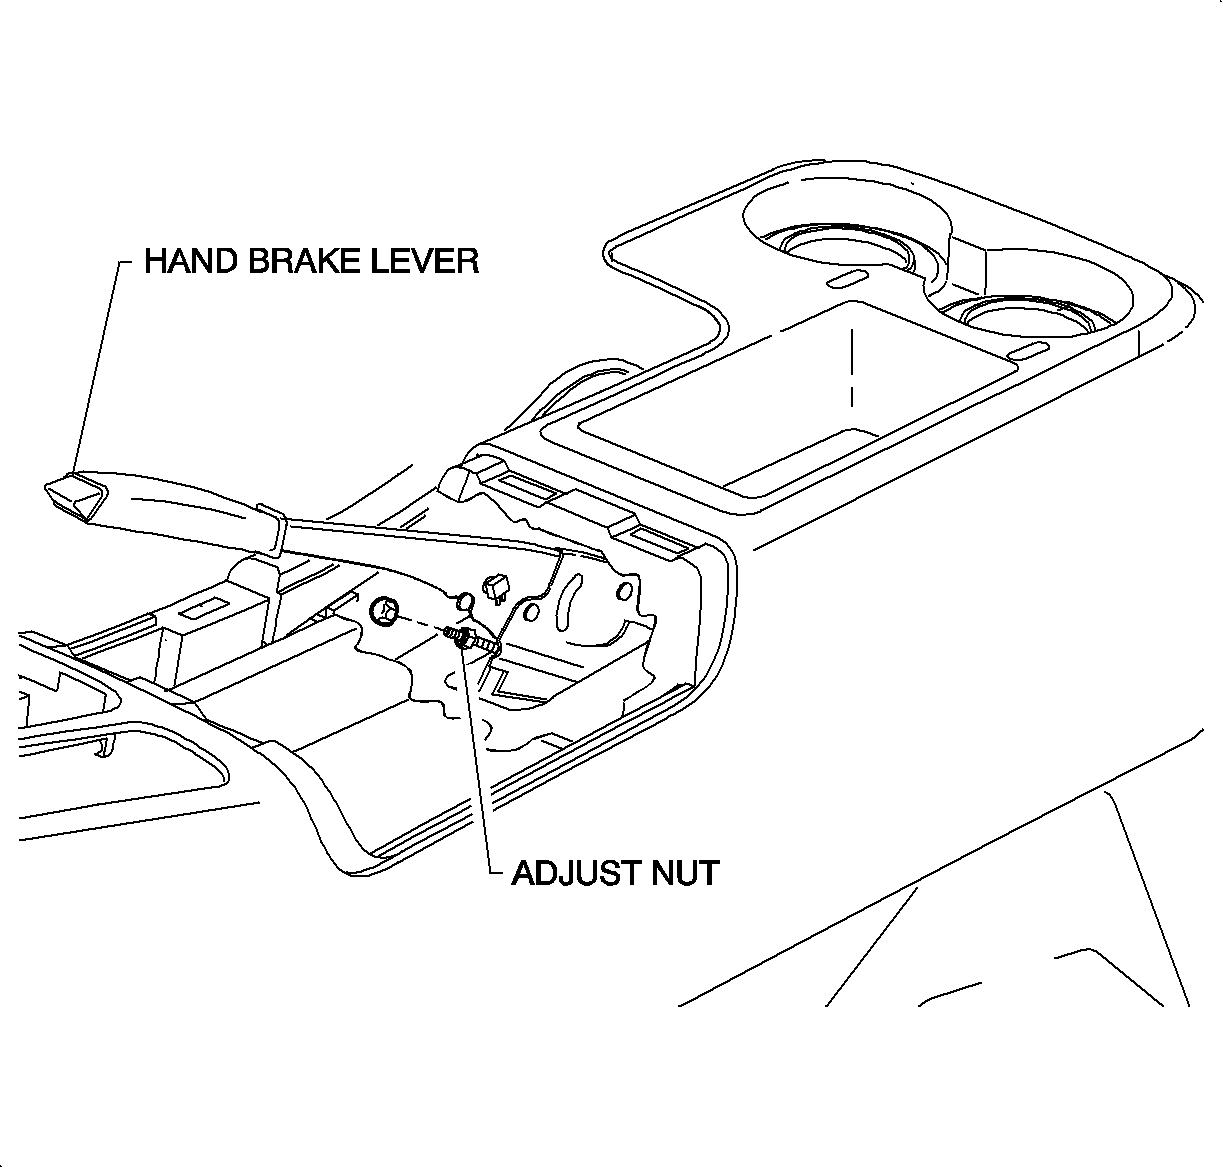
- Remove the park brake boot from the console by squeezing the sides of the boot while pulling upward.
- Raise the vehicle on a hoist so the wheels spin freely. Refer to Lifting and Jacking the Vehicle in General Information.
- Pull the park brake lever to the third click.
- Tighten the adjuster nut so there is heavy drag to no rotation, equal to both rear wheels.
- Apply and release the park brake several times. There should be no drag when the park brake lever is in the rest position.
- Pull the park brake lever to the third click. There should be heavy drag at both wheels when turned by hand.
- If necessary, repeat steps 3 through 5 until adjustment is correct.
- Install the park brake lever boot.
- Lower the vehicle from the hoist.
Notice: On new vehicles (less than 50 miles) and on vehicles which have just had the rear brake serviced, before performing Park Brake Adjustment procedures, apply and release the brake pedal 20 times. This allows the adjuster to position the brake linings and prevents premature wear of the brake linings due to improper park brake adjustment.
Caution: Refer to Vehicle Lifting Caution in the Preface section.

Important: After installation of any new park brake system components (e.g., park brake lever, cable, drum brake shoes, adjuster, lever, rear disc brake caliper, etc.), the park brake system must be set prior to performing the final park brake adjustment. To set the park brake system after performing initial adjustment, pull up on the park brake lever 3 or 4 times with approximately 445 N·m (100 lb) of force.
Important: If both rear wheels do not exhibit similar drag in steps 5 through 7, check for damaged or incorrectly installed rear disc or drum brake assembly components, park brake cables, and/or park brake lever assembly. Correct as necessary; return to step 3 of this procedure.
Parking Brake Adjustment Disc Brakes
- Remove the park brake boot from the console by squeezing in the sides while pulling upward.
- Raise the vehicle on a hoist enough to remove the rear wheels.
- Remove the rear wheel and the tire assemblies.
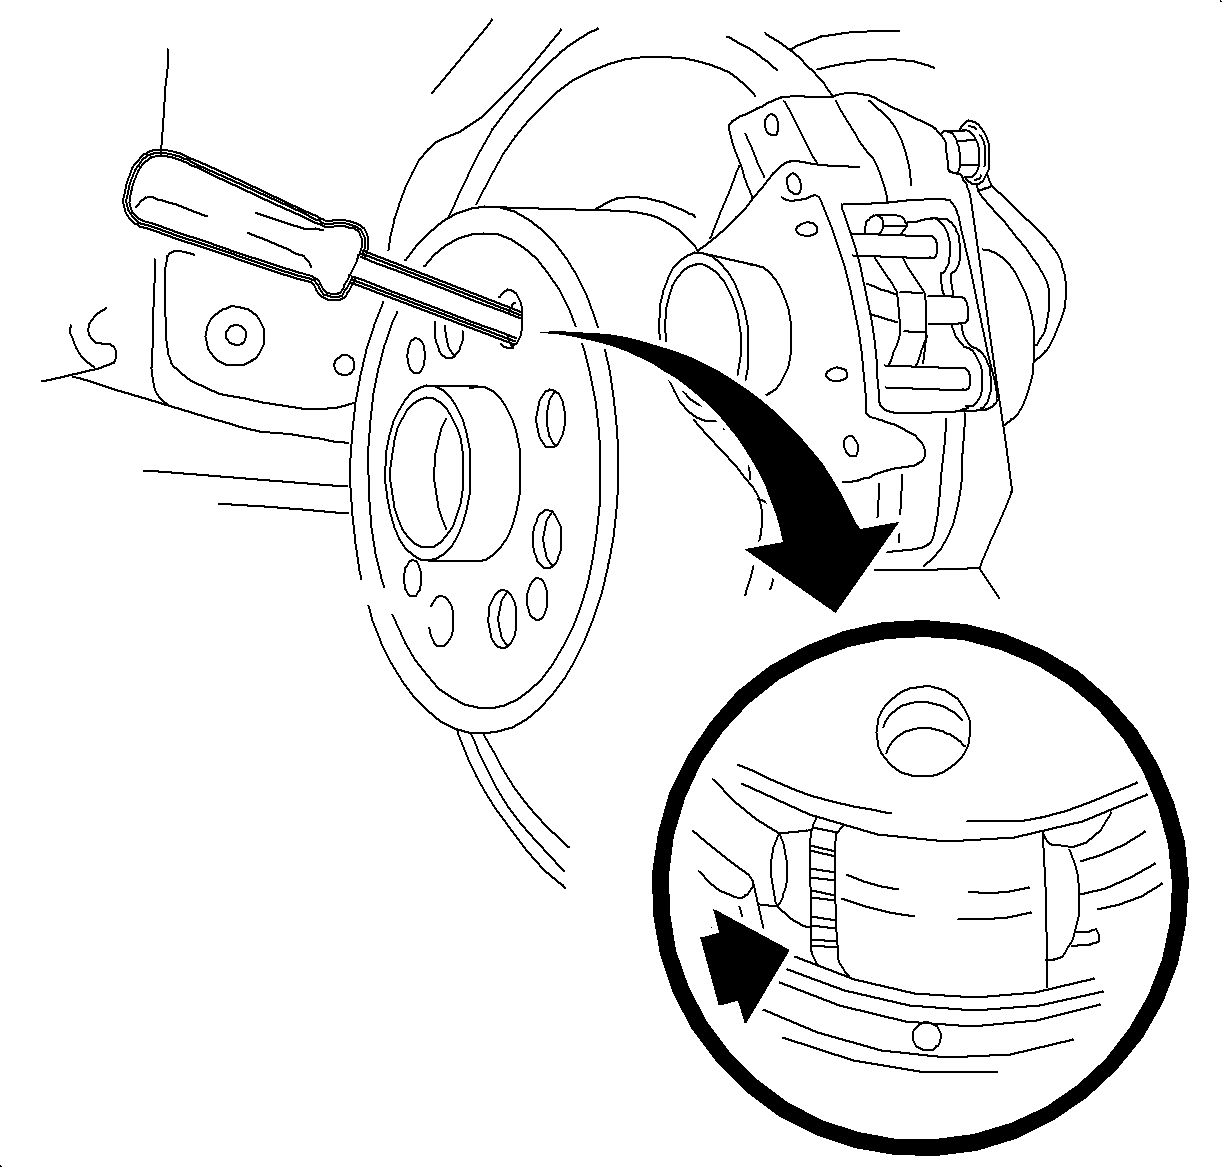
- Access to the park brake shoe adjuster is through a hole in the front face of the rotor.
- Using a medium size flat-blade screwdriver, turn the adjuster at the rear rotor until the brake disc locks. Turn back the adjuster until the brake disc just moves freely.
- Pull the park brake lever to the third click.
- Tighten the adjuster nut on the park brake lever until the rear wheel can just be turned by hand (heavy drag), equal to both the rear wheels.
- Apply and release the park brake several times. There should be no drag when the park brake lever is in the rest position.
- Pull the park brake lever to the third click. There should be heavy drag at both the wheels when turned by hand.
- If necessary, repeat steps 3 through 5 until the adjustment is correct.
- Install the park brake lever boot.
- Position the wheel and the tire assembly onto the hub.
- Install the wheel bolts and tighten in a crisscross pattern.
- Lower the vehicle from the hoist.
Caution: Refer to Vehicle Lifting Caution in the Preface section.


Important: After installation of any new park brake system components (e.g., park brake lever, cable, drum brake shoes, adjuster, lever, rear disc brake caliper, etc.), the park brake system must be set prior to performing the final park brake adjustment. To set the park brake system after performing initial adjustment, pull up on the park brake lever 3 or 4 times with approximately 445 N·m (100 lb) of force.
Important: If both rear wheels do not exhibit similar drag in steps 3 through 5, check for damaged or incorrectly installed rear disc or drum brake assembly components, park brake cables, and/or park brake lever assembly. Correct as necessary; return to step 3 of this procedure.
Notice: Refer to Wheel Installation Caution in the Preface section.
| 13.1. | Hand tighten all 5 wheel bolts. |
| 13.2. | Use a torque wrench to tighten the wheel bolts using a crisscross pattern. |
Tighten
Tighten the wheel bolts (initial torque) to 63 N·m
(46 lb ft).
| 13.3. | Use a torque wrench to final tighten the wheel bolts using a crisscross pattern. |
Tighten
Tighten the wheel bolts (final torque) to 125 N·m
(92 lb ft).
