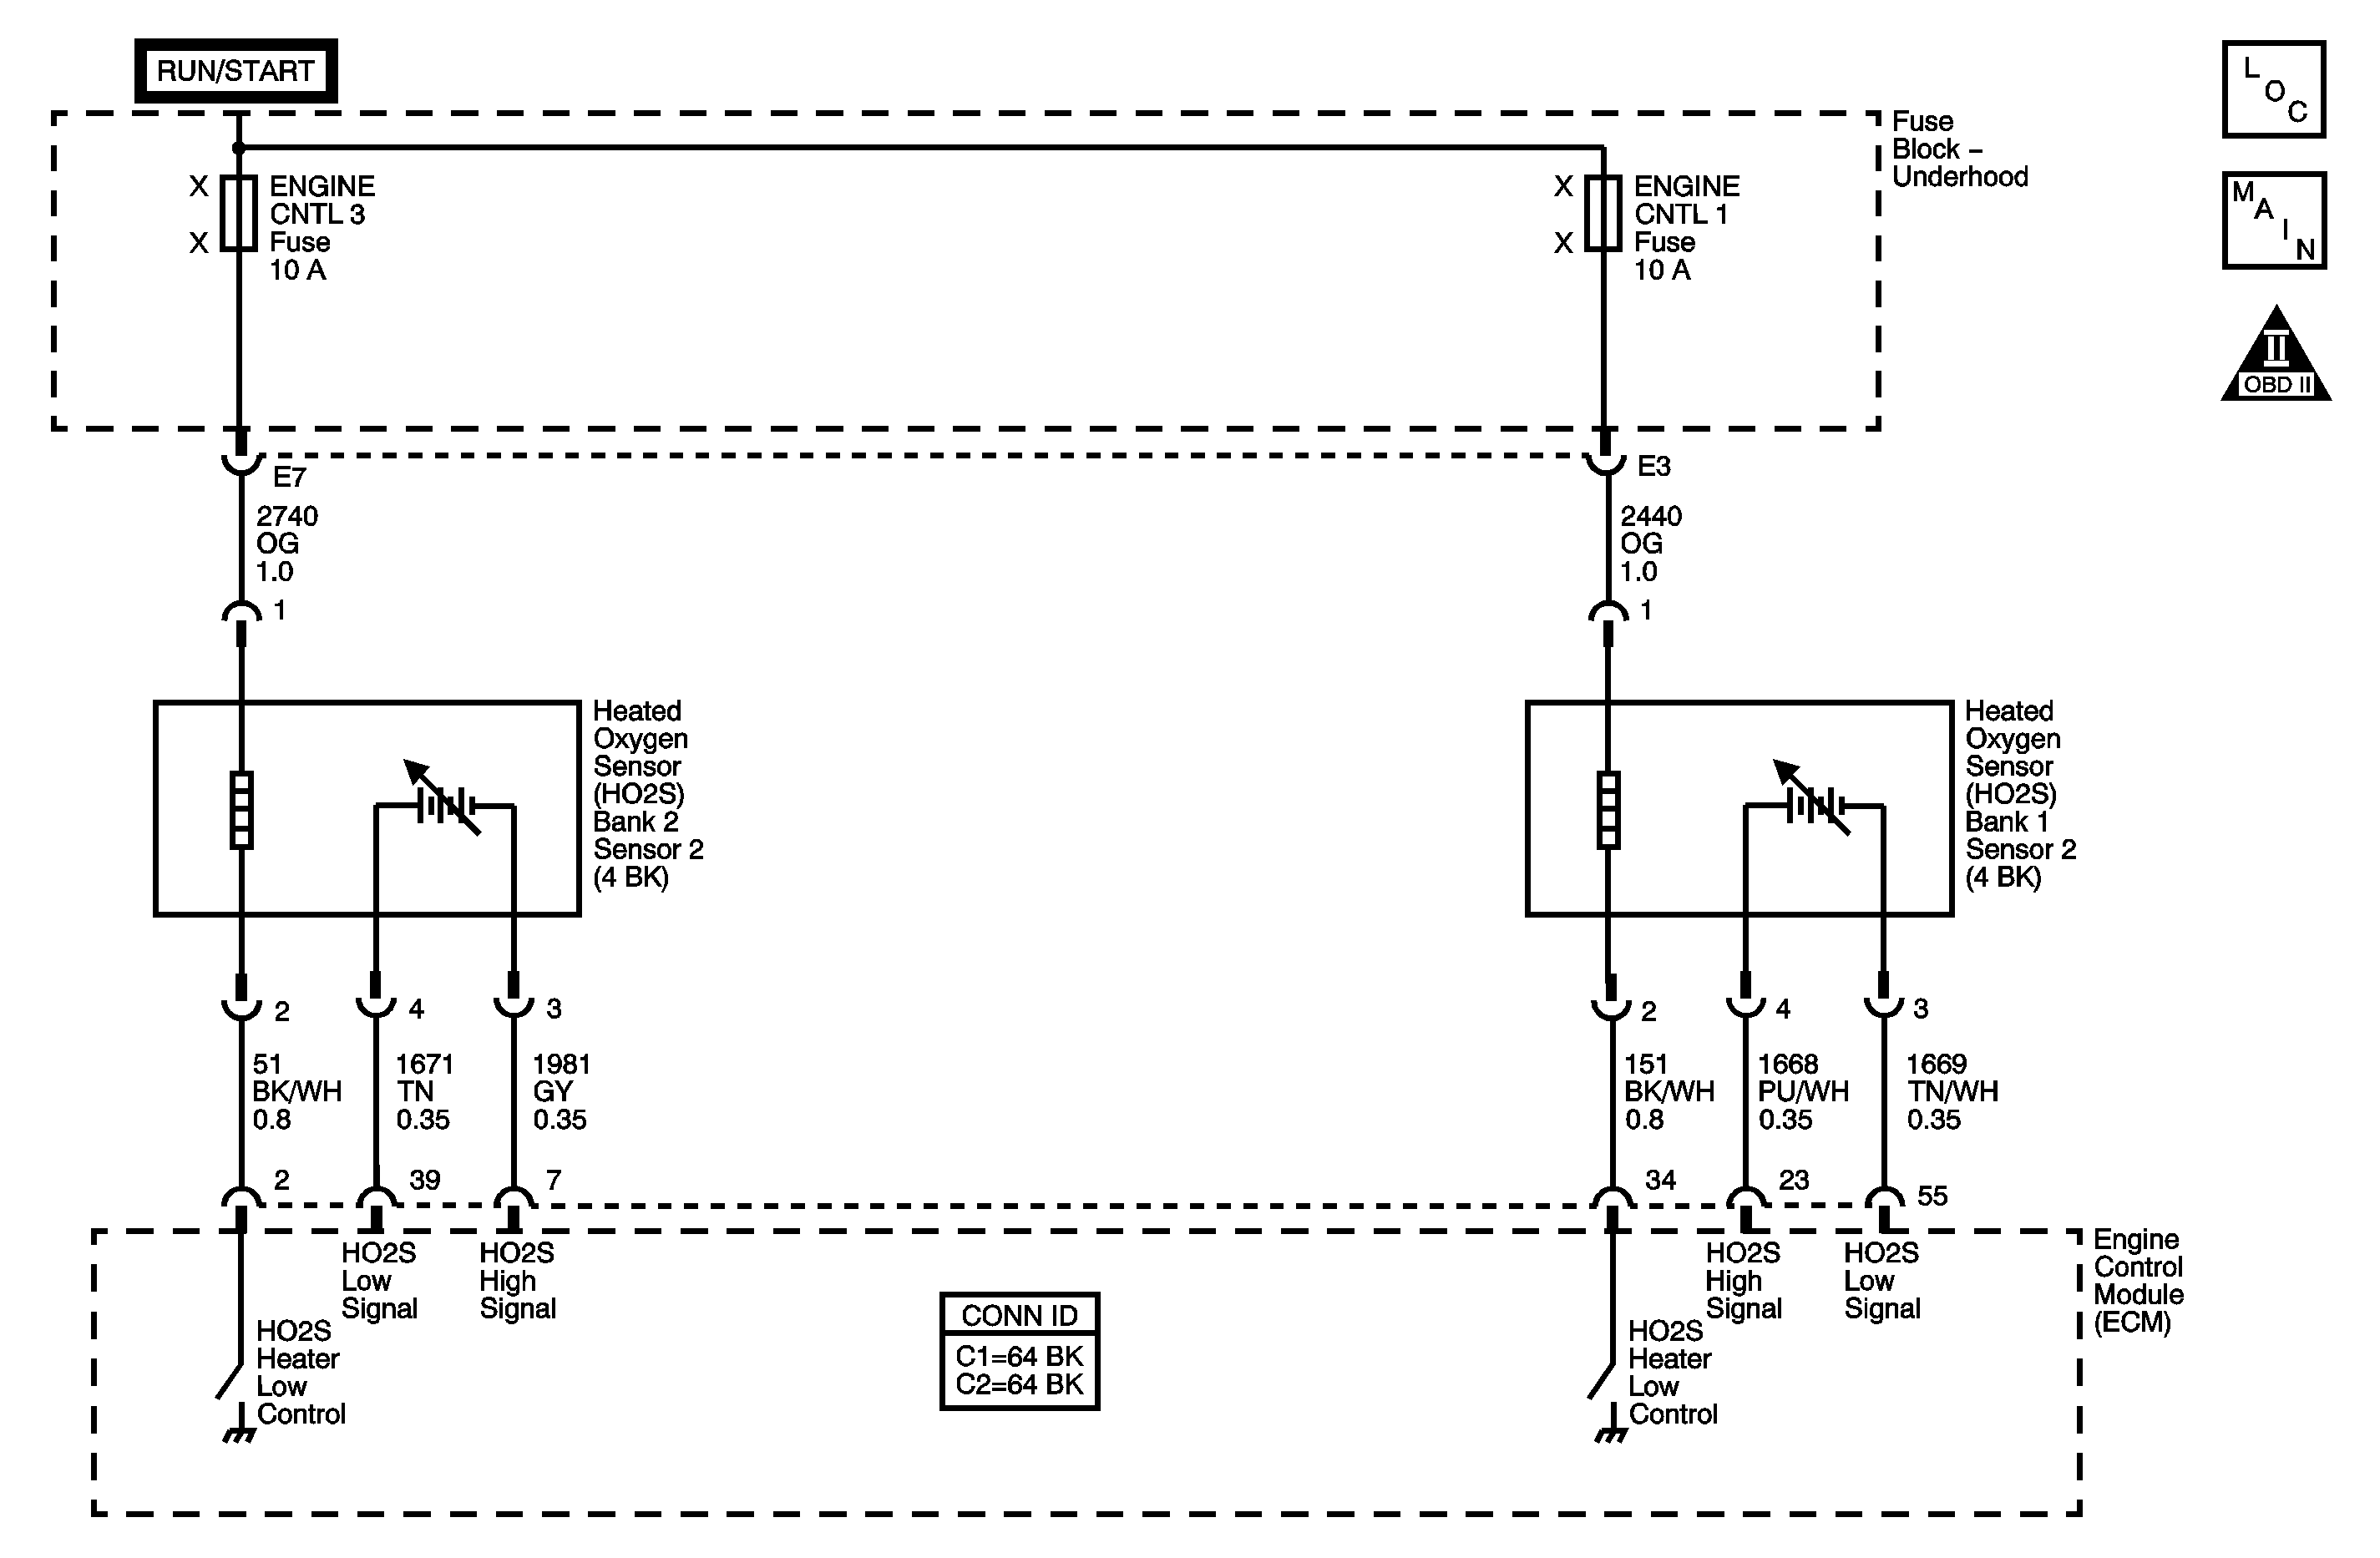
Circuit Description
The heated oxygen sensor (HO2S) produces a voltage that varies between 100-900 mV under normal operating conditions. The engine control module (ECM) produces a bias voltage on the HO2S signal circuit of 420-480 mV. The reference ground for the sensor is provided through the ECM. The ECM monitors the signal voltage to determine if the exhaust is lean or rich. The oxygen sensor voltage is high when the exhaust is rich, and low when the exhaust is lean. The ECM constantly monitors the HO2S signal during the closed loop operation. If the ECM forces a rich status and detects a HO2S voltage that is not responding to the commanded rich state, or if the ECM detects a HO2S voltage that stays below a specified value, DTC P0137 will set for bank 1 sensor 2 or DTC P0157 will set for bank 2 sensor 2.
Conditions for Running the DTC
| • | DTCs P0116, P0117, P0118, P0125 are not set. |
| • | The engine is running. |
| • | The Battery Voltage parameter is more than 11.0 volts. |
| • | The Loop Status bank 1 sensor 2 or Loop Status bank 2 sensor 2 parameter is Closed. |
| • | The Fuel Level parameter is more than 10 percent. |
| • | The calculated catalytic converter temperature is less than 800°C (1,472°F). |
Conditions for Setting the DTC
| • | The ECM detects that the HO2S parameter is less than 40 mV for more than 80 seconds. |
| OR |
| • | The ECM detects that the HO2S parameter is stuck below 350 mV for more than 110 seconds. |
| OR |
| • | The ECM detects that the HO2S parameter is more than 200 mV for more than 5 seconds during a decel fuel cut-off condition. |
Action Taken When the DTC Sets
| • | The control module illuminates the malfunction indicator lamp (MIL) on the second consecutive ignition cycle that the diagnostic runs and fails. |
| • | The control module records the operating conditions at the time the diagnostic fails. The first time the diagnostic fails, the control module stores this information in the Failure Records. If the diagnostic reports a failure on the second consecutive ignition cycle, the control module records the operating conditions at the time of the failure. The control module writes the operating conditions to the Freeze Frame and updates the Failure Records. |
Conditions for Clearing the MIL/DTC
| • | The control module turns OFF the malfunction indicator lamp (MIL) after 3 consecutive ignition cycles that the diagnostic runs and does not fail. |
| • | A current DTC, Last Test Failed, clears when the diagnostic runs and passes. |
| • | A history DTC clears after 40 consecutive warm-up cycles, if no failures are reported by this or any other emission related diagnostic. |
| • | Clear the MIL and the DTC with a scan tool. |
Step | Action | Values | Yes | No | ||||||||||||
|---|---|---|---|---|---|---|---|---|---|---|---|---|---|---|---|---|
Schematic Reference: Engine Controls Schematics Connector End View Reference: Engine Controls Connector End Views or Engine Control Module Connector End Views | ||||||||||||||||
1 | Did you perform the Diagnostic System Check-Engine Controls? | -- | Go to Step 2 | |||||||||||||
2 | Is DTC P0140 or P0160 also set? | -- | Go to Step 4 in DTC P0140 or P0160 | Go to Step 3 | ||||||||||||
3 |
Does the affected heated oxygen sensor (HO2S) voltage react instantly to the above action? | -- | Go to Step 4 | Go to Step 5 | ||||||||||||
4 |
Did the DTC fail this ignition? | -- | Go to Step 5 | Go to Intermittent Conditions | ||||||||||||
5 |
Is the voltage within the specified range? | 425-525 mV | Go to Step 6 | Go to Step 8 | ||||||||||||
6 |
Is the voltage less than the specified value? | 25 V | Go to Step 7 | Go to Step 9 | ||||||||||||
7 |
Is the voltage less than the specified value? | 25 V | Go to Step 11 | Go to Step 10 | ||||||||||||
8 | Test the HO2S high signal circuit for a short to ground or for a short to the low signal circuit. Refer to Circuit Testing and Wiring Repairs in Wiring Systems. Did you find and correct the condition? | -- | Go to Step 16 | Go to Step 13 | ||||||||||||
9 | Test the HO2S high signal circuit for an open or for high resistance. Refer to Circuit Testing and Wiring Repairs in Wiring Systems. Did you find and correct the condition? | -- | Go to Step 16 | Go to Step 13 | ||||||||||||
10 | Test the HO2S low signal circuit for an open or for high resistance. Refer to Circuit Testing and Wiring Repairs in Wiring Systems. Did you find and correct the condition? | -- | Go to Step 16 | Go to Step 13 | ||||||||||||
11 |
Did you find and correct the condition? | -- | Go to Step 16 | Go to Step 12 | ||||||||||||
12 | Inspect for poor connections at the harness connector of the HO2S sensor. Refer to Testing for Intermittent Conditions and Poor Connections and Connector Repairs in Wiring Systems. Did you find and correct the condition? | -- | Go to Step 16 | Go to Step 14 | ||||||||||||
13 | Inspect for shorted terminals and poor connections at the harness connector of the ECM. Refer to Testing for Intermittent Conditions and Poor Connections and Connector Repairs in Wiring Systems. Did you find and correct the condition? | -- | Go to Step 16 | Go to Step 15 | ||||||||||||
14 | Replace the affected HO2S. Refer to Heated Oxygen Sensor Replacement - Bank 1 Sensor 2 or Heated Oxygen Sensor Replacement - Bank 2 Sensor 2 . Did you complete the replacement? | -- | Go to Step 16 | -- | ||||||||||||
15 | Replace the ECM. Refer to Engine Control Module Replacement . Did you complete the replacement? | -- | Go to Step 16 | -- | ||||||||||||
16 |
Did the DTC fail this ignition? | -- | Go to Step 2 | Go to Step 17 | ||||||||||||
17 | Observe the Capture Info with a scan tool. Are there any DTCs that have not been diagnosed? | -- | System OK | |||||||||||||
