Route Option
When you press the Route Option multi-function key, you are able to select from the following options on the route calculation methods list:
Shortest Route/Fastest Route: The system will calculate the shortest route or fastest route possible. The system determines the shortest/fastest route based on the amount of turns necessary and the type of navigable roads available. Only one of the two may be chosen at a time.Use Freeway: The system will calculate the best route using freeways wherever possible. This selection will not always offer the shortest distance or time to your destination.
Use Tollroad: The system will calculate the best route using tollroads wherever possible.
Use Ferry: The system will calculate the best route using ferries wherever possible.
Use Time Restricted Road: The system will calculate the best route using roads that are time restricted. These include any roads where use is prohibited by the time of day you are traveling (i.e. no left turns before 3 PM, etc.).
Auto Recalc (Automatic Recalculate): If you have selected this option and leave the originally calculated route, the system will automatically calculate a new route without any further input from the driver. To choose from the list of options, use the Scroll/Select knob. You may select all or none of the items listed as route calculation options. Under the Route Option Menu, you will also be able to use the following multi-function keys:
Avoid Area: The system will allow you to choose an area you want to avoid traveling through. When you press this key, a map showing the travel area will be displayed, along with arrows which will allow you to scroll on the map to the area you want to avoid. See "Map Scroll" under Navi Menu Options List for more details. Before you set the area to avoid, you may want to select Use Freeway, so the system will allow you to take the freeway through the avoidance area. If you don't select it, the computer will avoid the chosen area entirely. When you near the area you want to avoid, the voice prompt will come on with this message "You are approaching your avoidance area." This allows you to decide if you still want to avoid that area or cancel the command. The system will allow you to enter up to 10 areas to avoid.
Calc (Calculate): The system will begin to calculate the route, using the calculation methods you have chosen.
Back: This key always returns you to the previous screen.
Store PT (Point)
Press the Store PT key to store points from your trip to memory.
Once you have entered a destination point, pressing the Store PT key will store it to memory. A total of 60 points may be stored. If all 60 stored points are entered, the system will notify you that there is no available storage left in memory. A stored point must then be removed before another can be added.
Any empty slots will be labeled as either Reserved or Empty. Any points which you store without categorizing will be considered Reserved. The only way you may enter a point into a Reserved slot is by pressing the Store PT key. Empty slots will be filled by any points which you store and assign categories to.
Stored PTs (Points)
Press the Stored PTs key to bring up a list of points which you have previously stored. It will also display the following multi-function key options:
More: This key serves no function for this screen.Sort: This key allows you to sort your stored points into categories.
Map: This key takes you to the map showing the location of the stored point.
Lock: This key allows you to lock in a point(s), so they cannot be accidentally deleted.
Delete All: This key deletes all stored points which haven't been locked in.
Back: This key always returns you to the previous screen. Use the Scroll/Select knob to move to the stored point you want to edit or delete. Once you make your selection, you will be able to do the following:
Edit: Select this option to edit the name or address of a stored point. The alpha or numeric bar will appear at the bottom of the screen to allow you to input the new name or address. See "Alpha Bar" and "Numeric Bar" under Using the Navigation System for more information.
Categorize (Landmark): Select this option to place your stored points into one of five categories: Personal, Business, Leisure, Special or Marked Point (these are stored by pressing the Marked Point key when the choice is given on a map screen, and haven't been categorized yet). Each of these categories, except for Marked Point (which is always represented by a yellow box) contains a number of icons which can be used to further organize the stored points. Once an icon has been selected, it will appear in front of the stored point on your list. Once you have categorized the stored point, press the Back key to return to the previous menu. Each categorized stored point will have an icon in front of it and will be highlighted a different color than other marked points on the list. You may then press one of the multi-function keys to sort your stored points by that category.
Delete: Select this option to delete the stored point from the list. If you select this option, the system will ask you if you are sure you want to delete the stored point. You may then press Yes or No and return to the previous screen.
Trip Points
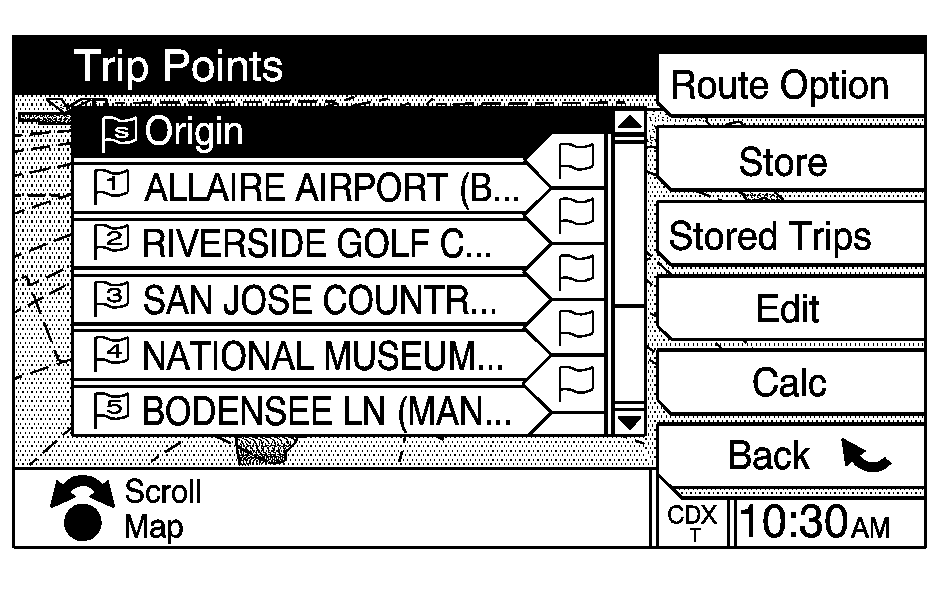
Press this key to list all of the points you have entered for your current trip. Once you have entered all of the points (origin, way-points and destination) for that trip, press the Stored Trips key to save it to memory. The system will allow you to save up to 10 trips.
Creating a Waypoint
When you have chosen a destination, you can also choose a waypoint. A waypoint can be your next stop, a mid-way point, etc.
If you change your destination, the waypoint automatically is deleted. A destination must first be set before entering a waypoint. Up to 10 waypoints can be entered for a destination.
Once a waypoint has been selected the system will automatically guide you to your waypoint and then to your destination.
To enter a waypoint after your destination has been selected, press the Trip PTs key. You can then turn the Scroll/Select knob to scroll "between" the points and press Add Waypoint. The system will then allow you to use one of the methods outlined in this section to select a waypoint or series of waypoints to add to your route.
Once you have entered all desired waypoints for your route, press the Calc (Calculate) key. The system will return you to the map and will plan the route to your selected destination.
After the route has been planned, you will notice the color of the highlighted route will change when a waypoint is inserted. For more information, see "Colors on the Screen" later in this section.
If you wish to delete a waypoint, scroll to that waypoint and press Delete. You may also change the order of your waypoints by selecting the Edit option from the Stored PTs menu. Scroll to a waypoint and select it (it will be highlighted), then turn the Scroll/Select knob to move it to the desired location within the list. Once the waypoint is at the point in the list where you wish to move it, press the Scroll/Select knob and the system will leave it there.
Enter Dest (Destination)
Press this key to display the Enter Destination menu. This menu will give you more ways to plan a route by entering destination points.
You may choose to enter a destination using one of the items from the list. Use the Scroll/Select knob to choose from the following destination planning options:
Stored Points: This option allows you to select a destination from your stored points list.Stored Trips: This option allows you to select a destination from your stored trips list.
Intersection: This option allows you to select a destination by inputting the intersecting roads you wish to travel to. When you select Intersection, the alpha bar will appear to allow you to input the name of the first street. This should bring up a list of cities that have streets with that name. Select the correct city and then the system will allow you to enter the second street. You will only be able to input streets that intersect with the first street entered. After you have entered the second street, the route will be calculated and a voice prompt will come on to direct you to "Proceed to the highlighted route."
Phone: This option allows you to select a destination by inputting the phone number.
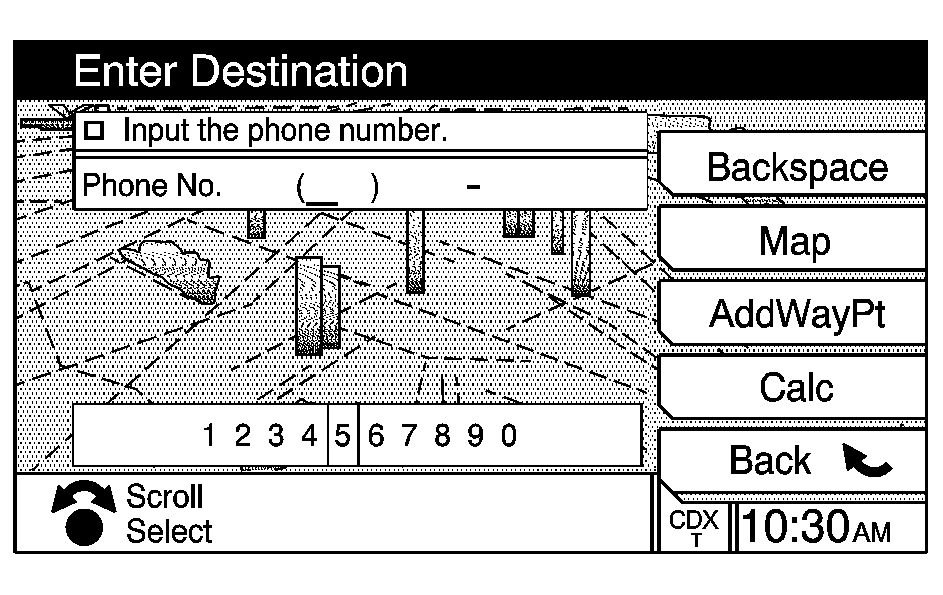
When you select Phone, the numeric bar will appear to allow you to enter the phone number of your destination. Once the phone number has been entered, select Calc to calculate the route to your destination. Only phone numbers in the database can be used. The database contains no home or cell phone numbers.
Previous Origin: This option allows you to return to the place where you started your last planned route. Only one previous origin can be held by the system at a time. Once you enter in a new route, the previous origin will be changed.Map Entry: This option allows you to use one of eight directional arrows on the map to scroll to the desired destination.
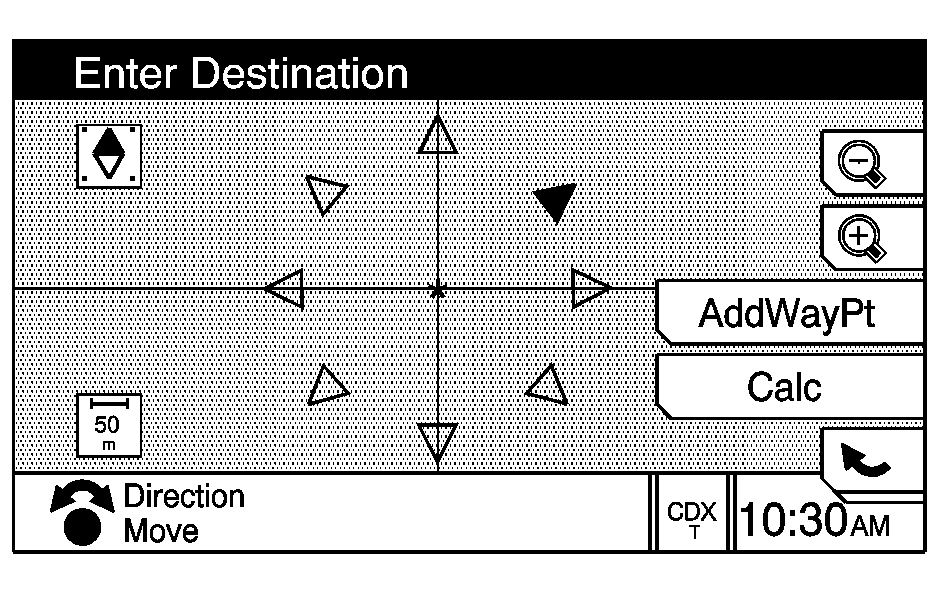
Once you have reached the desired destination, simply press the Calc key and the route will be planned for you. You will also hear a voice prompt directing you to "Proceed to the highlighted route."
Use the Zoom Out key to view the entire regional map for the CD you have currently installed. See "Zoom Out" under Using the Navigation System . However, when you zoom all of the way out and scroll around the map, some parts of the map will be "missing" because they are not included on the current regional CD. If you choose to pick a point outside of the CD coverage area as your destination, the system will seem to be working, but when you try to calculate the route, you'll receive the error message "Route planning unsuccessfully completed." You must then switch to the correct regional CD to plan your route.
Traveling Across Regions: If you want to plan a route that will take you from one region to the next, you must remember that all roads stop at the borders of a region. See "Regional Maps" under Maps for more information. In order to plan a route that will take you across regions, you must use one of the following methods:| • | Plan a route through a region and follow it until you reach the end of that region. At that time, you must load in the next regional disc. Repeat this procedure until you have reached your final destination. |
| • | Use the tenth disc, which only lists major highways and city centers, to plan a route to one of those cities. Once you have reached the region of your destination, remove the tenth disc and insert the disc for that region. If you will travel through more than one region, you must repeat the first procedure and load in new regional discs as required. |
While in the Enter Destination menu, you may also plan a route using the following multi-function keys:
Beam: This option allows you to input addresses or telephone numbers you may have stored in your Palm™ hand-held computing device, directly into the Navigation System.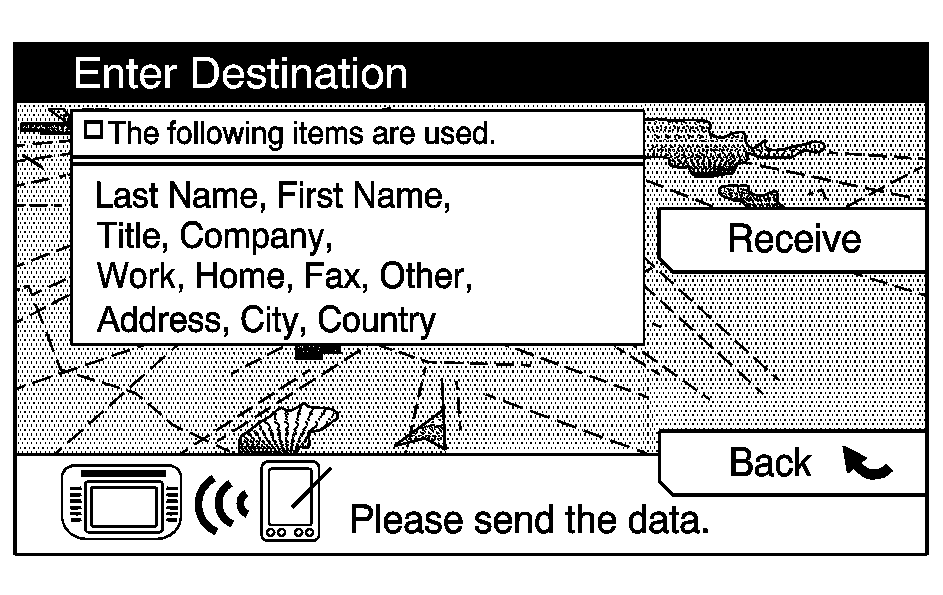
When you press the Beam key, the system will ask you to send the data. Select Receive, then hold the Palm near the infrared receiver at the top, right corner of the navigation screen and transmit. When the information has been successfully received, you will be able to use it to help plan your route.
However, any information you transmit must also be included in the database of the Navigation System or you won't be able to use it to plan a destination.
You may also select information from the All POI or Nearby POI lists to send to your Palm using the Info key. See "Info (Information) Key" later in this section for more information.
All POI (Points of Interest): This option allows you to choose a destination from the points of interest list. To view the list, see "Points of Interest List" later in this section.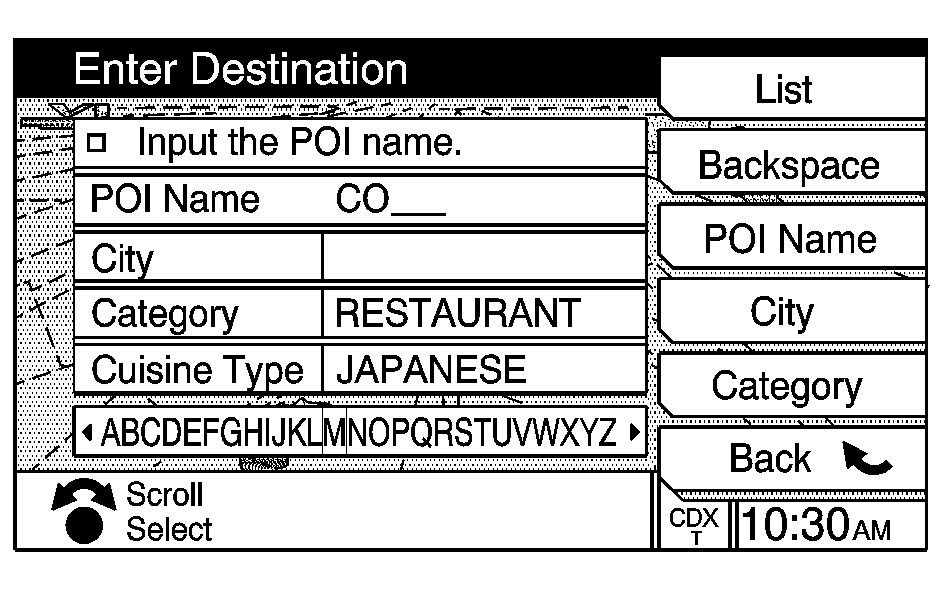
You have three ways to select a point of interest from this screen:
- Type in a point of interest by name using the alpha bar. As you type in a name, the system will search for an available match to your input. Select the correct point of interest name.
- Select a point of interest by choosing the Category option. Select a category from the list the system will supply. If the list of available points of interest for the category selected is still too long, you may need to enter in the name or city of the point of interest.
- Press the City key and then type in the city you wish to select a point of interest from. Press the List key to see a list of cities and select the correct one from it.
If you want to input the city or category of the POI, you must do so before you enter its name. If you enter the name first, the city and category options will no longer be available.
While inputting a point of interest or city name, the List key will become available once there are a hundred or less items to choose from. Press the List key to view the list of available name choices or continue to spell the name to further reduce the list of available items.
Once you select the desired location, the system will show a map of the area with a symbol marking the destination.
Points of Interest List
The following list shows the types of facilities in the CD database that you can choose from when using the All POI or Nearby POI options:
| • | Airport |
| • | Amusement Park |
| • | ATM |
| • | Auto Dealerships |
| • | Auto Service & Maintenance |
| • | Automobile Club |
| • | Bank |
| • | Border Crossing |
| • | Bowling Center |
| • | Bus Station |
| • | Business Facility |
| • | Casino |
| • | City Center |
| • | City Hall |
| • | College and University |
| • | Community Center |
| • | Commuter Rail Station |
| • | Convention/Exhibition Center |
| • | Court House |
| • | Ferry Terminal |
| • | Gas Station |
| • | Golf Course |
| • | Grocery Store |
| • | Historical Monument |
| • | Hospital |
| • | Hotel |
| • | Ice Skating Rink |
| • | Library |
| • | Marina |
| • | Movie Theater |
| • | Museums |
| • | Nightlife |
| • | Park & Ride |
| • | Park/Recreation Area |
| • | Parking Garage |
| • | Parking Lot |
| • | Performing Arts |
| • | Police Station |
| • | Rental Car Agency |
| • | Rest Area |
| • | Restaurant |
| • | School |
| • | Shopping |
| • | Ski Resort |
| • | Sports Complex |
| • | Tourist Attraction |
| • | Tourist Information |
| • | Train Station |
| • | Winery |
The full names of some Points of Interest on the list cannot be displayed due to their length. These names will be followed by three dots (...). If you wish to see the full name of the POI, press the More key and the system will scroll to the end of the name.
The POI for Restaurant is broken down into 51 distinct categories. Select Restaurant from the POI choices and press the List key. Cuisine Type will then appear as an option. Press the List key again to view the restaurant categories and select one to use as your POI.
Nearby POI (Points of Interest): This feature allows you to choose a destination nearest to your current position on the map, within approximately a 30 mile (48 km) radius.Select a category from the points of interest list. Once a category is selected, the system will display a list of cities where that type of attraction may be found. Select the correct city and a list of available facilities will be displayed for you to choose from. The points are listed in order of distance from your current position to each destination.
Select the desired facility and the location will be shown on the map with a symbol marking the destination.
You may also rank the categories on the list using the multi-function keys. Rank the categories as the Top 1, 2 or 3 and they will automatically appear at the top of the POI Category list so you won't have to scroll down to them. If no category ranks are set by the user, the system will automatically default to ATM, gas station and restaurant as the top three.
Info (Information) Key: Press this key to receive further information about the chosen POI, such as the address and phone number.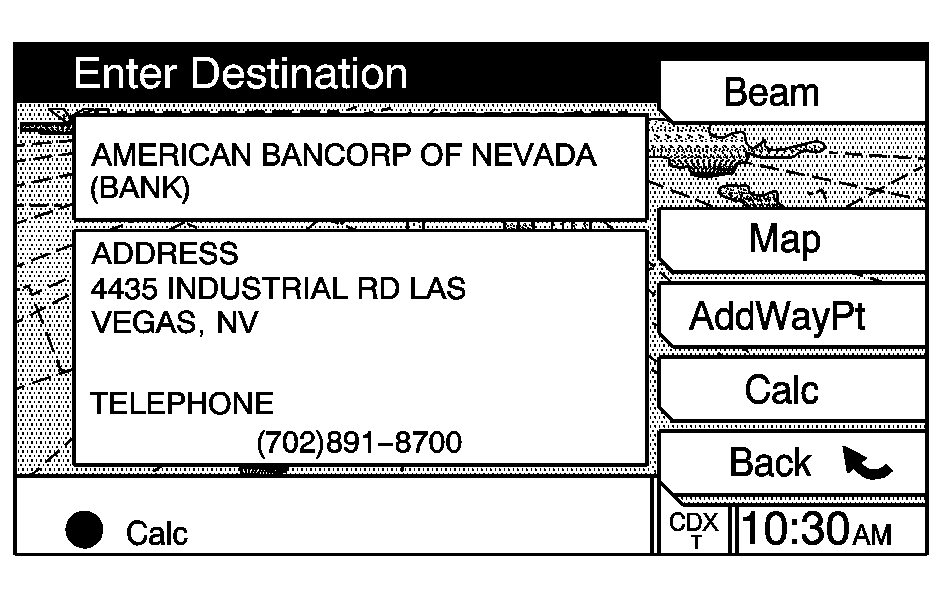
For example, if you select a restaurant as your POI and press the Info key, the name, address and phone number for that restaurant will appear.
When a Nearby POI is not available within the search area, the system will display "No Facility Found in This Area."
From this screen you may also Beam information to your Palm hand-held computing device. See "Beam" under Navigation Menu for more information.
Interstate America®: This feature allows the system to inform you of the services available at each exit on a major highway (i.e. restaurants, gas stations, lodging, etc.). Once you have a route planned and begin to travel, a series of icons will appear on the screen before each exit you pass. If the service is available at that exit and contained in the CD database, the icon will be highlighted. A "pointer" will also appear on the map by the exit.
If you are traveling on a surface road and come to the last intersection before a major highway (even if it is still a long distance away), once you pass the intersection the Interstate America icons will appear.
Keep in mind that the POI and Interstate America sources are different and may not completely correspond with one another.
Last 10: This option allows you to select a destination from the last 10 locations you have programmed into the Navigation System. Press the Last 10 key to bring up the list. Choose your destination from this list. While using the Last 10 option, press the Store PT key to add a location from the Last 10 list to the Stored PTs list. Press the Map key while using the Last 10 option, and the system will take you to the map and show you the location of the point you have chosen on that map. Turn the Scroll/Select knob to move to the point you wish to view.Address: This method allows you to input and store an address (without a zip code). You need to provide the system with a street number, street name and a city.
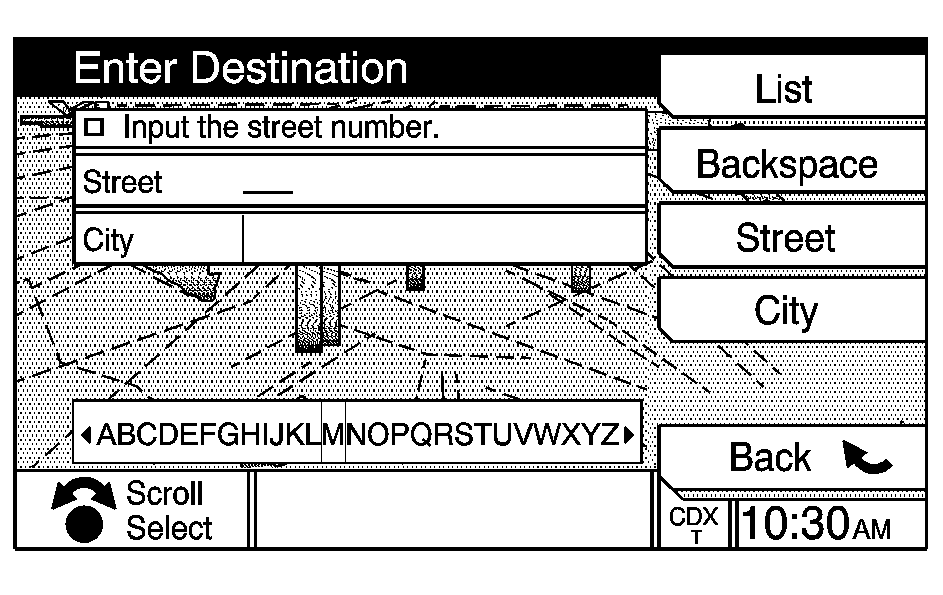
Enter the name of a street using the alpha bar. See "Alpha Bar" under Using the Navigation System for more information. Since there may be many streets within the map database with the same name, you may have difficulty selecting the correct one. If this occurs try entering the city name first.
To enter the city name, select City on the Address screen. Enter the name of the city using the alpha bar. Select the desired city name from the list the system provides. After you have entered the city name, the system will prompt you to enter the name of the street or will give you a list of street names to choose from. Enter or select the desired street name.
As information is entered, the system will automatically search for available names. While inputting a name, the List key will become available once there are a hundred or less items to choose from. Press the List key to view the available name choices or continue to spell the name to further reduce the number of available items. If you are unsuccessful when inputting a name, the name may need to be input differently or the map CD (database) may not contain this information. See Database Coverage Explanations .
Enter the address number using the numeric bar. See "Numeric Bar" under Using the Navigation System for more information.
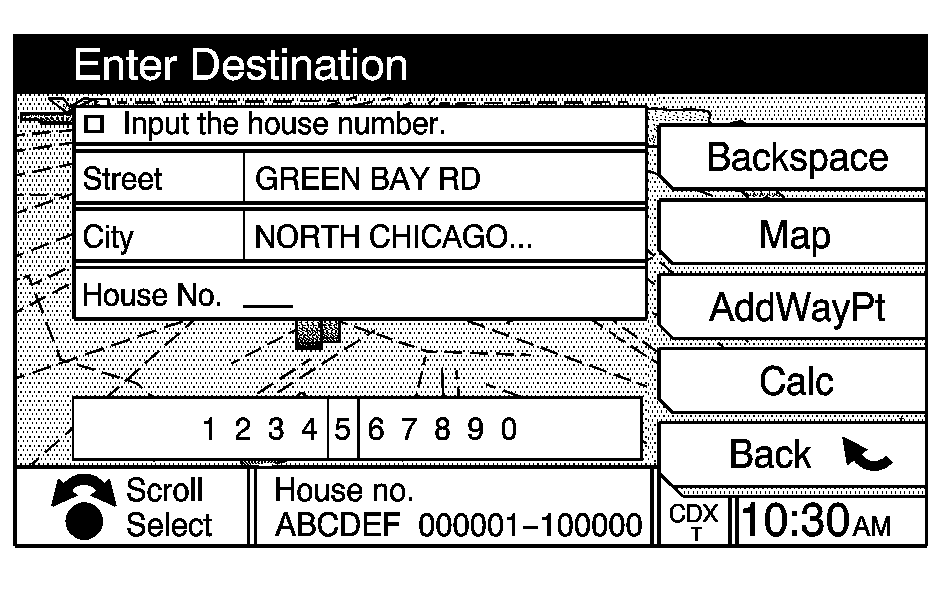
The system will list the address number range that is available for the street. If you have entered an address number that is incorrect or not available the system will indicate this.
If you did not select the city name previously, the system may prompt you to do so using the alpha bar or from a list of names which the system provides. Select the desired city name.
Press the Scroll/Select knob to set this as your destination. The system will return to the Enter Destination screen.
Plan a Route
After you have entered a destination using the options listed here, you must do the following to plan your route:
Press the Calc (Calculate) key. The system will return you to the map and will plan the route to your selected destination. While the system is planning your route, the following messages will appear at the bottom of the screen: "The Route is Being Calculated" and "Choose ‘Stop’ to Cancel the Calculation."
When your route guidance has been planned, it will be highlighted and a checkered flag symbol will appear on the map to show your destination and a symbol for a waypoint if one has been set. The computer will display "Route Calculation Completed" at the bottom of the screen.
To start the route guidance, start driving the vehicle. The route guidance will automatically begin after a short distance.
Back: This key always returns you to the previous screen.Colors on the Screen
When a route has been planned, it will be highlighted on the screen in blue. If you have set a waypoint(s) for your route, the colors on the screen will change. The waypoint(s) will be in maroon and from the waypoint(s) to the final destination will be blue. Once you have arrived at your final waypoint(s), the route to your destination will change to blue.
Different colors are also used to distinguish between interstate freeways, state highways, county roads, major streets and secondary streets. Highways will be shown as a thicker line than a general street will.
