Tools Required
J 38778 Door Trim Pad and Garnish Clip Remover
Removal Procedure
- Position the window fully downward.
- Remove the trim panel. Refer to Rear Side Door Trim Panel Replacement .
- Remove the door module. Refer to Door Control Module Replacement .
- Remove the water deflector. Refer to Rear Side Door Water Deflector Replacement .
- Remove the garnish molding. Refer to Rear Door Opening Frame Garnish Molding Replacement .
- Remove the inner window belt sealing strip. Refer to Rear Door Window Belt Inner Sealing Strip Replacement .
- Remove the window. Refer to Rear Side Door Window Replacement .
- Remove the rear door stationary window/division channel. Refer to Rear Side Door Stationary Window and Front Channel Replacement .
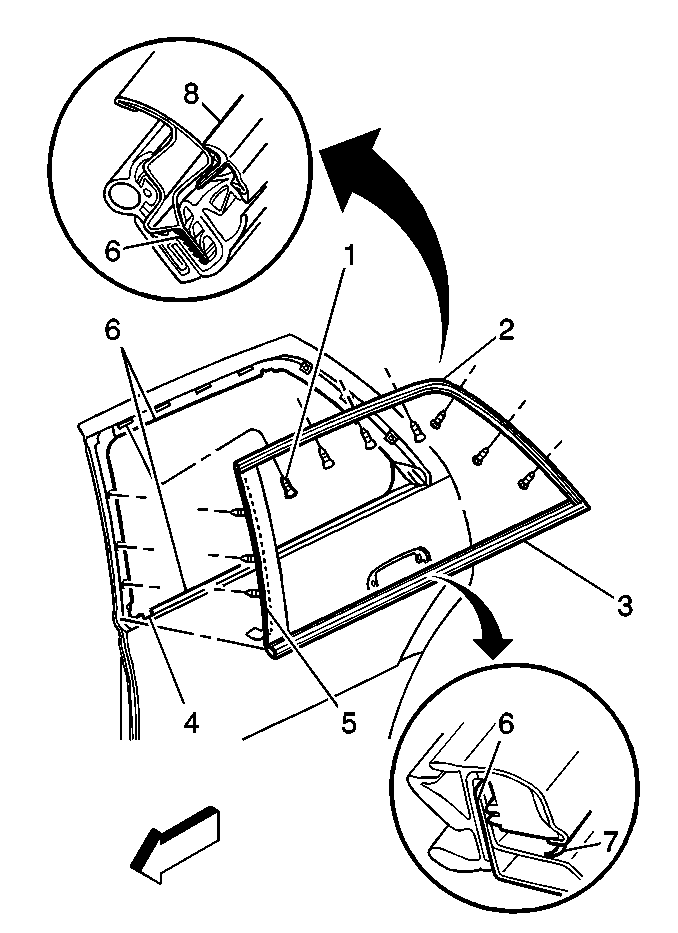
- Remove the seven screws attaching the reveal molding to the door.
- Insert a thin, flat-bladed tool between the applique (5) and the door pillar and cut the foam tape. Work from the top downward until the tape is separated.
- Use the J 38778 to release the push pins securing the reveal molding to the door.
- Perform the following to remove the reveal molding:

| 12.1. | Pull outward on the scalp section (2), away from the door header. |
| 12.2. | Grip the inner and outer sides of the belt section (3), and pull upward to release the reveal molding from the door flange (6). |
Installation Procedure
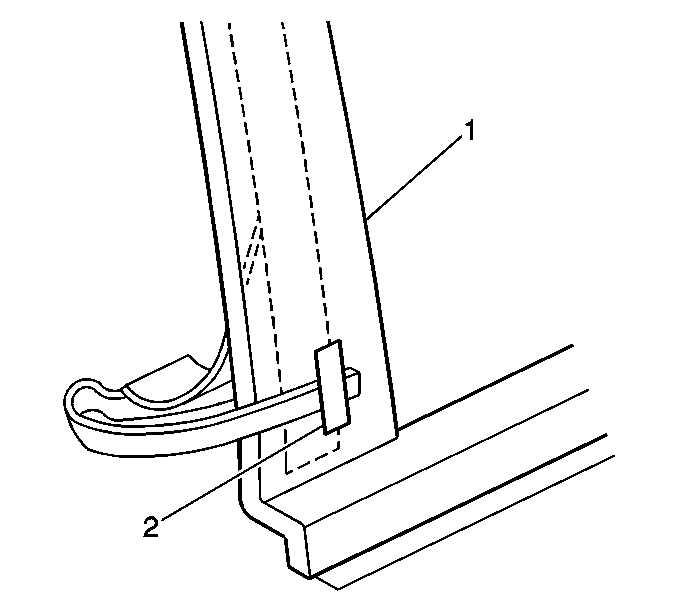
- Mark the location of the old tape strip on the molding applique with a scribe.
- Remove all of the tape residue from the door pillar and the molding applique (1).
- Install new foam tape to the molding applique (1). Align the new tape with the scribe marks made previously.
- Wrap the clear plastic release liner tab to the outside of the molding applique (1).
- Secure the release liner tab in place with a small piece of masking tape (2).
- Ensure the door is properly aligned prior to installing the reveal molding. Refer to Door Adjustment .
- Position the front edge of the belt section (3) to the front edge of the door.
- Work the reveal moldings belt section (3) into the door flange (6) by pushing downward from front to rear.
- Press the push pins into the door pillar.
- Install the alignment screw (1) to the door header.
- Working rearward, install the remaining screws.
- Remove the release liner from the tape.
- Press firmly onto the applique (1) to adhere the tape to the door pillar.
- Install the stationary window/division channel. Refer to Rear Side Door Stationary Window and Front Channel Replacement .
- Install the window. Refer to Rear Side Door Window Replacement .
- Install the inner window belt sealing strip. Refer to Rear Door Window Belt Inner Sealing Strip Replacement .
- Install the garnish molding. Refer to Rear Door Opening Frame Garnish Molding Replacement .
- Install the water deflector. Refer to Rear Side Door Water Deflector Replacement .
- Install the door module. Refer to Door Control Module Replacement .
- Install the trim panel. Refer to Rear Side Door Trim Panel Replacement .
Important: If the old molding is to be reused, the foam tape must be replaced as outlined in steps 1 through 4. A new molding from GMSPO will have new tape installed.

Use a isopropyl alcohol dampened cloth in order to remove the old tape residue.

Important: The following must be maintained when the belt section is positioned
to the flange:
• The belt molding blade is engaged into the flange notch (4). • The lace (7) is compressed inboard and constant.
Notice: Use the correct fastener in the correct location. Replacement fasteners must be the correct part number for that application. Fasteners requiring replacement or fasteners requiring the use of thread locking compound or sealant are identified in the service procedure. Do not use paints, lubricants, or corrosion inhibitors on fasteners or fastener joint surfaces unless specified. These coatings affect fastener torque and joint clamping force and may damage the fastener. Use the correct tightening sequence and specifications when installing fasteners in order to avoid damage to parts and systems.
Tighten
Tighten the screws to 1.3 N·m (12 lb in).

