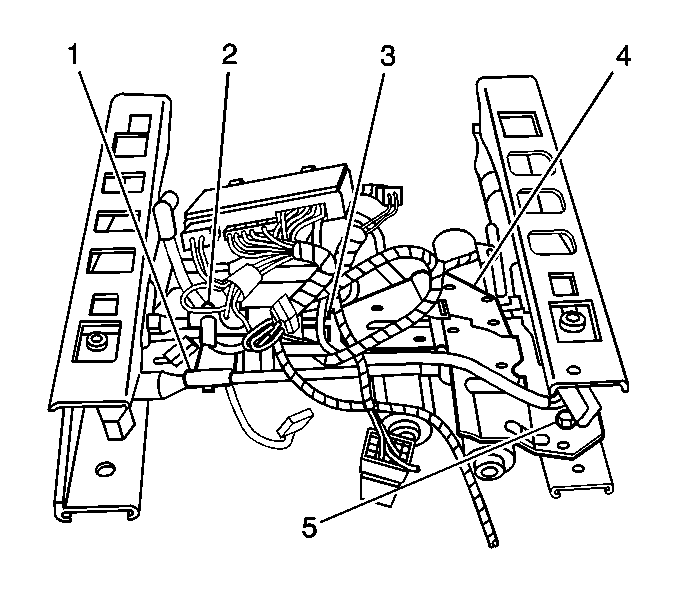
Removal Procedure
Caution: Do not try to change the designed seat position by changing the seat
adjuster-to-floor pan anchor placement or the seat adjuster-to-seat frame
anchor placement. Changing the designed seat position could affect the safe
performance of the seat and cause personal injury.
- Raise the seat full up and position the seat mid-way on the track
assembly.
- Remove the seat assembly, with the aid from an assistant. Refer to
Bucket Seat Replacement
.
- Place the seat upside down on a clean, protected surface.
- Remove the seat side trim and switch assembly. Refer to
Power Seat Switch Replacement
.
- Remove the seat bottom J-channels as necessary in order to access the
fasteners and the electrical connectors.
- Remove the seat belt buckle. Refer to
Front Seat Belt Buckle Replacement
in Seat Belts.
- Remove the hog rings at the rear of the seat cushion skirt.
- Remove the seat back cover and pad. Refer to
Seat Back Cover and Pad Replacement
.
- Remove the seat cushion cover and pad assembly.
- Disconnect the electrical connectors.

- Remove the four bolts retaining the seat
cushion frame to the adjuster assembly.
- Remove the nut securing the adjuster motor assembly bracket to the seat
adjuster track.
- Disengage the adjuster cables (1,2,3) and transfer to the new adjuster
assembly.
- Remove the adjuster motor (4) bracket assembly and transfer to
the new adjuster assembly.
Installation Procedure
- Transfer the remaining seat components to the new seat adjuster frame
as noted in the removal procedure.
| • | The adjuster cable/sensors (1,2,3) |
| • | The seat adjuster motor assembly bracket (4) |
| • | The electrical harness clips |

- Install the seat cushion frame to the adjuster
assembly.
- Install the four bolts in order to secure the seat cushion frame to the
adjuster assembly.
- Connect the electrical connectors.
- Install the seat cushion cover and pad assembly.
- Install the seat back cover and pad. Refer to
Seat Back Cover and Pad Replacement
.
- Install the hog rings at the rear of the seat skirt.
- Install the seat belt buckle. Refer to
Front Seat Belt Buckle Replacement
in Seat Belts.
- Install the seat bottom J-channels.
- Install the outer finish panel and switch assembly. Refer to
Power Seat Switch Replacement
.
- Adjust the power seat adjusters. Refer to
Seat Adjuster Phase Adjustment
.
- Install the seat assembly, with the aid from an assistant. Refer to
Bucket Seat Replacement
.
- If the vehicle is equipped with memory seats, calibrate the seat. Refer
to
Memory Seat Calibration
.


