Battery Negative Cable Replacement LY7 (LHD)
Removal Procedure
Important:
• Always use replacement cables that are of the same type, diameter and length of the cables that you are replacing. • Always route the replacement cable the same as the original cable.
- Disconnect the negative battery cable. Refer to Battery Negative Cable Disconnection and Connection .
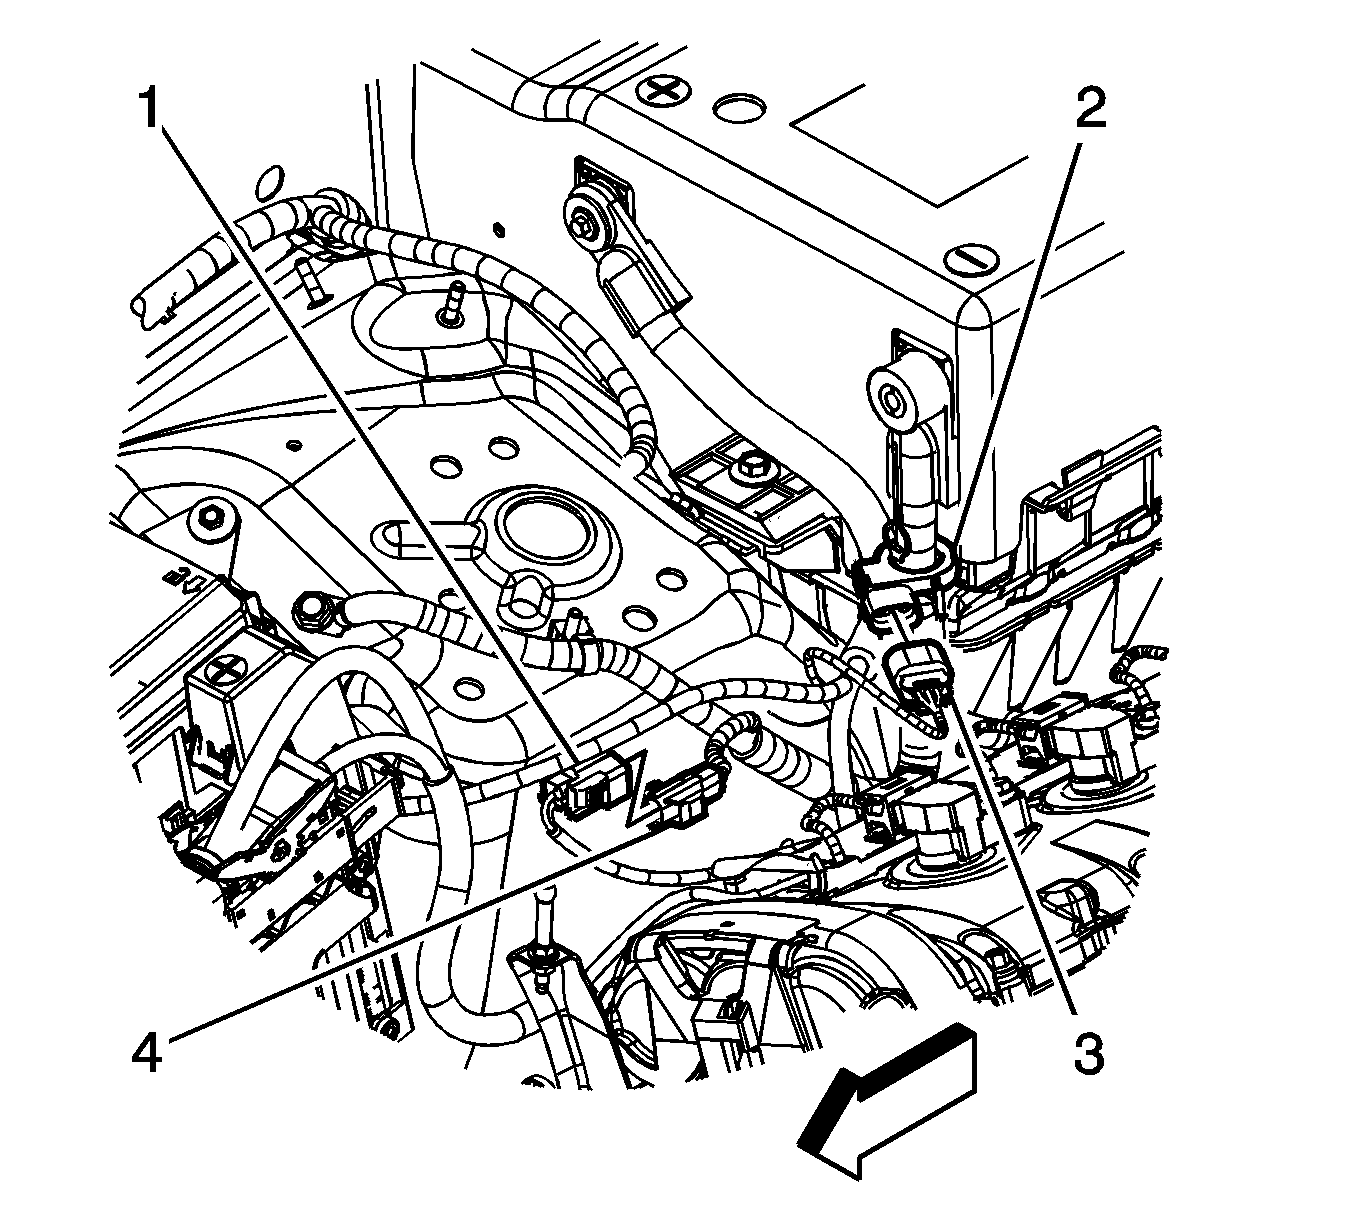
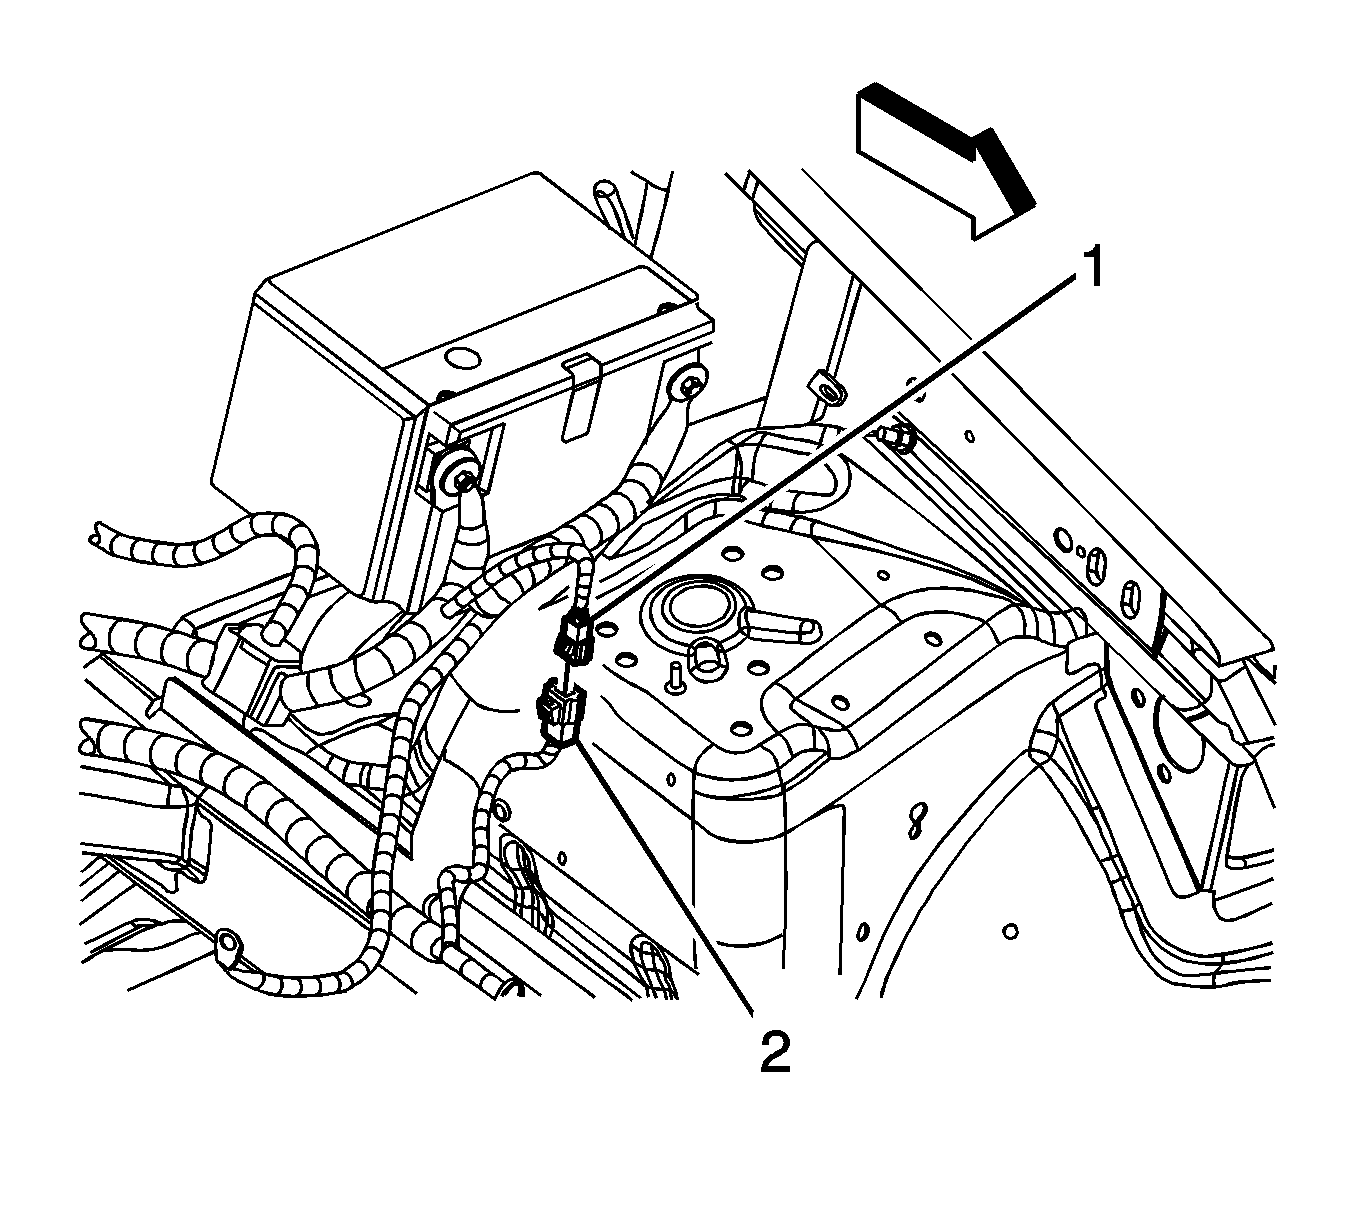
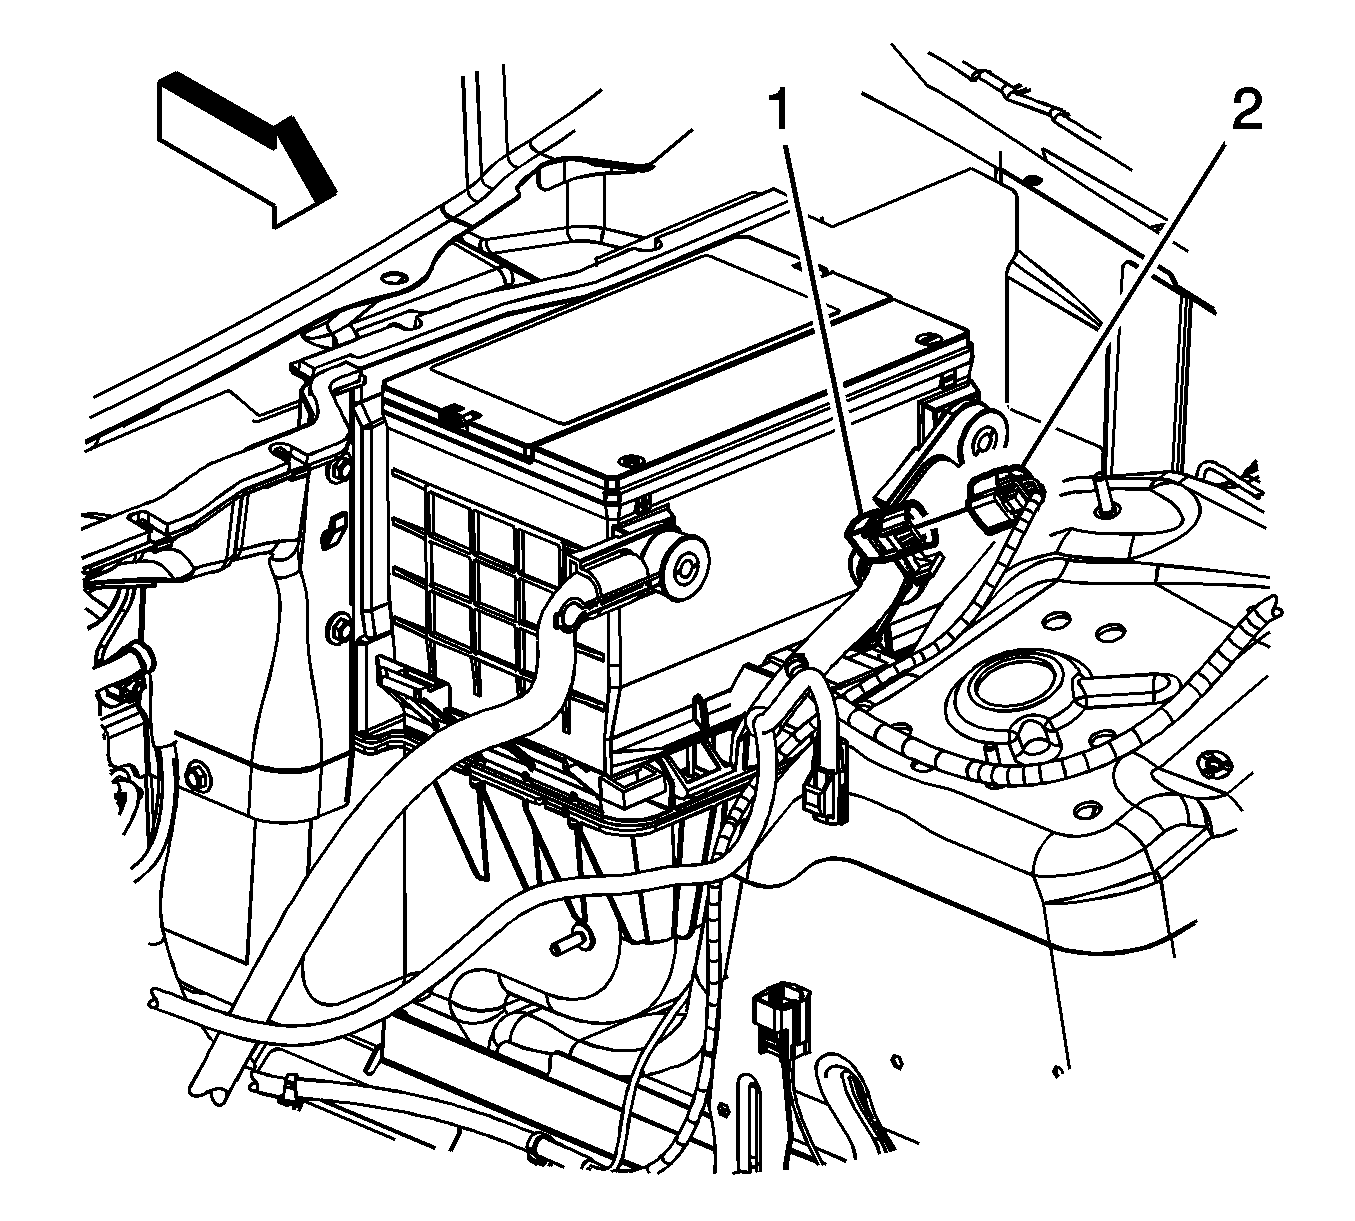
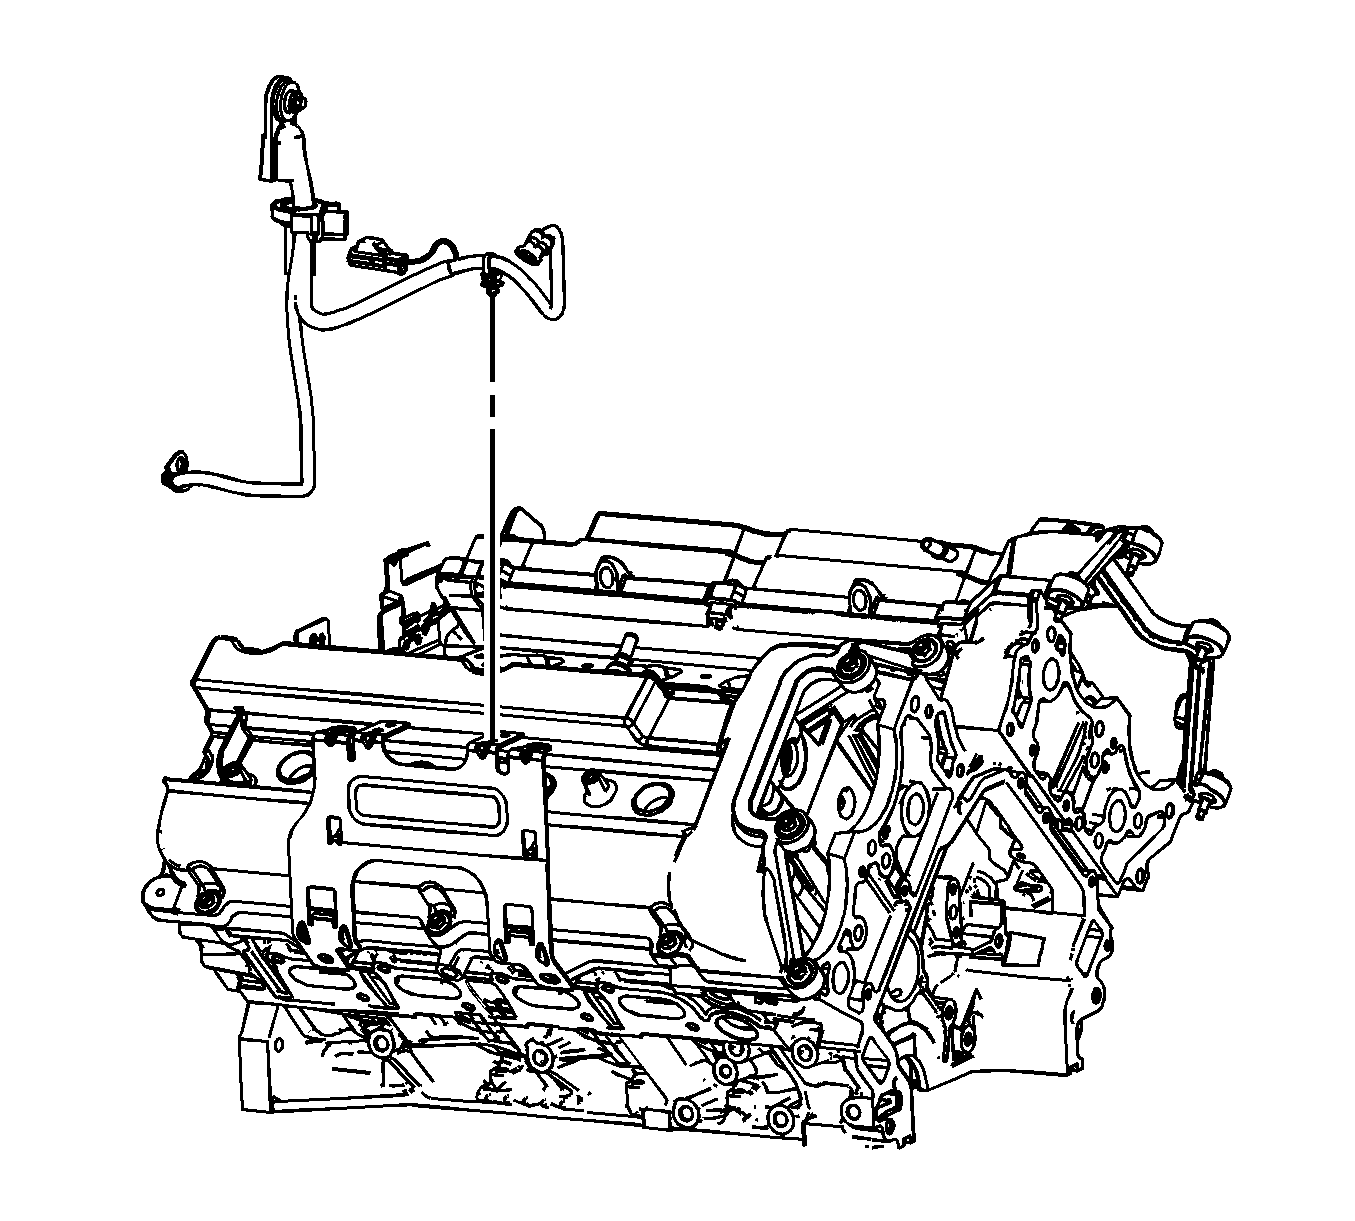
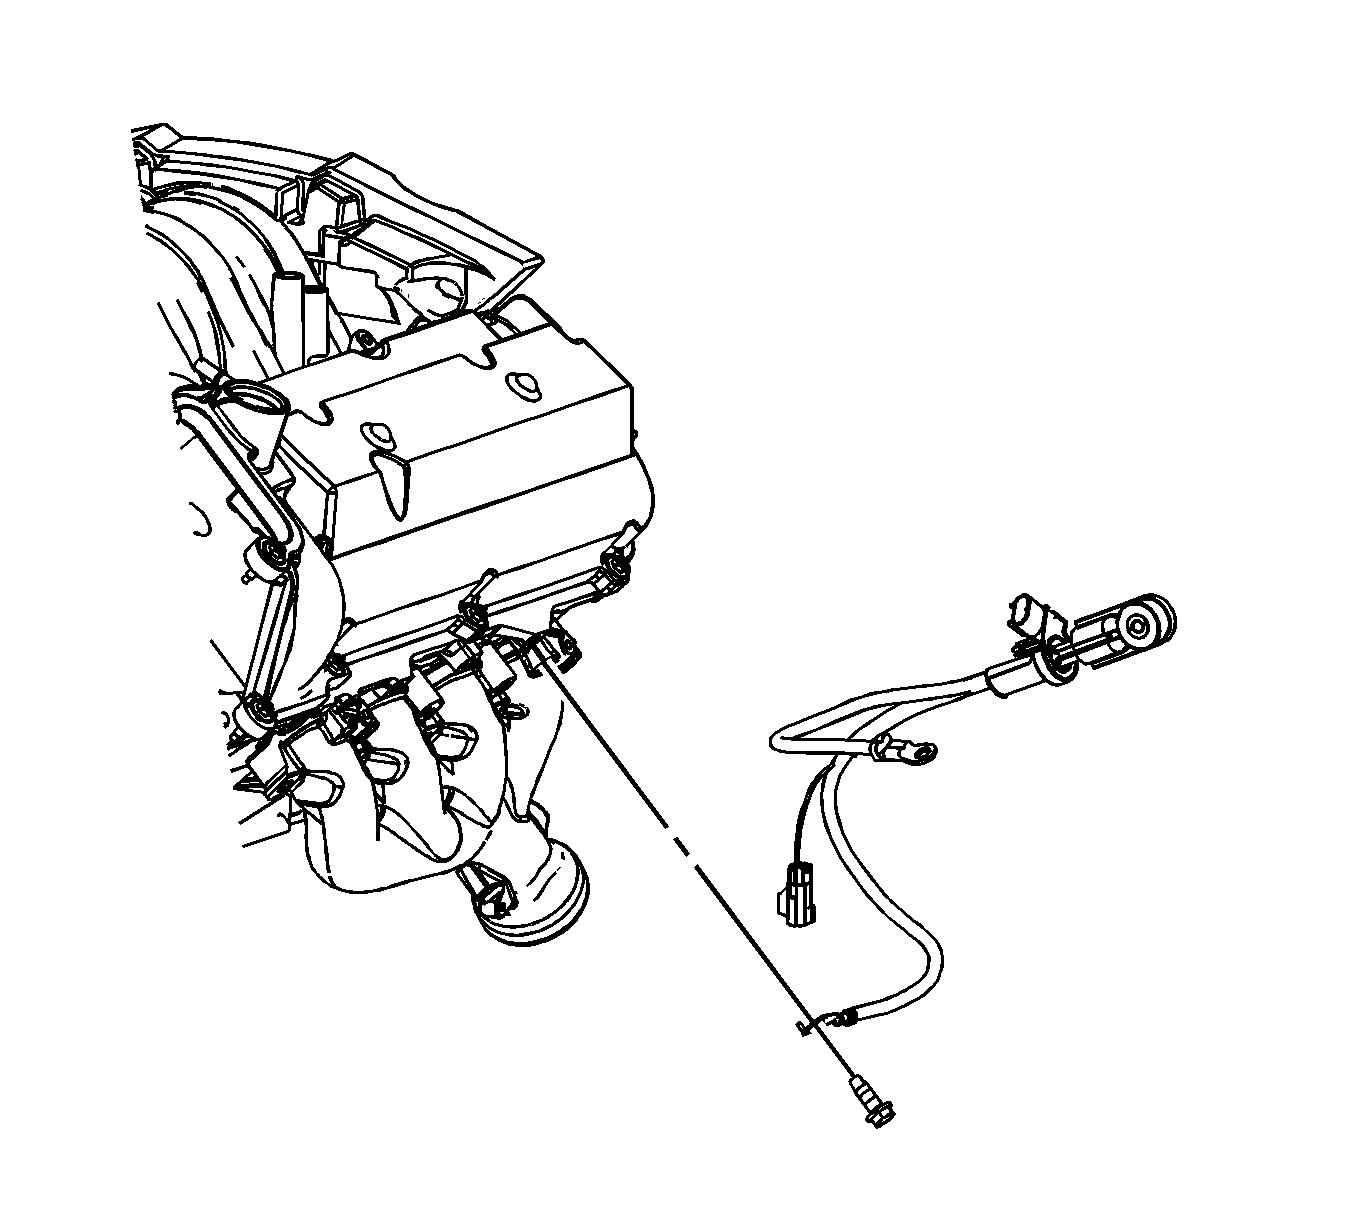
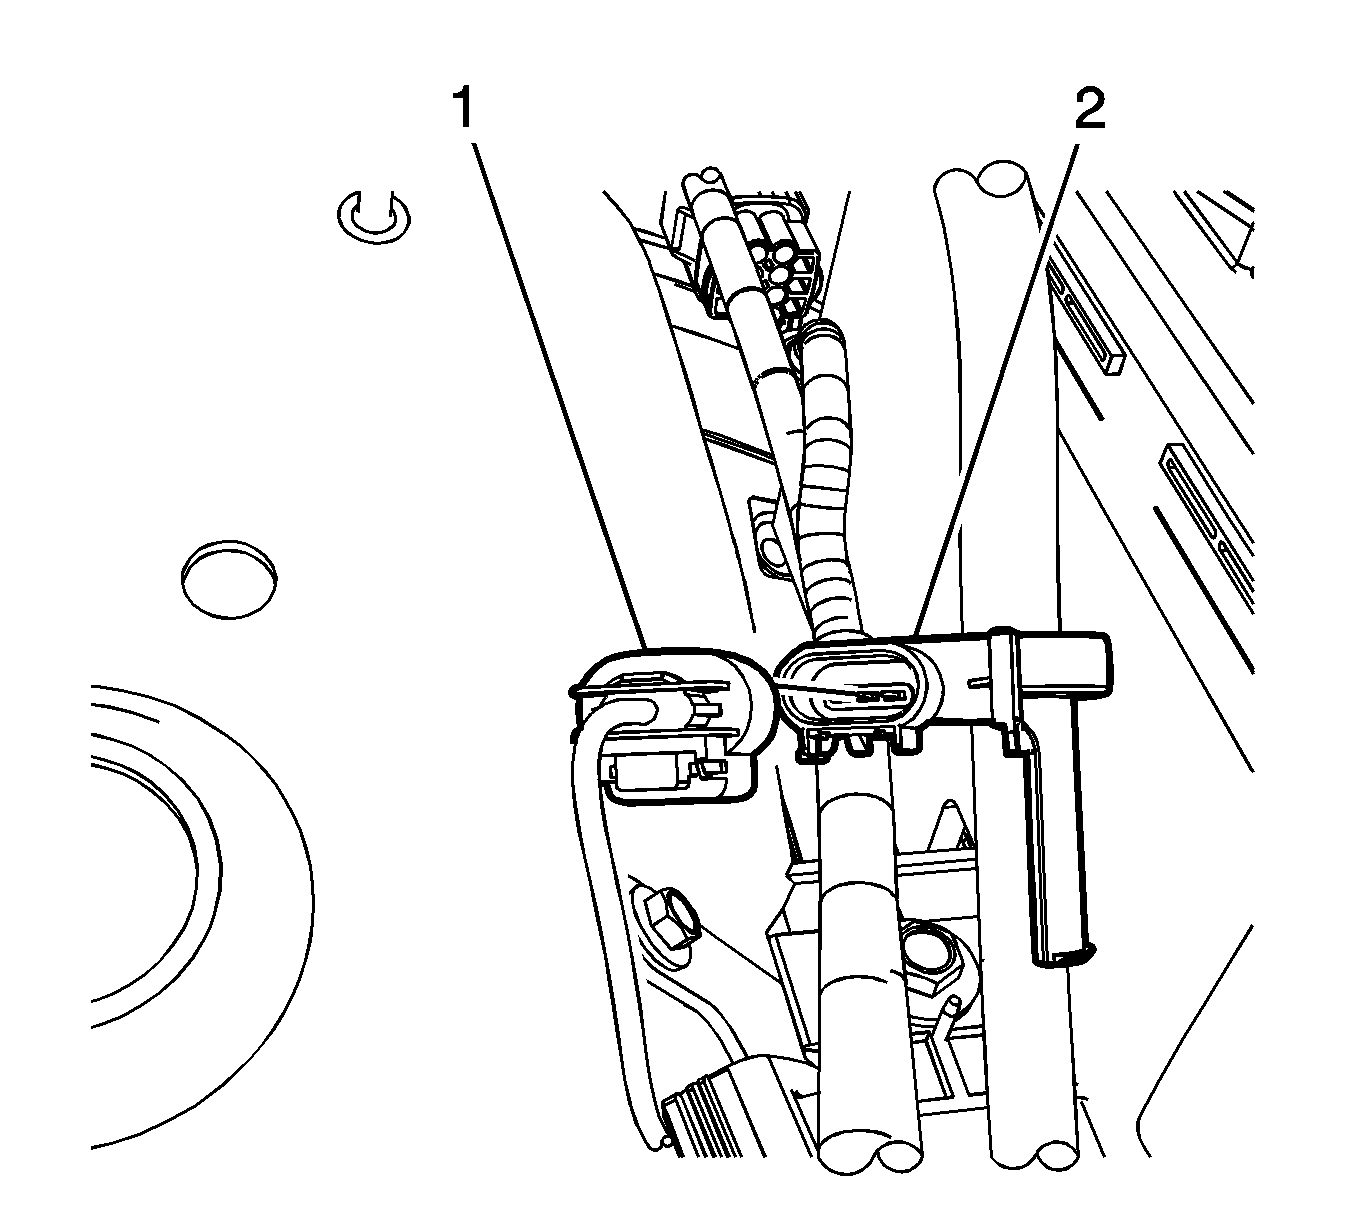
- Disconnect the instrument panel (I/P) wiring harness electrical connector (1) from the negative battery cable electrical connector (4).
- Disconnect the I/P wiring harness electrical connector (3) from the battery current sensor (2).
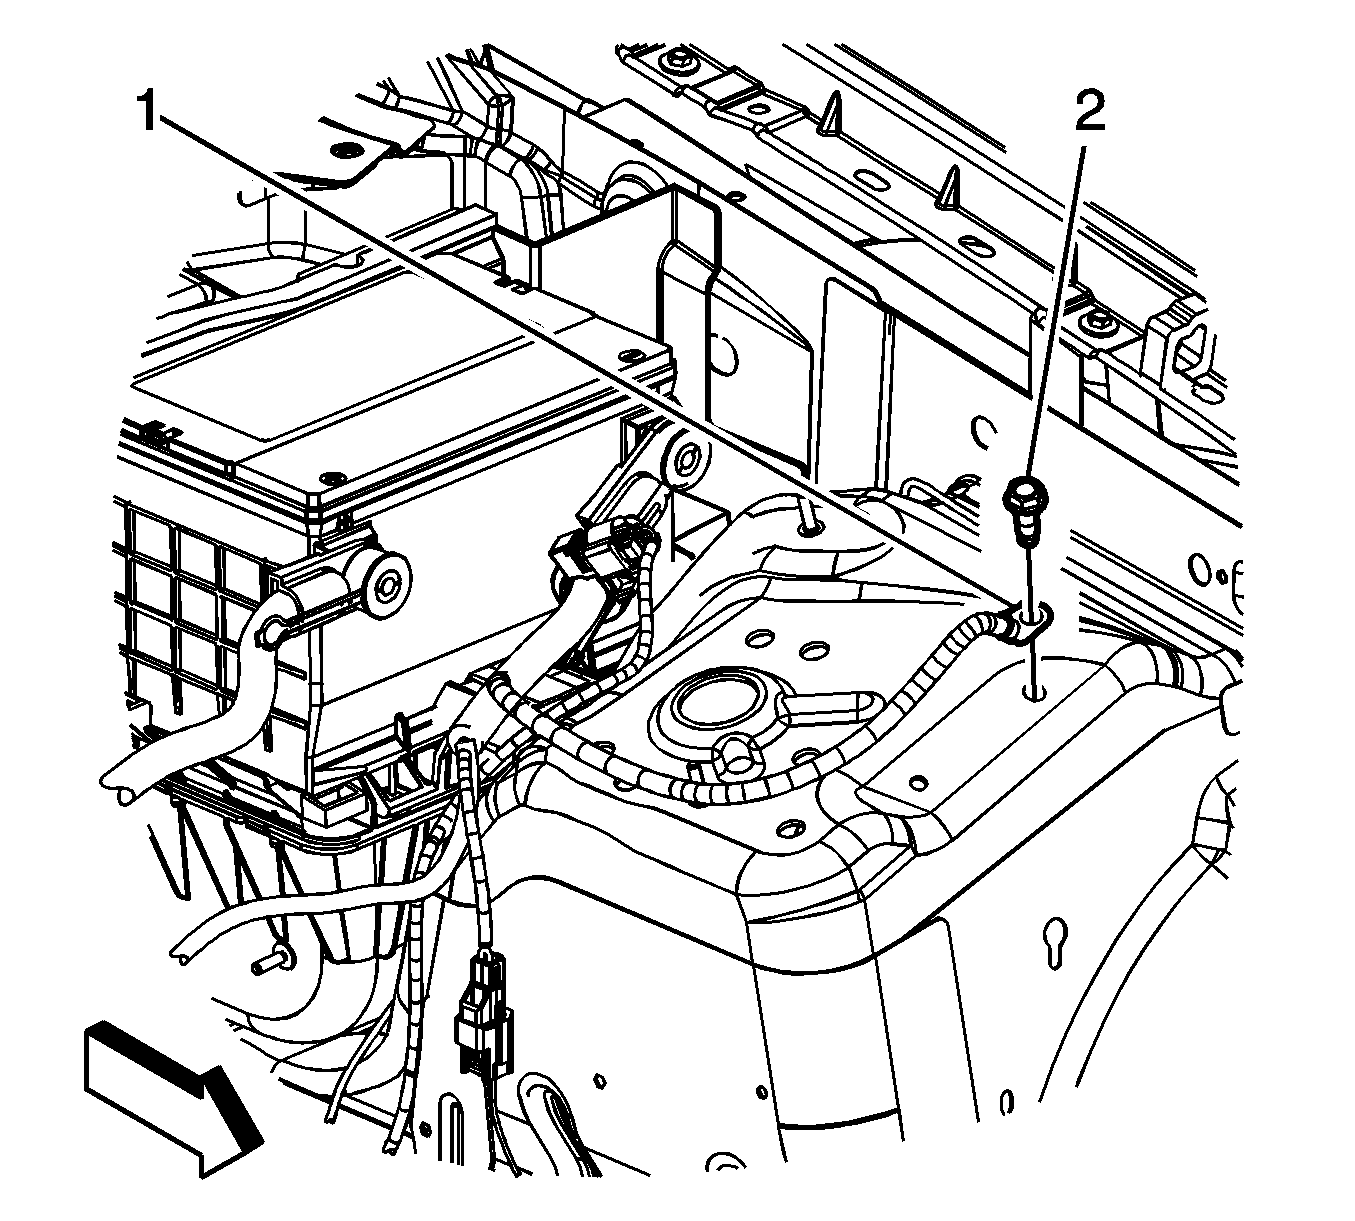
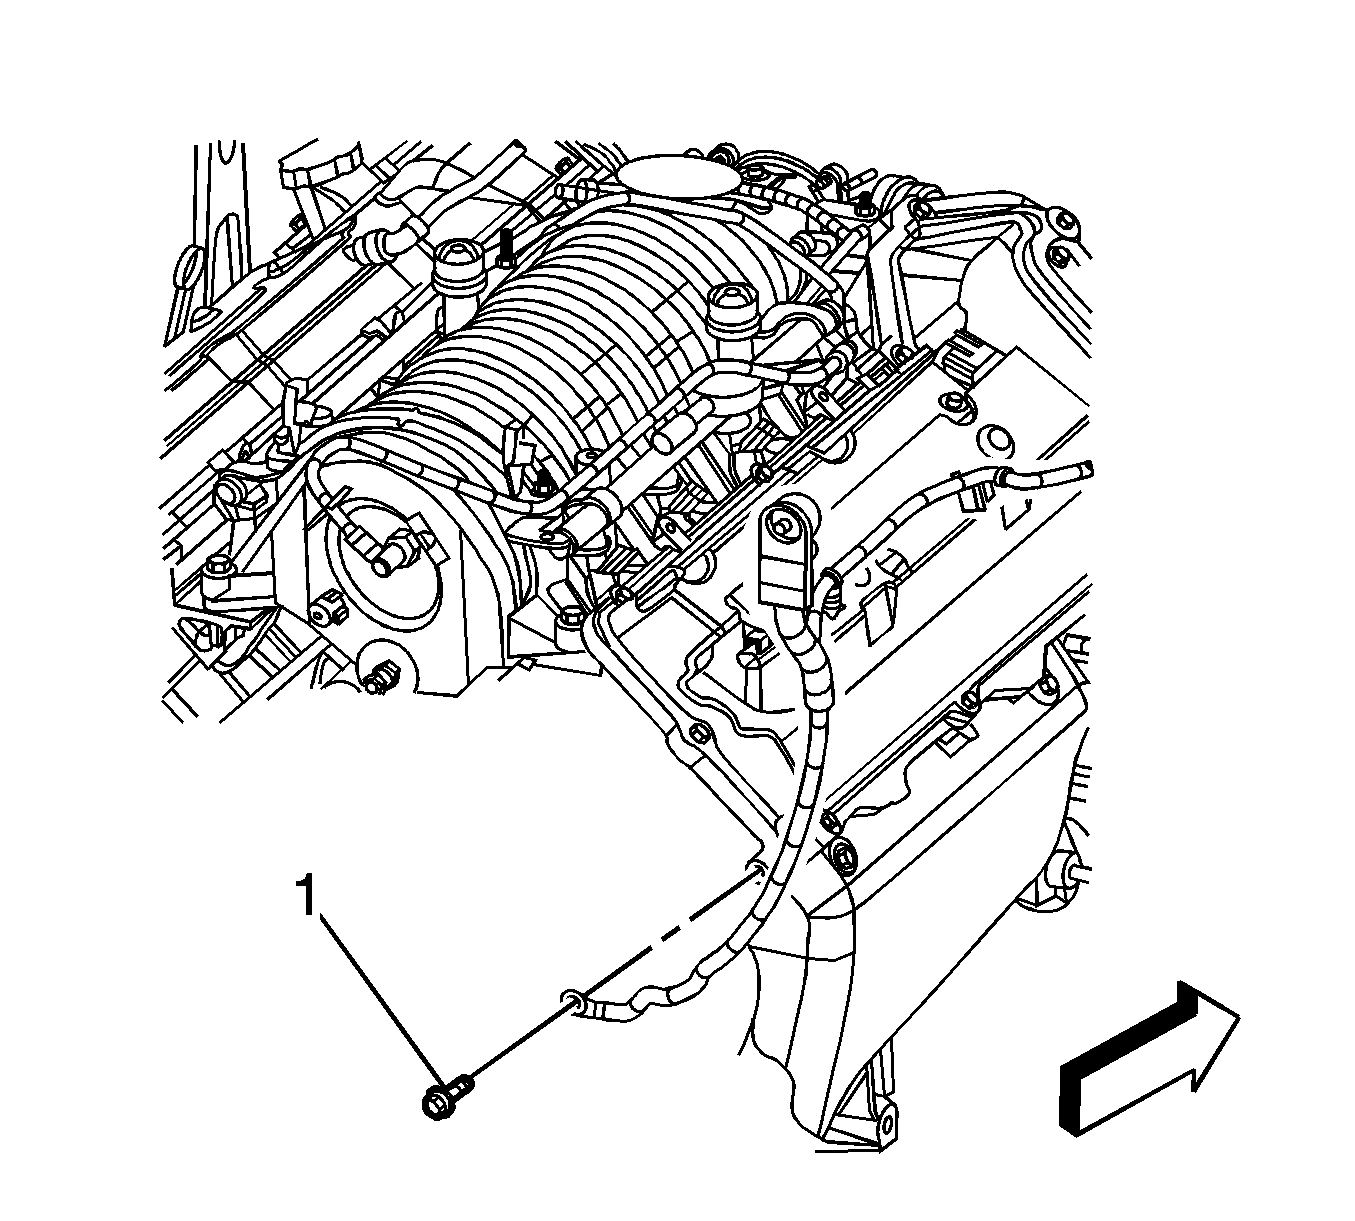
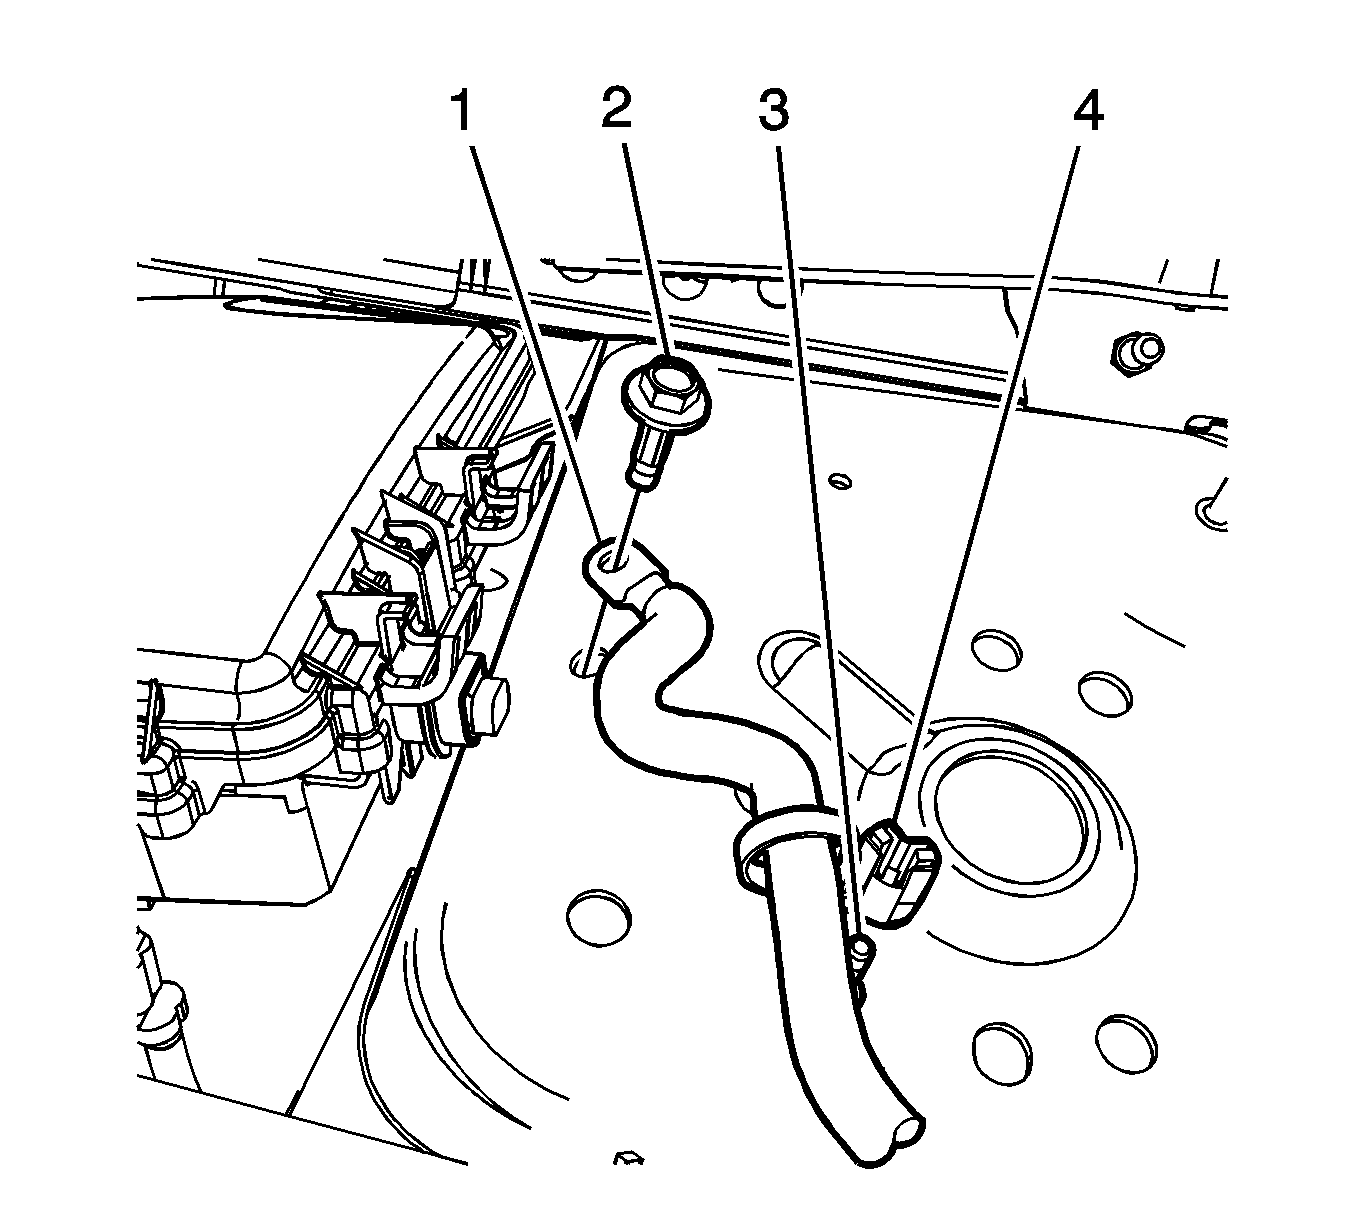
- Remove the negative battery cable ground bolt (3).
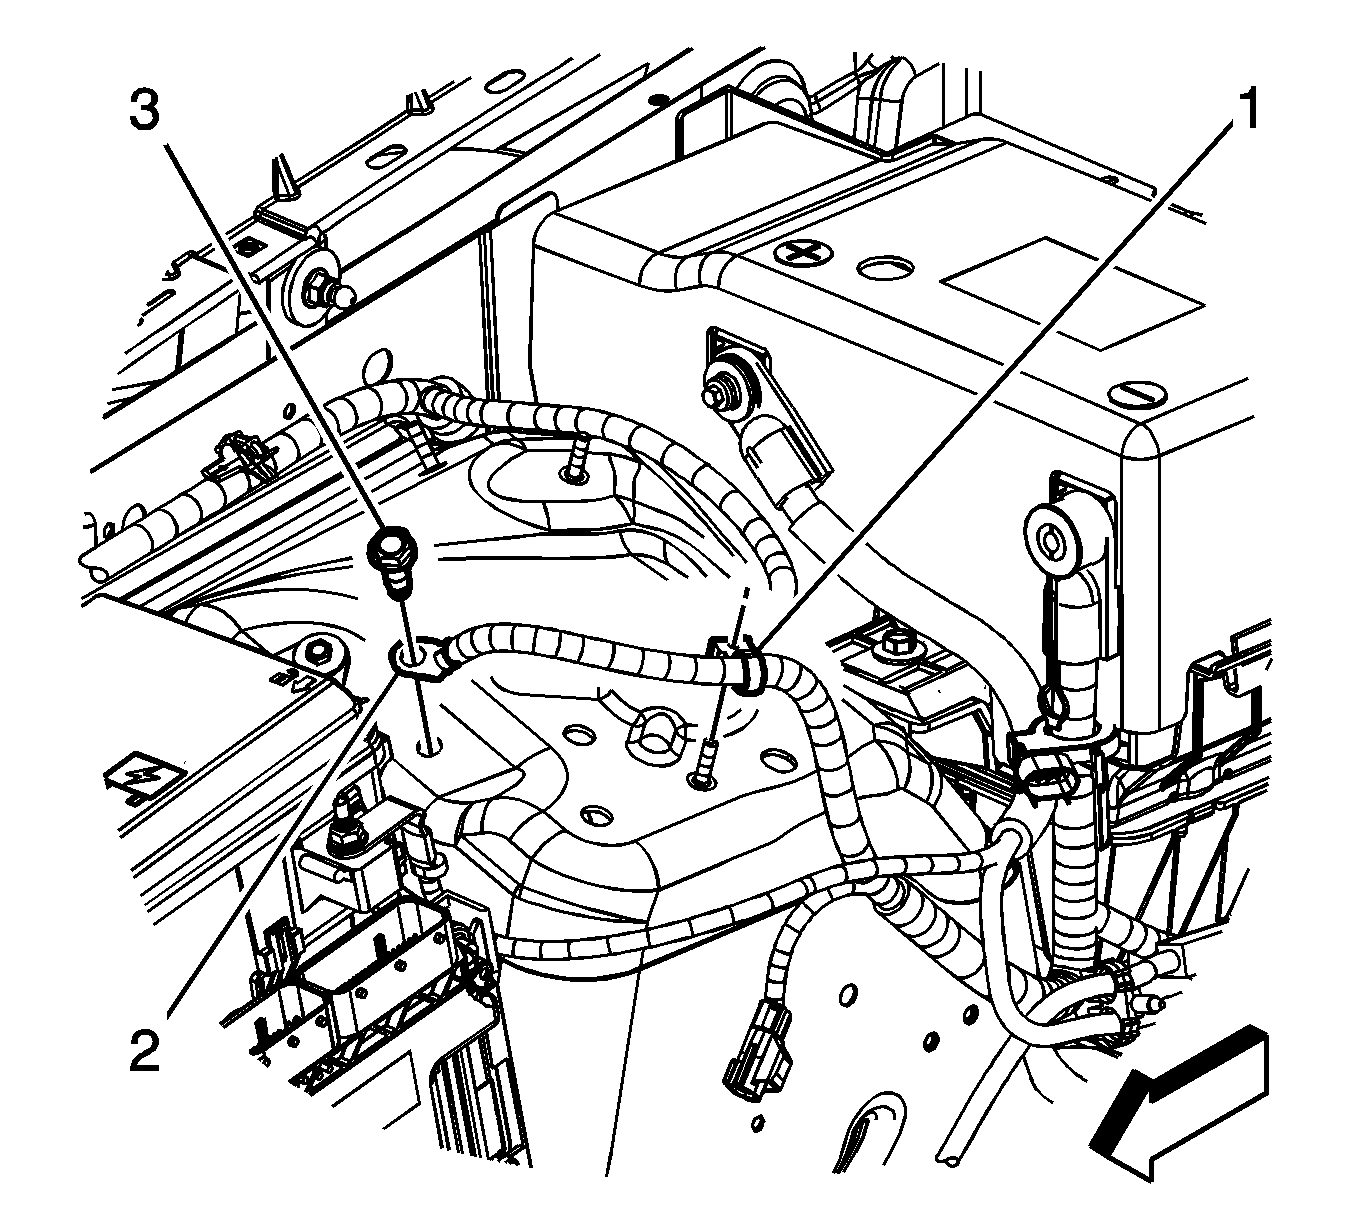
- Remove the negative battery cable clip (1) from the strut tower stud.
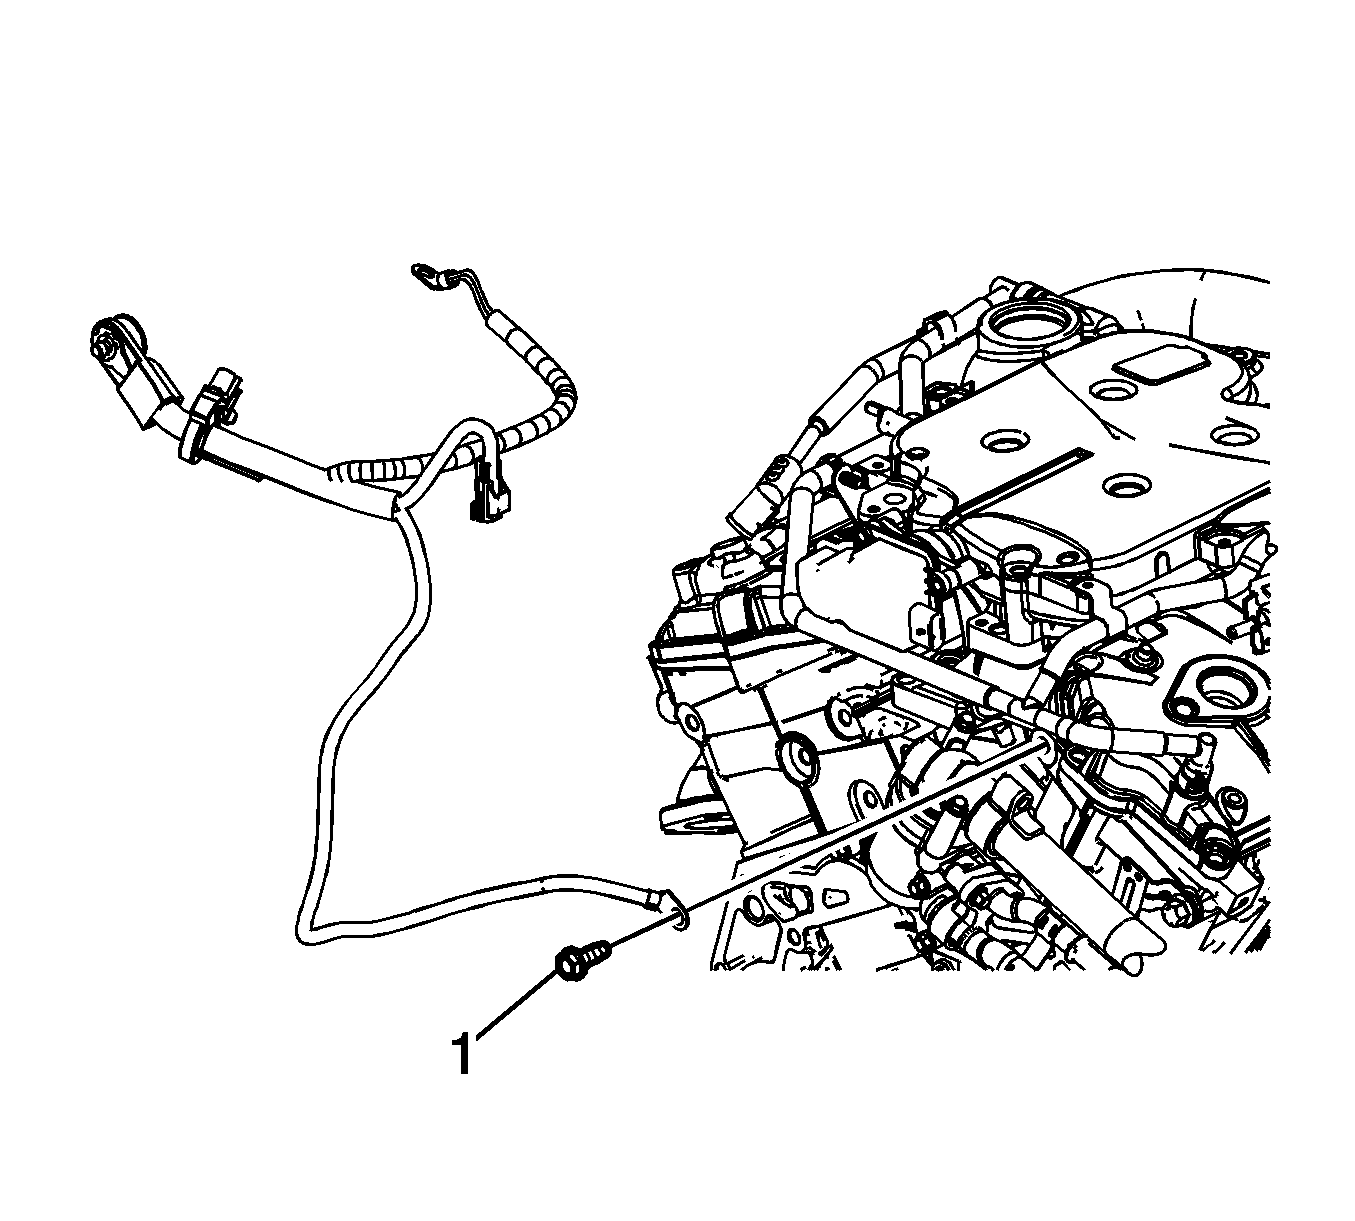
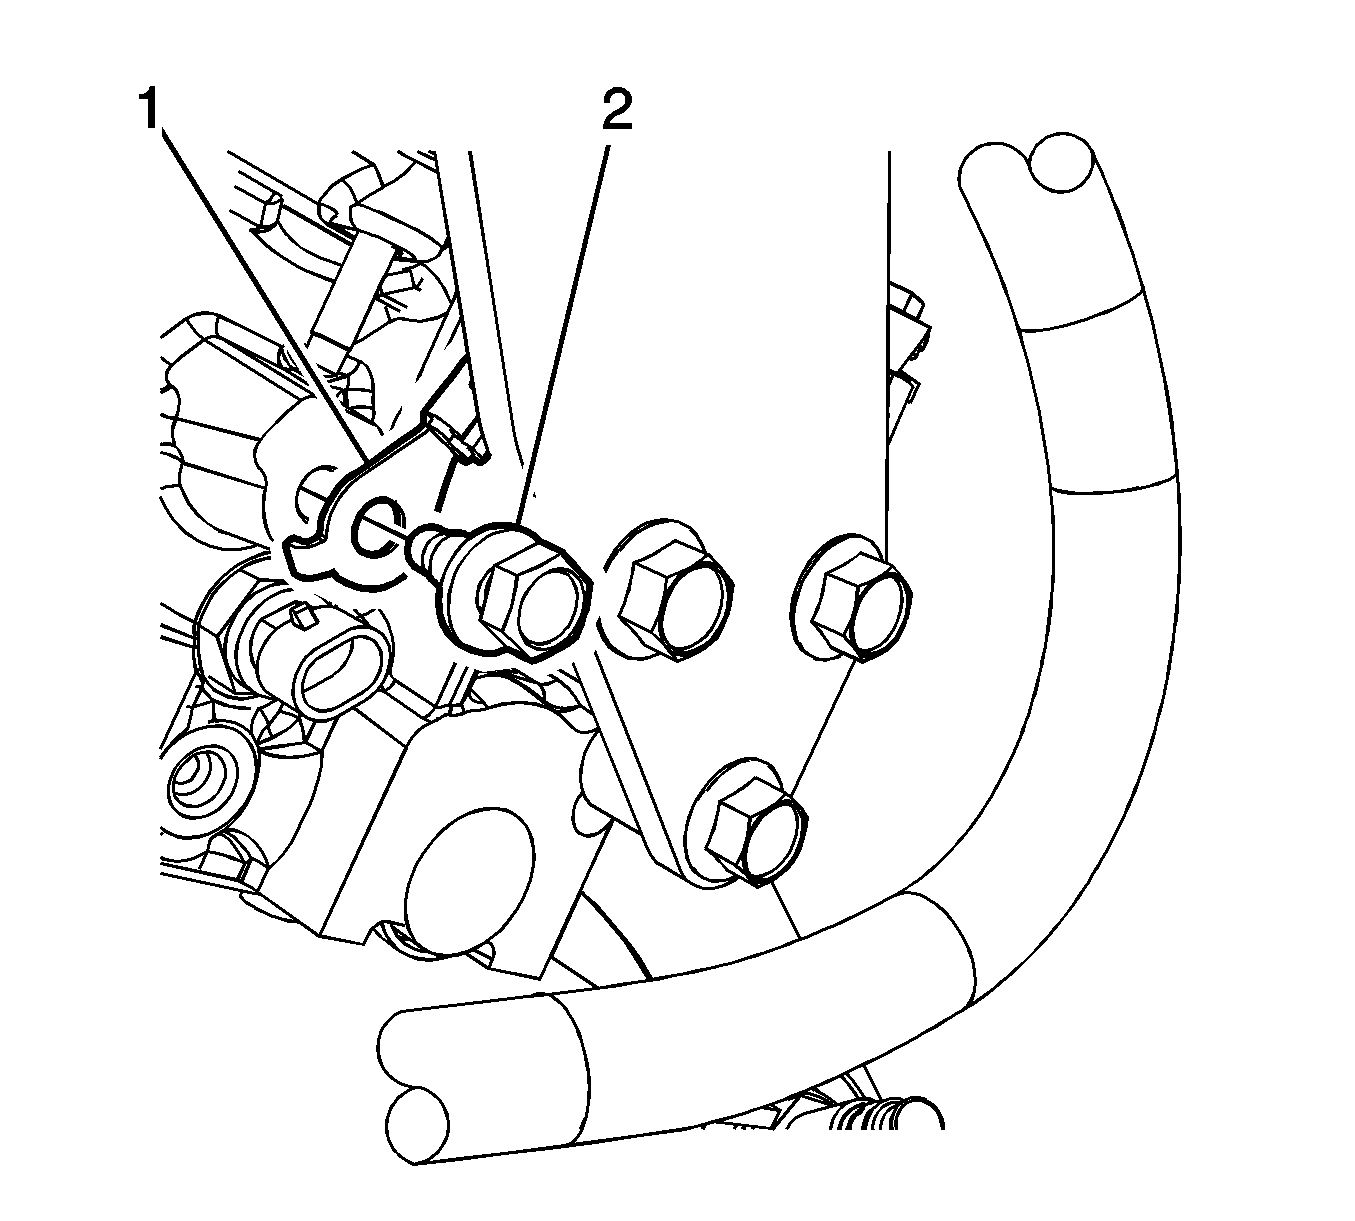
- Remove the negative cable ground stud at the cylinder head.
- Remove the negative battery cable from the vehicle.
Installation Procedure
- Position the negative cable to the cylinder head.
- Install the negative battery cable ground stud.
- Install the negative battery cable clip (1) to the strut tower stud and position the cable ground.
- Install the negative battery cable ground bolt (3).
- Connect the I/P wiring harness electrical connector (3) to the battery current sensor (2).
- Connect the I/P wiring harness electrical connector (1) to the negative battery cable electrical connector (4).
- Connect the negative battery cable. Refer to Battery Negative Cable Disconnection and Connection .
Notice: Refer to Fastener Notice in the Preface section.
Tighten
Tighten the stud to 50 N·m (37 lb ft).
Tighten
Tighten the bolt to 25 N·m (18 lb ft).
Battery Negative Cable Replacement LY7 (RHD)
Removal Procedure
Important:
• Always use replacement cables that are of the same type, diameter and length of the cables that you are replacing. • Always route the replacement cable the same as the original cable.
- Remove the fuel injector sight shield. Refer to Fuel Injector Sight Shield Replacement .
- Disconnect the negative battery cable. Refer to Battery Negative Cable Disconnection and Connection .
- Disconnect the instrument panel (I/P) wiring harness electrical connector (2) from the negative battery cable electrical connector (1).
- Disconnect the I/P wiring harness electrical connector (2) from the battery current sensor.
- Remove the negative battery cable ground bolt (2).
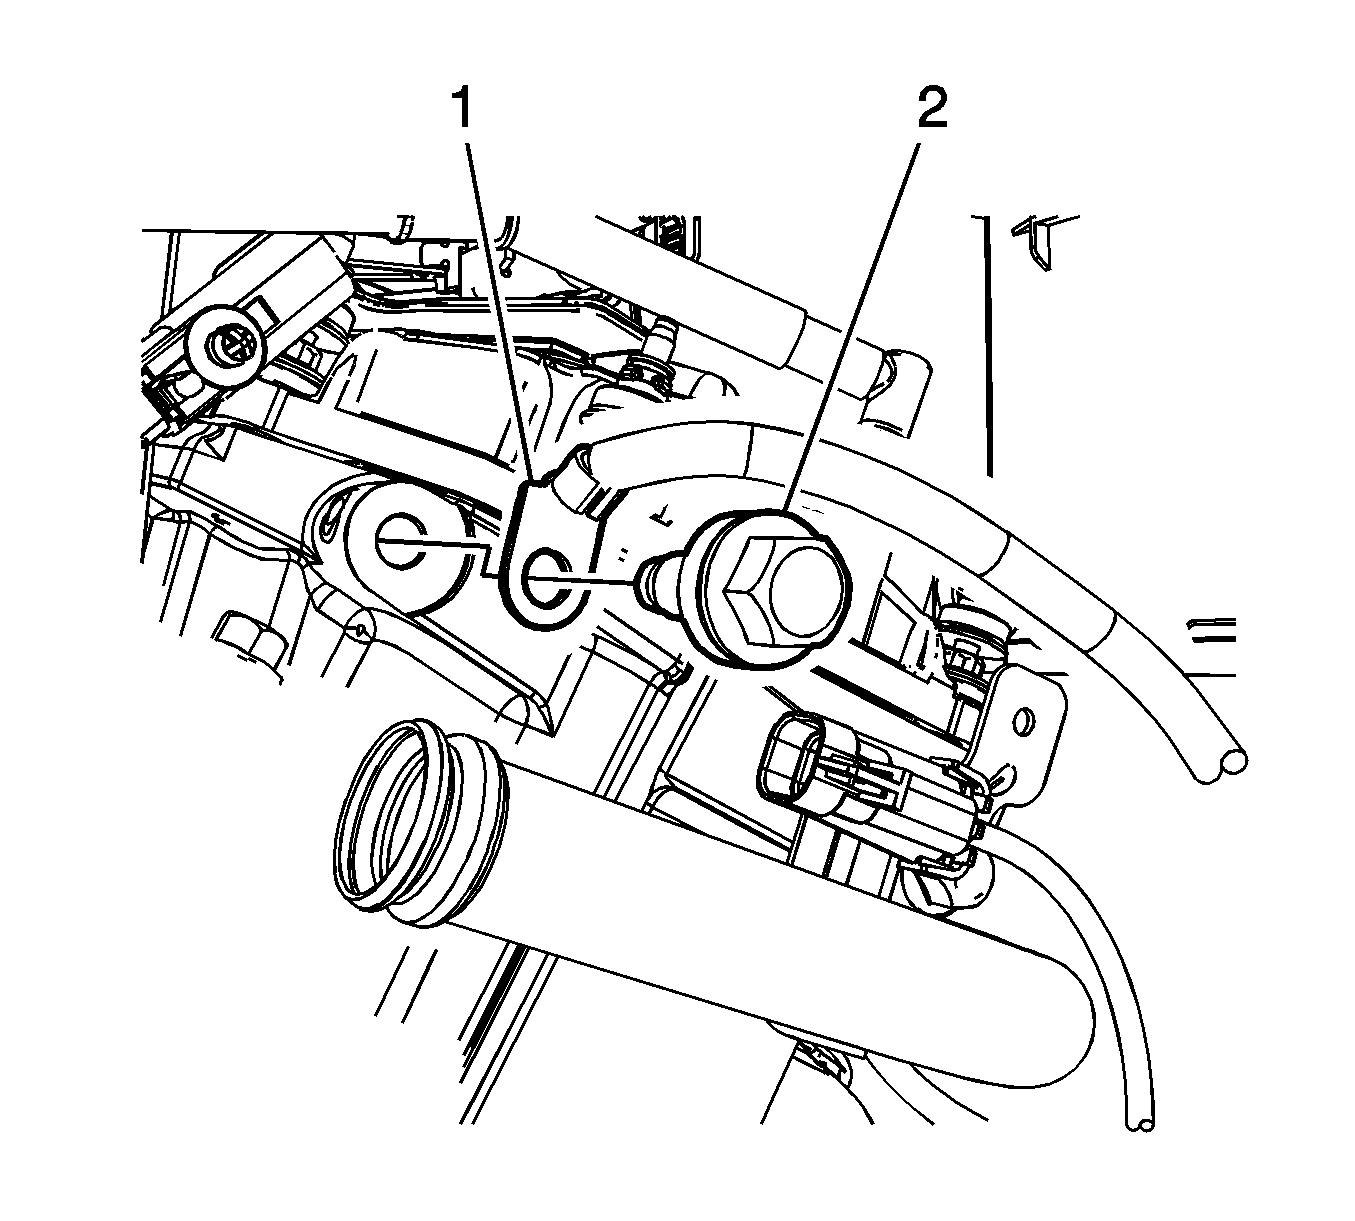
- Remove the negative cable ground bolt (1) at the cylinder head.
- Remove the negative battery cable from the vehicle.
Installation Procedure
- Position the negative cable to the cylinder head.
- Install the negative battery cable ground bolt (1).
- Position the negative battery cable (1) to the strut tower.
- Install the negative battery cable ground bolt (2).
- Connect the I/P wiring harness electrical connector (2) to the battery current sensor.
- Connect the I/P wiring harness electrical connector (2) to the negative battery cable electrical connector (1).
- Connect the negative battery cable. Refer to Battery Negative Cable Disconnection and Connection .
- Install the fuel injector sight shield. Refer to Fuel Injector Sight Shield Replacement .
Notice: Refer to Fastener Notice in the Preface section.
Tighten
Tighten the bolt to 45 N·m (33 lb ft).
Tighten
Tighten the bolt to 25 N·m (18 lb ft).
Battery Negative Cable Replacement LH2 (LHD)
Removal Procedure
Important:
• Always use replacement cables that are of the same type, diameter and length of the cables that you are replacing. • Always route the replacement cable the same way as the original cable.
- Disconnect the negative battery cable. Refer to Battery Negative Cable Disconnection and Connection .
- Remove the fuel injector sight shield. Refer to Fuel Injector Sight Shield Replacement .
- Remove the negative battery cable ground bolt (3).
- Remove the negative battery cable clip (1) from the strut tower stud.
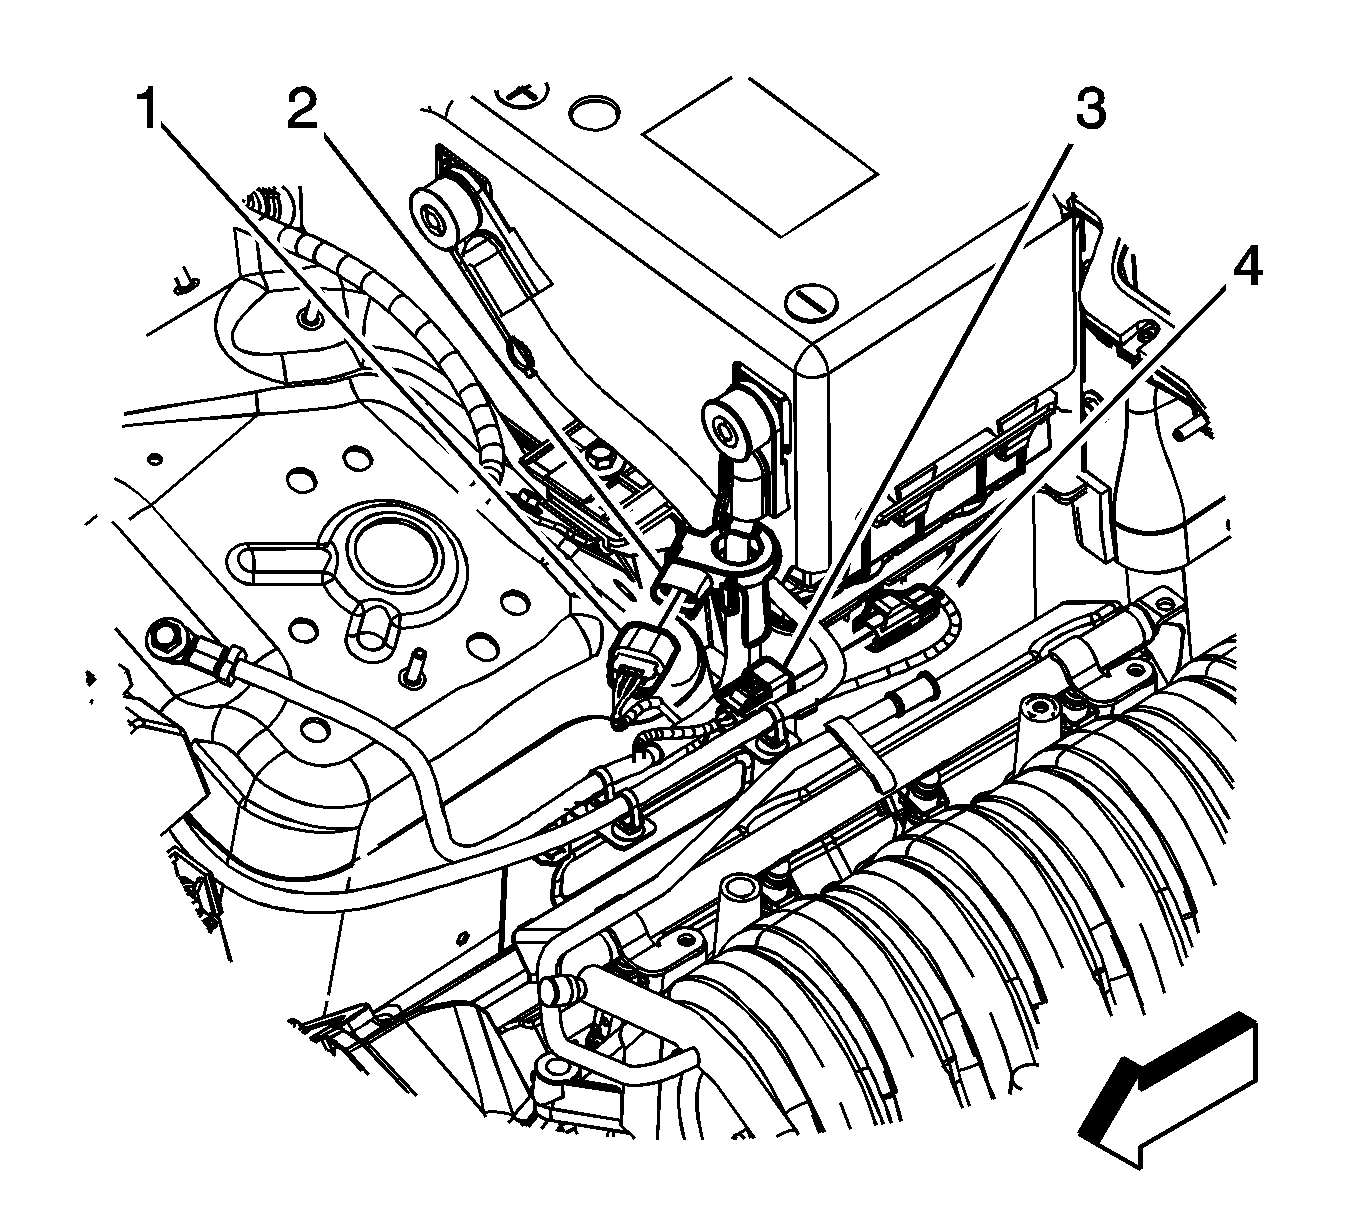
- Disconnect the instrument panel (I/P) wiring harness electrical connector (1) from the battery current sensor (2).
- Disconnect the I/P wiring harness electrical connector (4) from the negative battery cable electrical connector (3).
- Remove the negative battery cable ground bolt (1) from the cylinder head.
- Remove the negative battery cable clip from the engine wiring harness bracket.
- Remove the negative battery cable from the vehicle.
Installation Procedure
- Install the negative battery cable to the vehicle.
- Install the negative battery cable clip to the engine wiring harness bracket.
- Position the negative battery cable to the cylinder head.
- Install the negative battery cable ground bolt (1) to the cylinder head.
- Connect the I/P wiring harness electrical connector (4) to the negative battery cable electrical connector (3).
- Connect the I/P wiring harness electrical connector (1) to the battery current sensor (2).
- Install the negative battery cable clip (1) to the strut tower stud.
- Install the negative battery cable ground bolt (3).
- Install the fuel injector sight shield. Refer to Fuel Injector Sight Shield Replacement .
- Connect the negative battery cable. Refer to Battery Negative Cable Disconnection and Connection .
Notice: Refer to Fastener Notice in the Preface section.
Tighten
Tighten the bolt to 45 N·m (33 lb ft).
Tighten
Tighten the bolt to 20 N·m (15 lb ft).
Battery Negative Cable Replacement LH2 (RHD)
Removal Procedure
Important:
• Always use replacement cables that are of the same type, diameter and length of the cables that you are replacing. • Always route the replacement cable the same way as the original cable.
- Disconnect the negative battery cable. Refer to Battery Negative Cable Disconnection and Connection .
- Remove the negative battery cable ground bolt (2).
- Disconnect the instrument panel (I/P) wiring harness electrical connector (2) from the battery current sensor (1).
- Disconnect the I/P wiring harness electrical connector (2) from the negative battery cable electrical connector (1).
- Remove the negative battery cable ground bolt from the cylinder head.
- Remove the negative battery cable from the vehicle.
Installation Procedure
- Install the negative battery cable to the vehicle.
- Position the negative battery cable to the cylinder head and install the ground bolt.
- Connect the I/P wiring harness electrical connector (2) to the negative battery cable electrical connector (1).
- Connect the I/P wiring harness electrical connector (2) to the battery current sensor (1).
- Position the negative battery cable and install the negative battery cable ground bolt (2).
- Connect the negative battery cable. Refer to Battery Negative Cable Disconnection and Connection .
Notice: Refer to Fastener Notice in the Preface section.
Tighten
Tighten the bolt to 45 N·m (33 lb ft).
Tighten
Tighten the bolt to 20 N·m (15 lb ft).
Battery Negative Cable Replacement LH2(LHD) with Top Post
Removal Procedure
Important:
• Always use replacement cables that are of the same type, diameter and length of the cables that you are replacing. • Always route the replacement cable the same way as the original cable.
- Disconnect the negative battery cable (2). Refer to Battery Negative Cable Disconnection and Connection .
- Disconnect the I/P harness electrical connector (1) from the battery current sensor (2).
- Disconnect the cable retaining clip (4) from the stud (3) on the shock tower.
- Remove the bolt (1) securing the negative battery cable (2) to the shock tower.
- Remove the fuel injector sight shield. Refer to Fuel Injector Sight Shield Replacement .
- Disconnect the cable retaining clips from the engine bracket.
- Remove the bolt (2) securing the negative battery cable (1) to the engine block.
- Remove the negative battery cable.
Installation Procedure
- Position the negative battery cable to the engine.
- Install the bolt (2) securing the negative battery cable (1) to the engine block.
- Connect the cable retaining clips to the engine bracket.
- Install the bolt (2) securing the negative battery cable (1) to the shock tower.
- Connect the cable retaining clip (4) to the stud (3) on the shock tower.
- Connect the I/P harness electrical connector (1)) to the battery current sensor (2).
- Install the fuel injector sight shield. Refer to Fuel Injector Sight Shield Replacement .
- Connect the negative battery cable. Refer to Battery Negative Cable Disconnection and Connection .
Notice: Refer to Fastener Notice in the Preface section.
Tighten
Tighten the bolt to 25 N·m (18 lb ft).
Tighten
Tighten the bolt to 10 N·m (89 lb in).
Battery Negative Cable Replacement LY7 and LLT(LHD) With Top Post
Removal Procedure
Important:
• Always use replacement cables that are of the same type, diameter and length of the cables that you are replacing. • Always route the replacement cable the same as the original cable.
- Disconnect the negative battery cable. Refer to Battery Negative Cable Disconnection and Connection .
- Disconnect the I/P harness electrical connector (1) from the battery current sensor (2).
- Disconnect the cable retaining clip (4) from the stud (3) on the shock tower.
- Remove the bolt (1) securing the negative battery cable (2) to the shock tower.
- Raise the vehicle. Refer to Lifting and Jacking the Vehicle .
- Remove the bolt (2) securing the negative battery cable (1) to the engine block.
- Lower the vehicle.
- Remove the negative battery cable.
Installation Procedure
- Position the negative battery cable.
- Install the bolt (2) securing the negative battery cable (1) to the engine block.
- Connect the cable retaining clip (4) from the stud (3) on the shock tower.
- Install the bolt (1) securing the negative battery cable (2) to the shock tower.
- Connect the I/P harness electrical connector (1) to the battery current sensor (2).
- Connect the negative battery cable. Refer to Battery Negative Cable Disconnection and Connection .
Notice: Refer to Fastener Notice in the Preface section.
Tighten
Tighten the bolt to 50 N·m (37 lb ft).
Tighten
Tighten the bolt to 10 N·m (89 lb in).
