For 1990-2009 cars only
Removal Procedure
- Disable the SIR system. Refer to SIR Disabling and Enabling .
- Disconnect the battery ground cable. Refer to Battery Negative Cable Disconnection and Connection .
- Remove the console assembly. Refer to Console Replacement .
- Remove the radio. Refer to Radio Replacement .
- Remove the closeout/insulator panels. Refer to Instrument Panel Insulator Panel Replacement - Right Side and to Instrument Panel Insulator Panel Replacement - Left Side .
- Remove the instrument panel (I/P) compartment. Refer to Instrument Panel Compartment Replacement .
- Remove the I/P compartment trim bezel. Refer to Instrument Panel Compartment Trim Bezel Replacement .
- Remove the knee bolster trim panel. Refer to Driver Knee Bolster Panel Replacement .
- Remove the left knee bolster bracket. Refer to Driver Knee Bolster Bracket Replacement .
- Remove the right and the left I/P trim panels. Refer to Instrument Panel Trim Panel Replacement - Left Side and to Instrument Panel Trim Panel Replacement - Right Side .
- Remove the right and the left hinge pillar trim. Refer to Body Hinge Pillar Trim Panel Replacement .
- Remove the windshield side garnish moldings. Refer to Windshield Side Garnish Molding Replacement .
- Remove the right and the left I/P end caps. Pull outward to disengage the caps from the I/P.
- Remove the I/P trim pad. Refer to Instrument Panel Trim Pad Replacement .
- Remove the I/P cluster (IPC). Refer to Instrument Cluster Replacement .
- Remove the speakers from the I/P. Refer to Radio Front Speaker Replacement .
- Remove the sensing and diagnostic module (SDM) and the YAW sensors from the I/P carrier.
- Remove the global positioning system (GPS) antenna from the I/P carrier. Refer to Global Positioning System (GPS) Antenna Replacement .
- Remove the remote control door lock receiver. Refer to Remote Control Door Lock Receiver Replacement .
- Remove the steering wheel from the steering column. Refer to Steering Wheel Replacement .
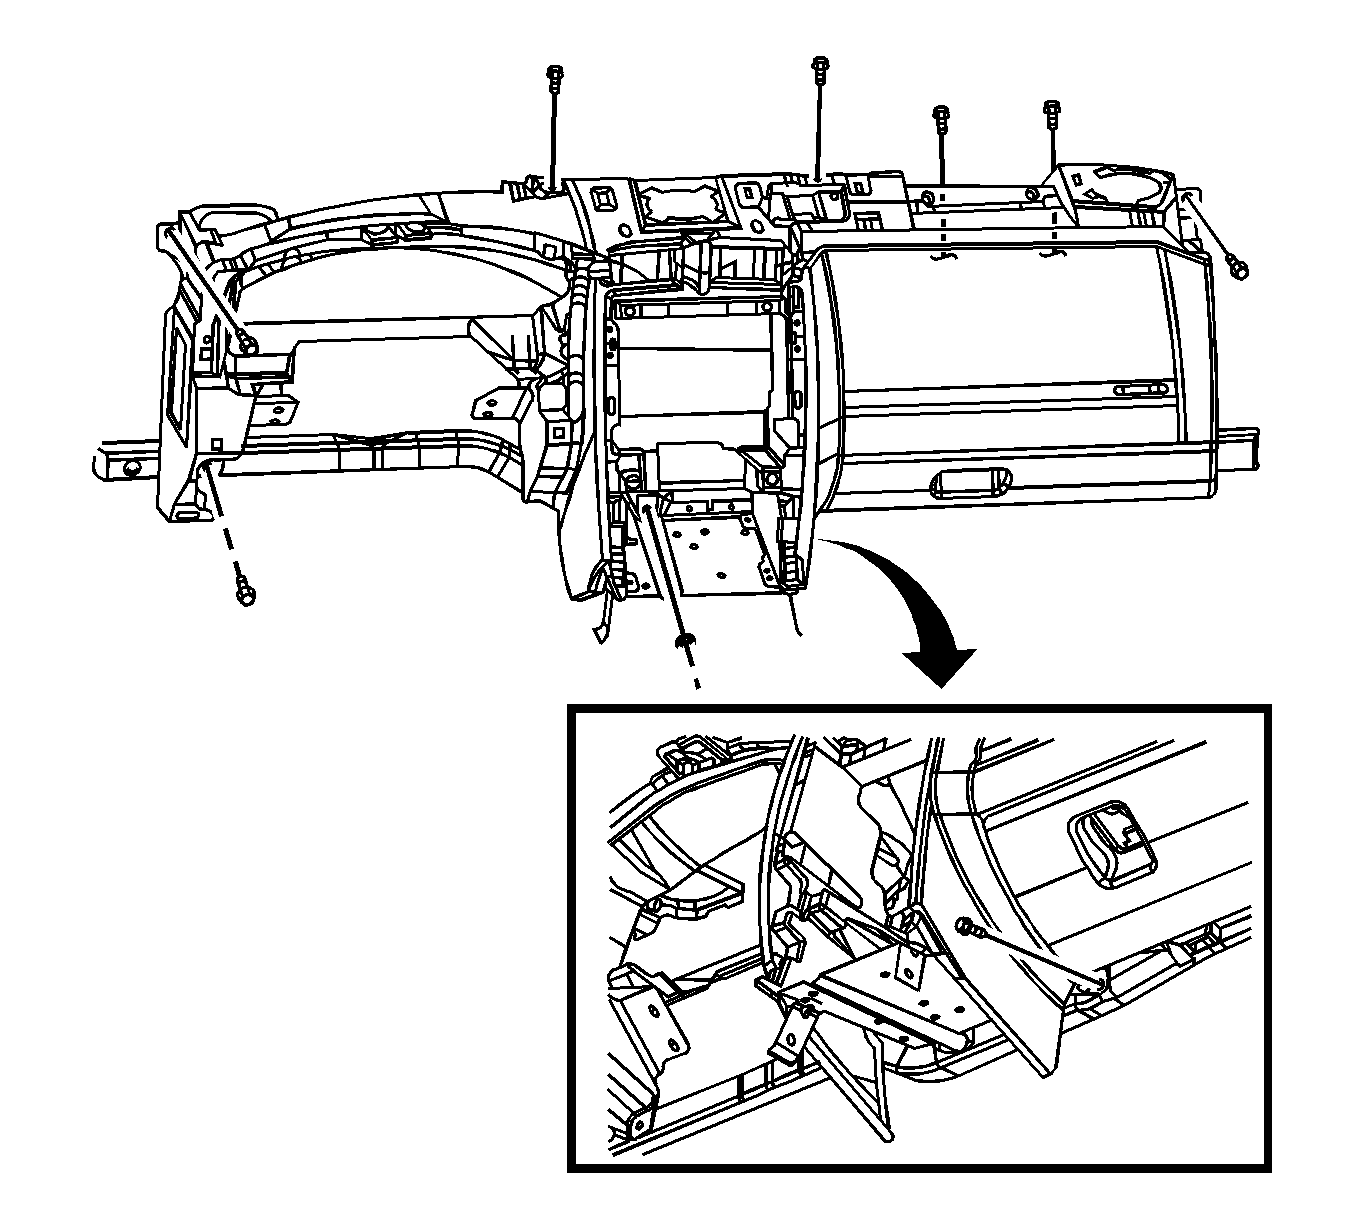
- Remove the retaining bolts and nuts from the I/P carrier.
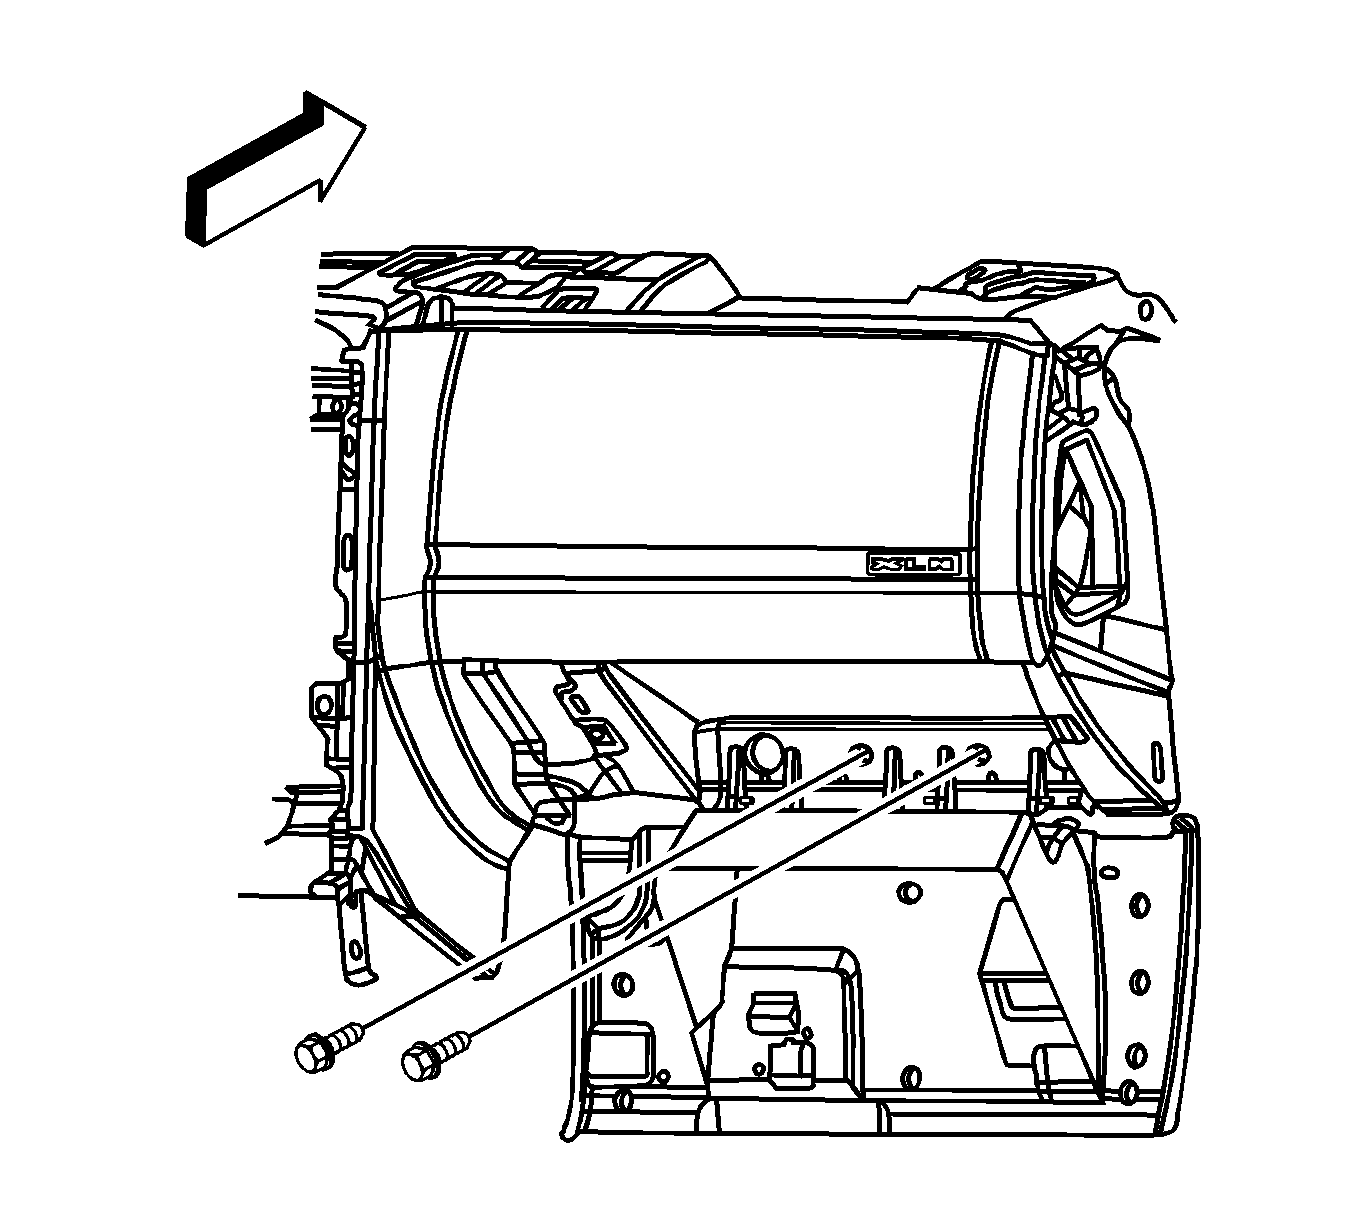
- Remove the retaining bolts from the lower beam behind the I/P compartment door.
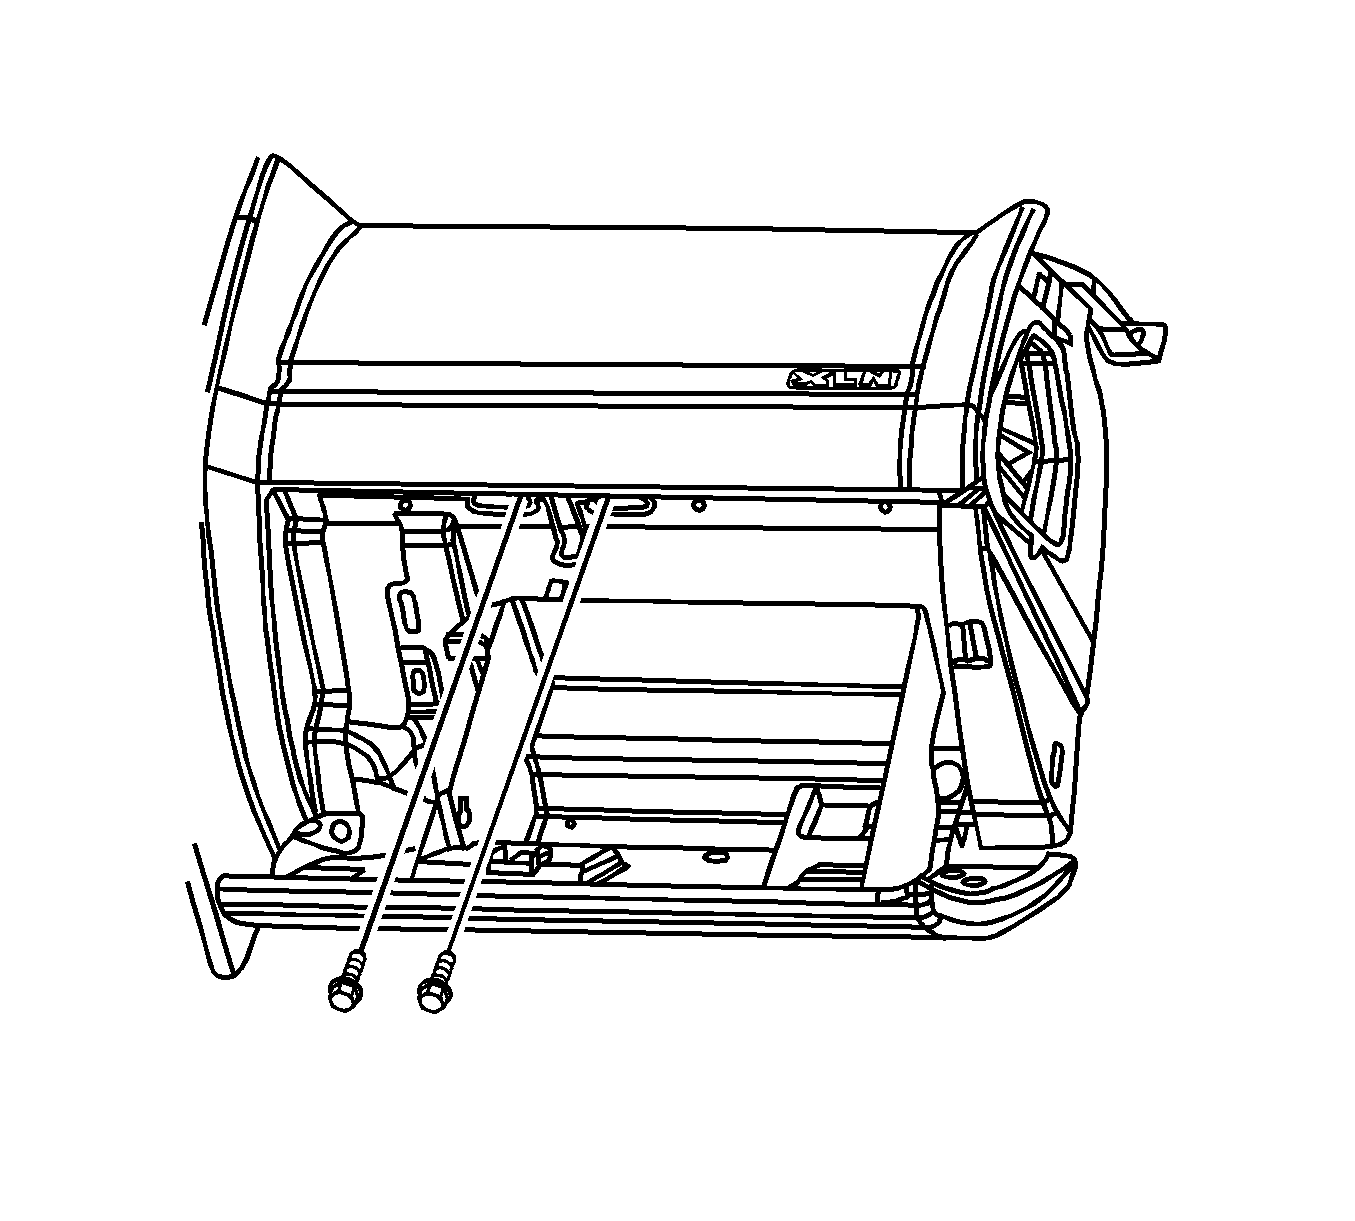
- Remove the I/P compartment striker from the I/P carrier.
- Remove the I/P carrier from the mounting and slowly route all of the wiring from the I/P carrier.
- Remove the I/P carrier from the vehicle.
Caution: Refer to SIR Caution in the Preface section.
Caution: Refer to Battery Disconnect Caution in the Preface section.


Installation Procedure
- Position the I/P carrier to the lower and the upper I/P beams.
- Route the I/P wiring harness.
- Install the retaining bolts and nuts to the I/P carrier.
- Install the I/P compartment striker.
- Install the I/P retaining bolt at the lower beam behind the I/P compartment door.
- Install the steering wheel to the steering column. Refer to Steering Wheel Replacement .
- Install the remote control door lock receiver. Refer to Remote Control Door Lock Receiver Replacement .
- Install the GPS antenna to the I/P carrier. Refer to Global Positioning System (GPS) Antenna Replacement .
- Install the SDM and the YAW sensors to the I/P carrier.
- Install the speakers to the I/P. Refer to Radio Front Speaker Replacement .
- Install the I/P cluster (IPC). Refer to Instrument Cluster Replacement .
- Install the I/P trim pad. Refer to Instrument Panel Trim Pad Replacement .
- Install the right and the left I/P end caps.
- Install the windshield side garnish moldings. Refer to Windshield Side Garnish Molding Replacement .
- Install the right and the left hinge pillar trim. Refer to Body Hinge Pillar Trim Panel Replacement .
- Install the right and the left I/P trim panels. Refer to Instrument Panel Trim Panel Replacement - Left Side and to Instrument Panel Trim Panel Replacement - Right Side .
- Install the left knee bolster bracket. Refer to Driver Knee Bolster Bracket Replacement .
- Install the I/P compartment trim bezel. Refer to Instrument Panel Compartment Trim Bezel Replacement .
- Install the I/P compartment. Refer to Instrument Panel Compartment Replacement .
- Install the closeout/insulator panels. Refer to Instrument Panel Insulator Panel Replacement - Right Side and to Instrument Panel Insulator Panel Replacement - Left Side .
- Install the radio. Refer to Radio Replacement .
- Install the console assembly. Refer to Console Replacement .
- Connect the battery ground cable. Refer to Battery Negative Cable Disconnection and Connection .
- Enable the SIR system. Refer to SIR Disabling and Enabling .
Notice: Refer to Fastener Notice in the Preface section.

Tighten
Tighten the bolts to 10 N·m (89 lb in).

Tighten
Tighten the striker to 1.9 N·m (17 lb in).

Tighten
Tighten the bolt to 10 N·m (89 lb in).
Caution: Refer to Battery Disconnect Caution in the Preface section.
Caution: Refer to SIR Caution in the Preface section.
