Roof Side Rail Inflatable Restraint Module Replacement LHD
Removal Procedure
- Disable the SIR system. Refer to SIR Disabling and Enabling .
- Remove the windshield garnish moulding. Refer to Windshield Garnish Molding Replacement .
- Remove the sunshade from the headliner. Refer to Sunshade Replacement .
- Remove the assist handles from the headliner. Refer to Sunshade Replacement .
- Remove the lower centre pillar trim panel. Refer to Center Pillar Lower Trim Panel Replacement .
- Remove the upper centre pillar trim panel. Refer to Center Pillar Upper Trim Panel Replacement .
- Remove the rear window shelf trim panel. Refer to Rear Window Shelf Trim Panel Replacement .
- Remove the rear quarter pillar trim panel. Refer to Quarter Lower Rear Trim Panel Replacement .
- Remove the rear quarter pillar trim panel. Refer to Quarter Upper Trim Panel Replacement .
- Lower the headliner in order to gain access to the roof rail module. Refer to Headlining Trim Panel Replacement .
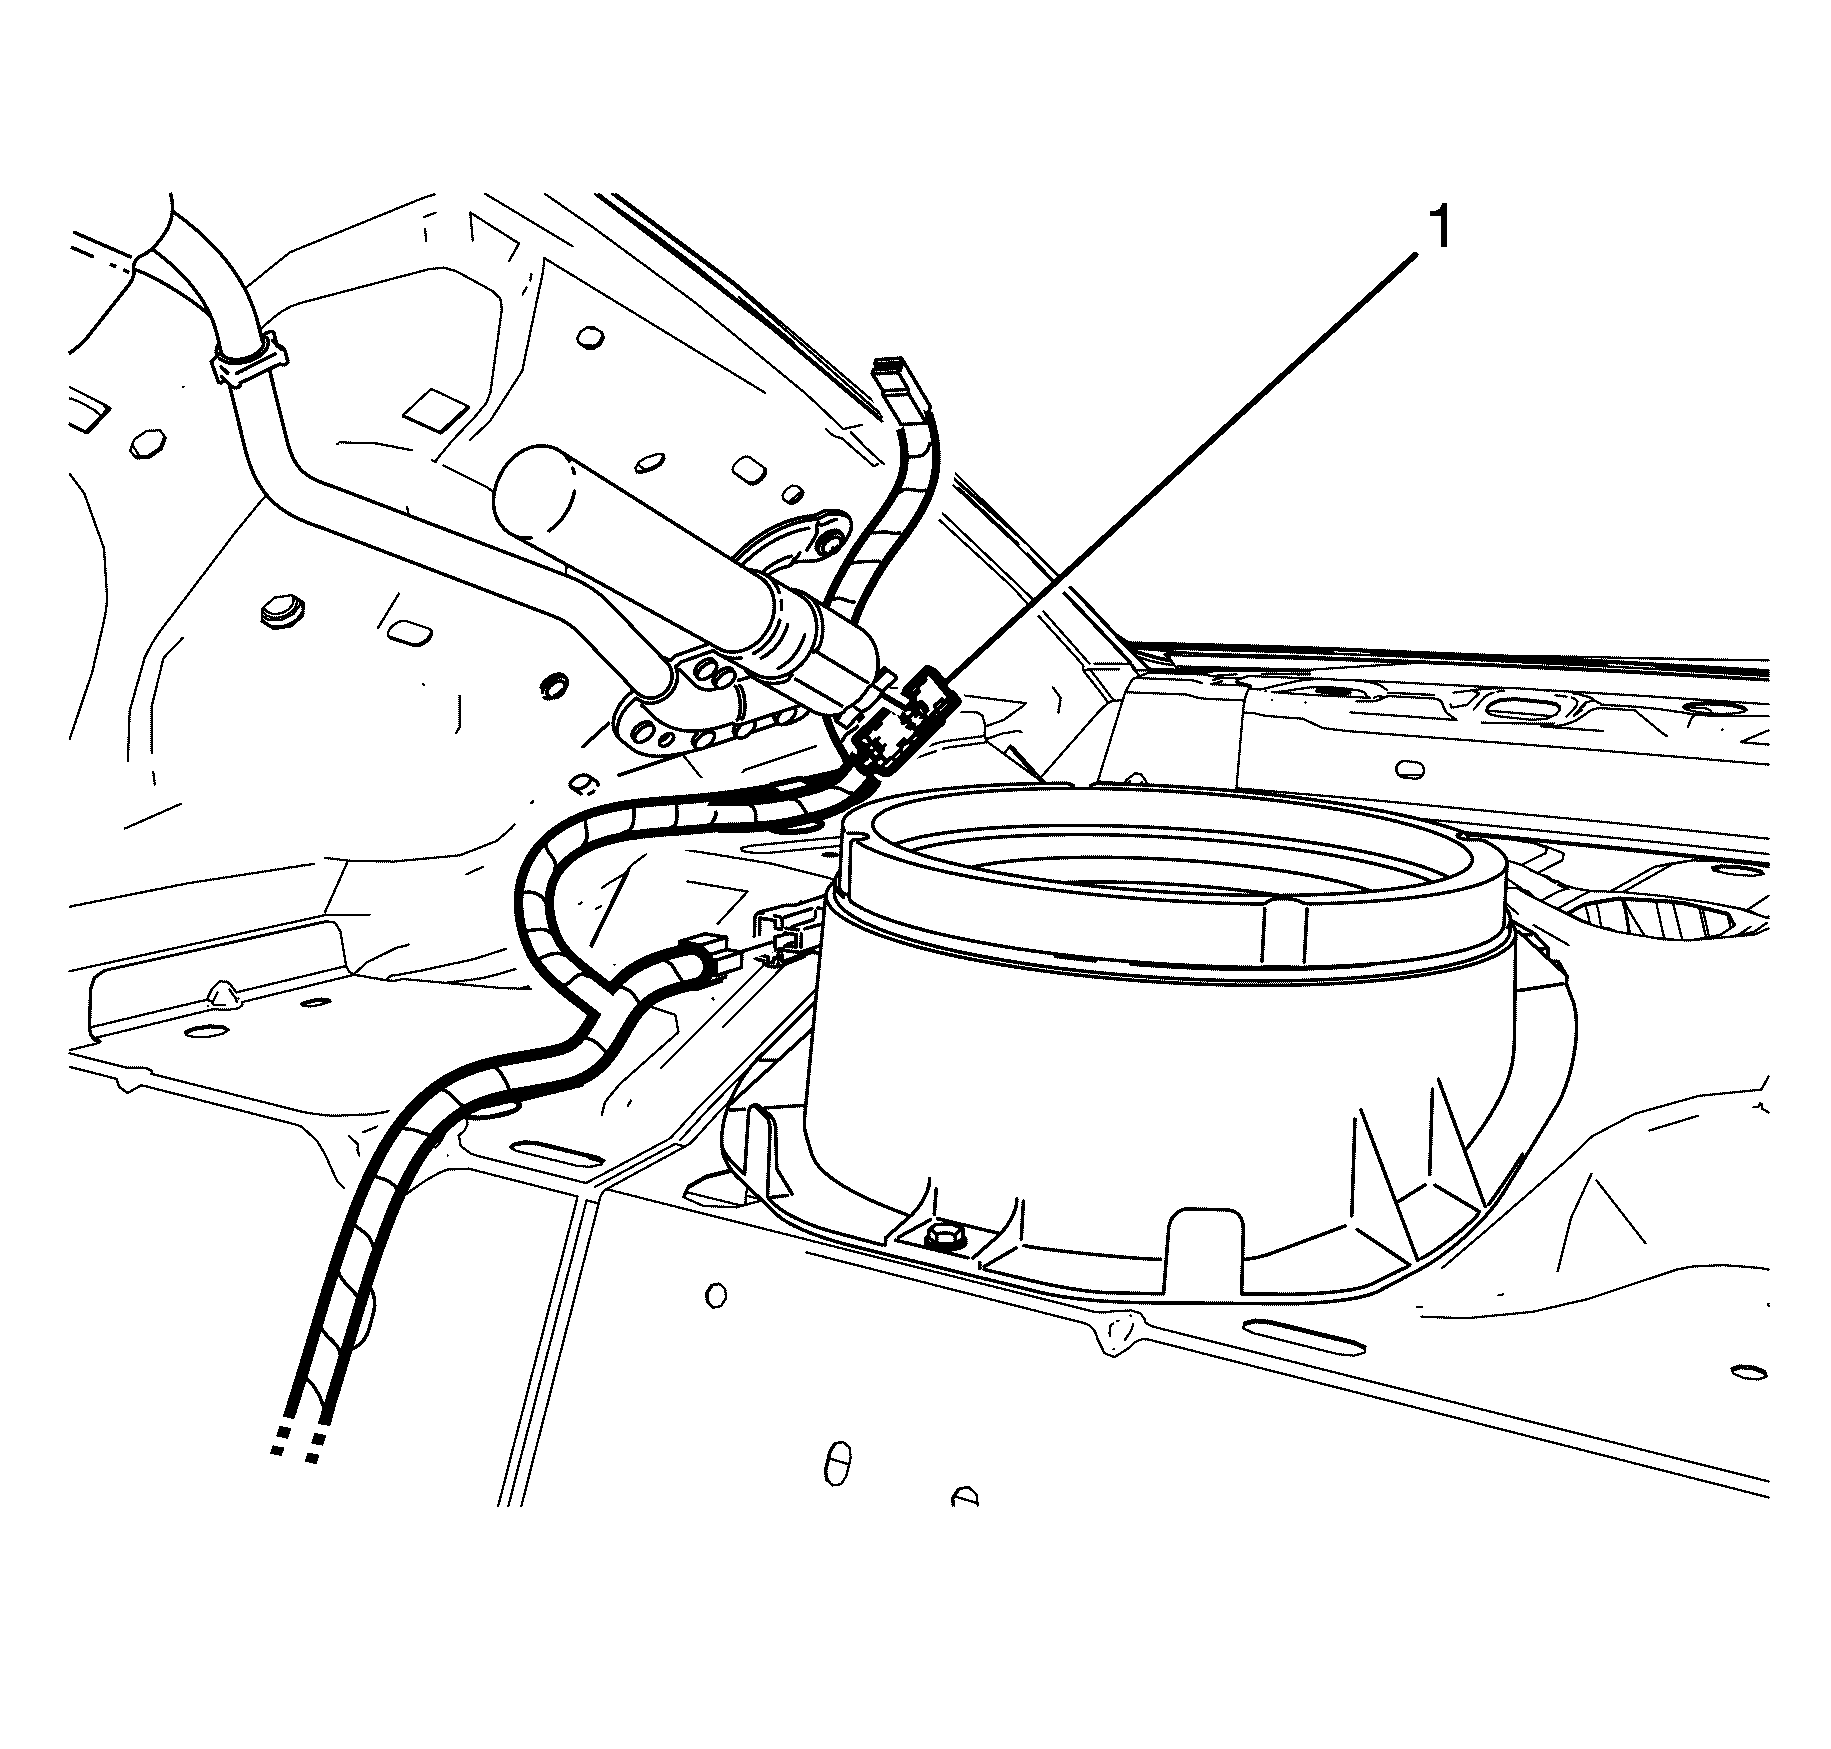
- Disconnect the harness connector (1) from the roof rail module.
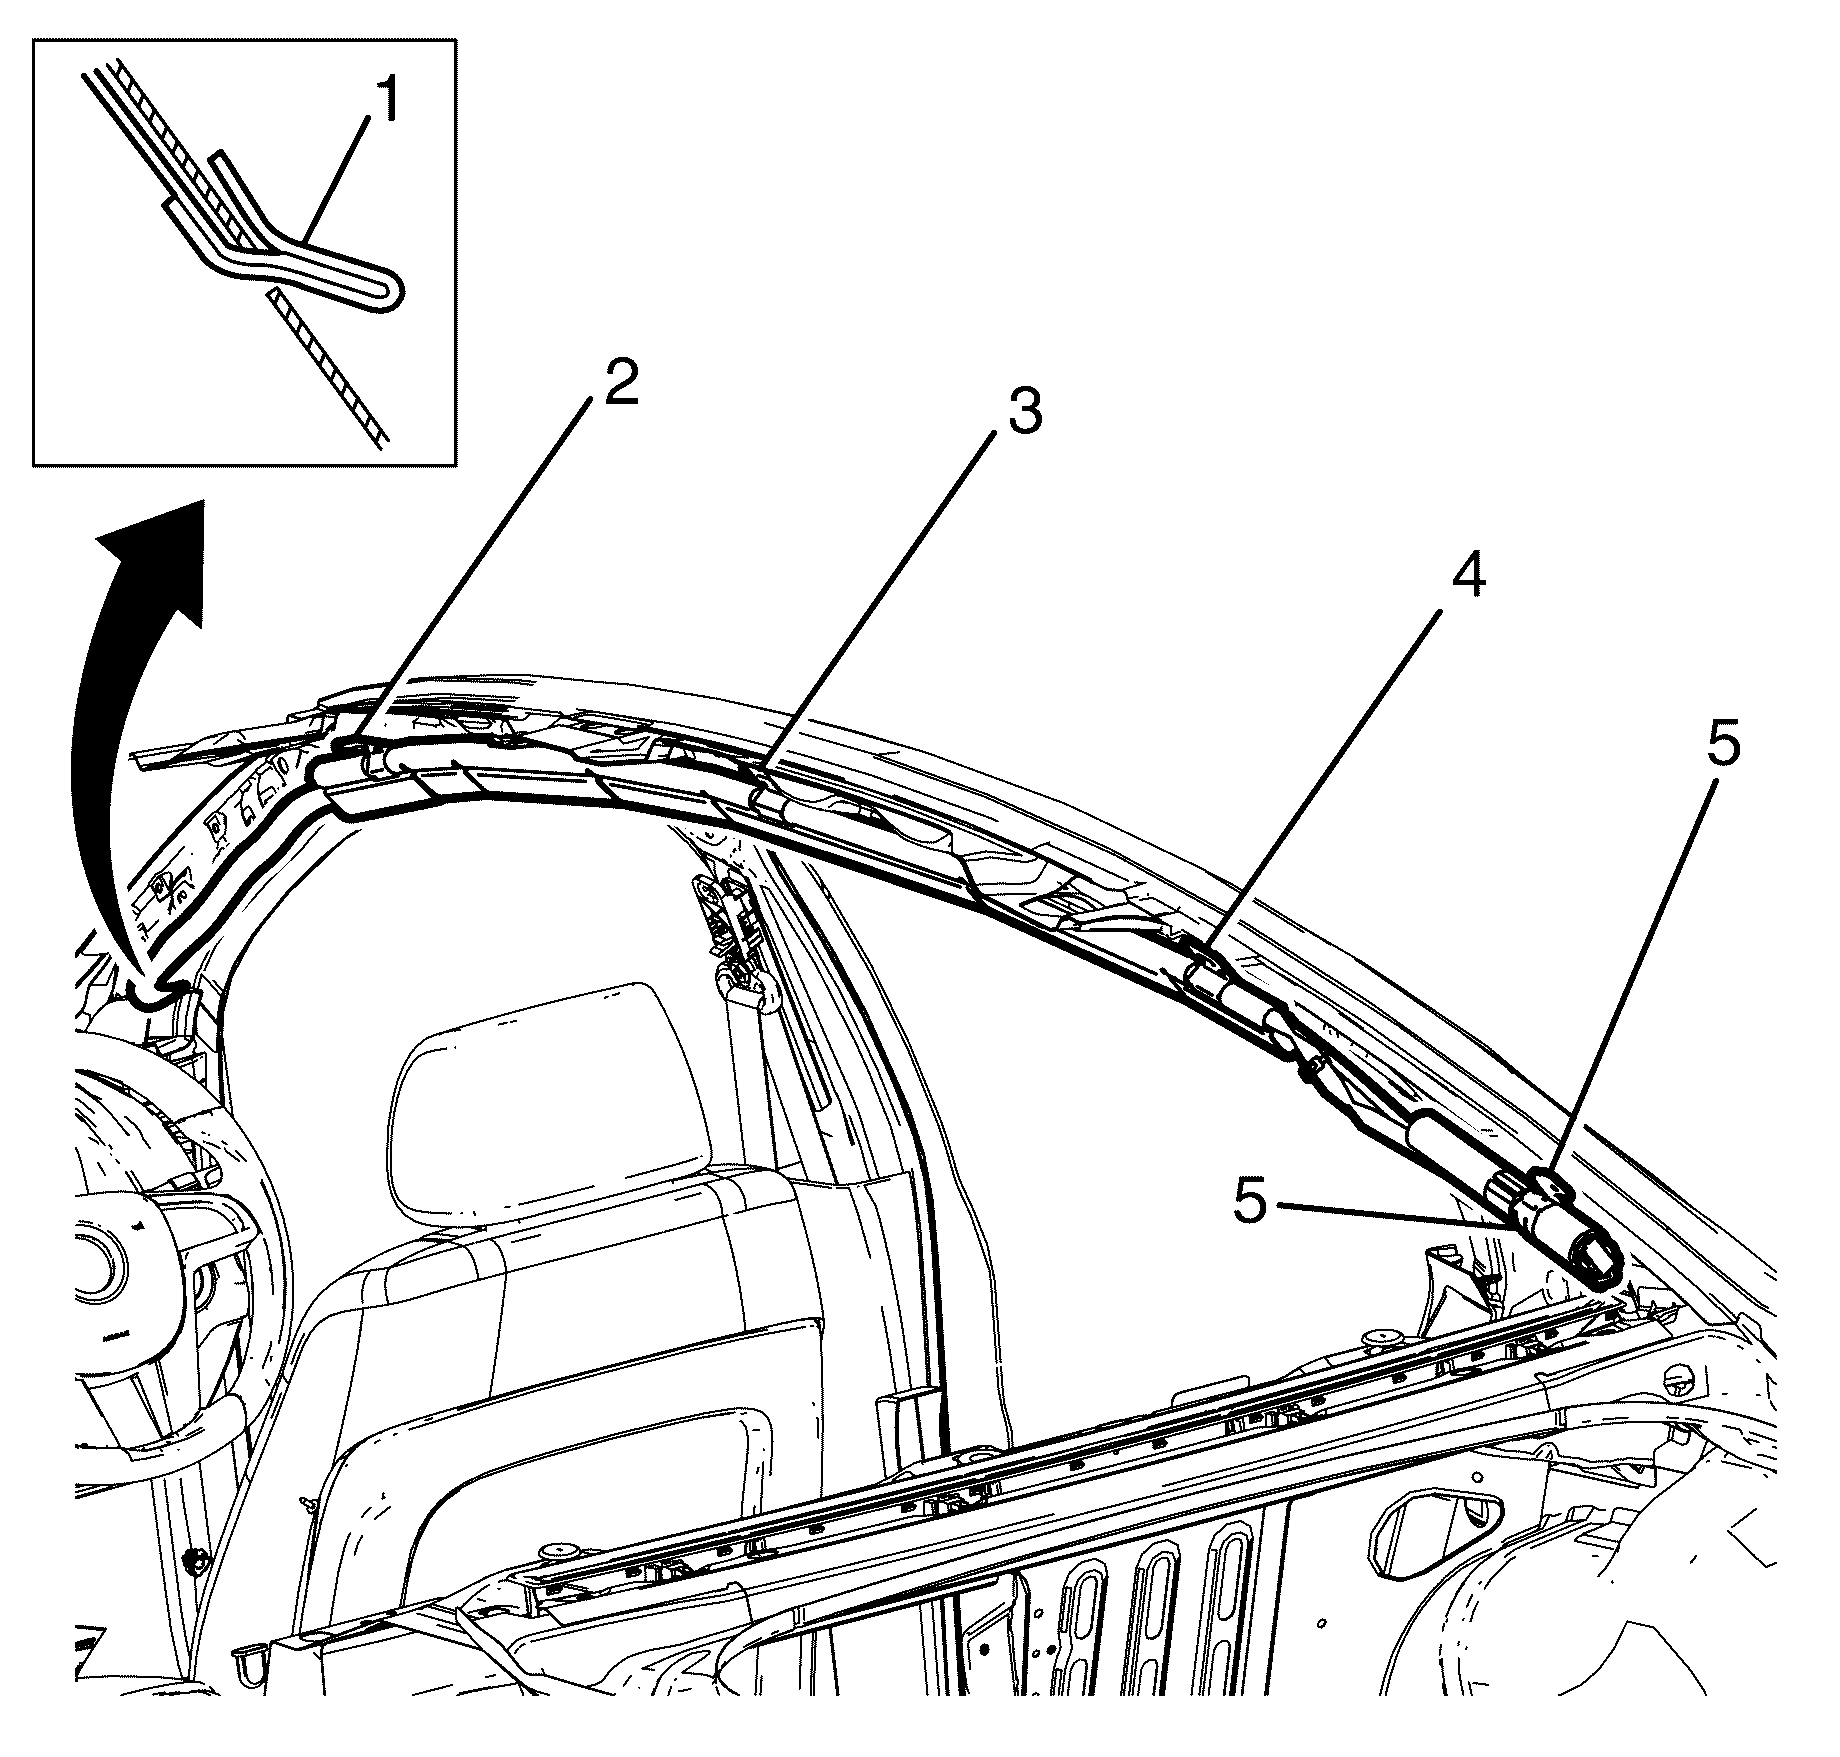
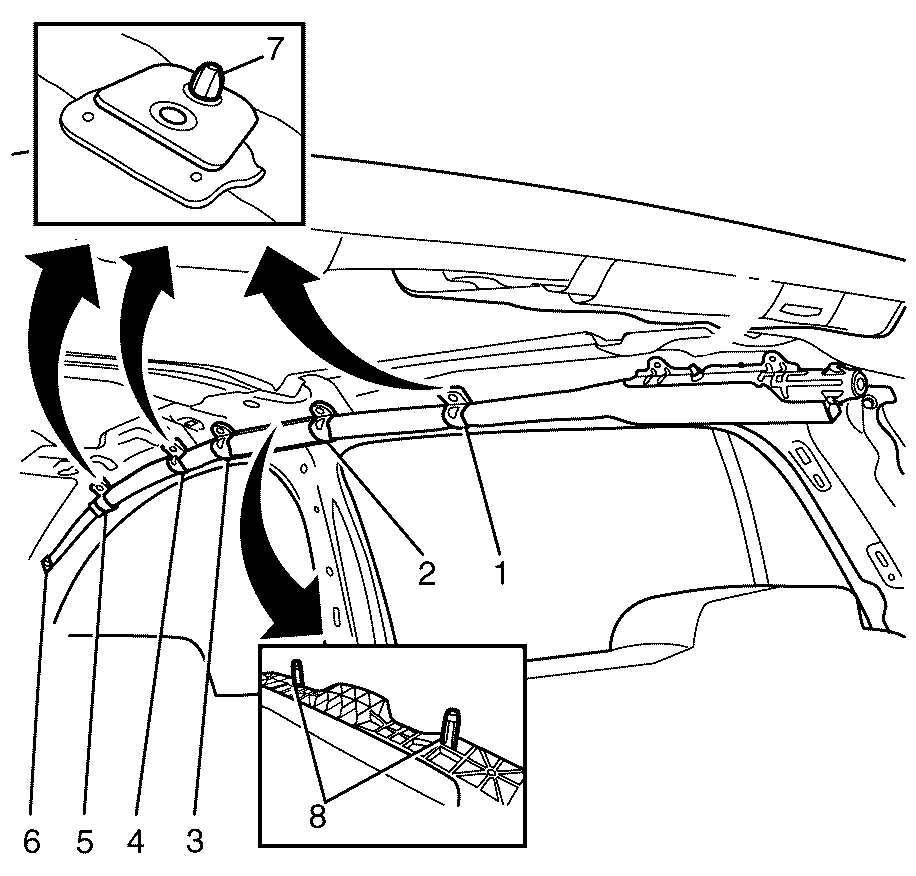
- Remove the following roof rail bolts in sequence (5), (4), (3), and (2), then unhook the tether (1).
- With the aid of an assistant lift the roof rail upwards towards the roof making sure to un-hook the mounting points on the roof.
- For deployment procedure. Refer to Inflator Module Handling and Scrapping .
Caution: Refer to SIR Caution in the Preface section.
Caution: Refer to SIR Inflator Module Handling and Storage Caution in the Preface section.
Installation Procedure
- Remove any dirt, grease, or other impurities from the mounting surface.
- With the aid of an assistant carefully replace the roof rail upwards towards the roof making sure the hooks are seated correctly in place on the roof.
- Install the mounting fasteners to the inflatable restraint roof rail module in the following order (2), (3), (4), (5) and then the tether hook (1).
- Re-connect the harness connector (1) to the roof rail module.
- Raise the headliner. Refer to Headlining Trim Panel Replacement .
- Replace the rear quarter pillar trim panel. Refer to Quarter Upper Trim Panel Replacement .
- Replace the rear quarter pillar trim panel. Refer to Quarter Upper Trim Panel Replacement .
- Replace the rear window shelf trim panel. Refer to Rear Window Shelf Trim Panel Replacement .
- Replace the upper centre pillar trim panel. Refer to Rear Window Shelf Trim Panel Replacement .
- Replace the lower centre pillar trim panel. Refer to Center Pillar Lower Trim Panel Replacement .
- Replace the windshield garnish moulding. Refer to Windshield Garnish Molding Replacement .
- Replace the sunshade from the headliner. Refer to Sunshade Replacement .
- Replace the assist handles from the headliner. Refer to Assist Handle Replacement .
- Enable the SIR system. Refer to Assist Handle Replacement .
Caution: Refer to SIR Caution in the Preface section.
Caution: Refer to SIR Inflator Module Handling and Storage Caution in the Preface section.
Caution: In order to prevent accidental deployment of the air bag which could cause personal injury, do not dispose of an undeployed inflator module as normal shop waste. The undeployed inflator module contains substances that could cause severe illness or personal injury if the sealed container is damaged during disposal. Use the following deployment procedures to safely dispose of an undeployed inflator module. Failure to dispose of an inflator module as instructed may be a violation of federal, state, province, or local laws.
Notice: Refer to Fastener Notice in the Preface section.

Tighten
Tighten the fasteners to 6 N·m (53 lb in).

Roof Side Rail Inflatable Restraint Module Replacement Sportwagon
Removal Procedure
Caution: Refer to SIR Caution in the Preface section.
Caution: Refer to SIR Inflator Module Handling and Storage Caution in the Preface section.
- Disable the SIR system. Refer to SIR Disabling and Enabling.
- Remove the headlining. Refer to Headlining Trim Panel Replacement.
- Disengage the roof rail module electrical connector retaining clip (3) from the roof rail module electrical connector (2).
- Disconnect the roof rail module electrical connector (2) from the roof rail module (1).
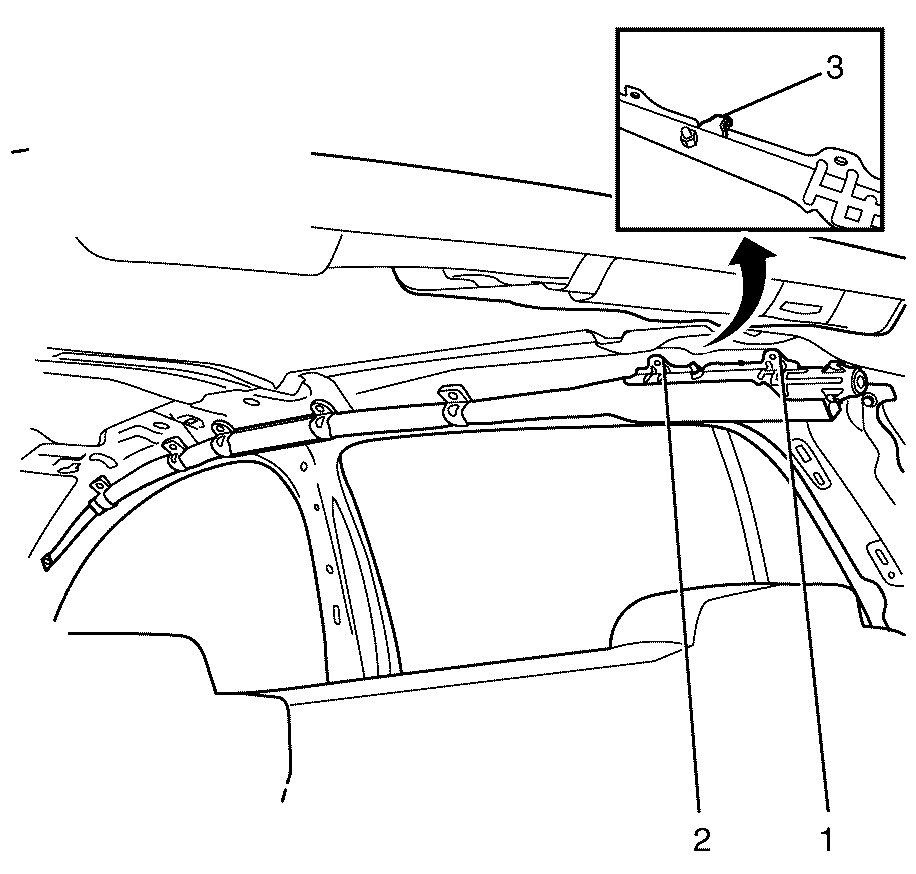
- Remove the roof rail module bolts (1), (2).
- With the aid of an assistant carefully lift the roof rail module up towards the roof to unhook the mounting point (3).
- Remove the following roof rail module bolts in sequence (1), (2), (3), (4), (5), (6).
- Release the datum pins (7), (8) from the vehicle.
- Remove the roof rail module from the vehicle.
- For deployment procedure. Refer to Inflator Module Handling and Scrapping.
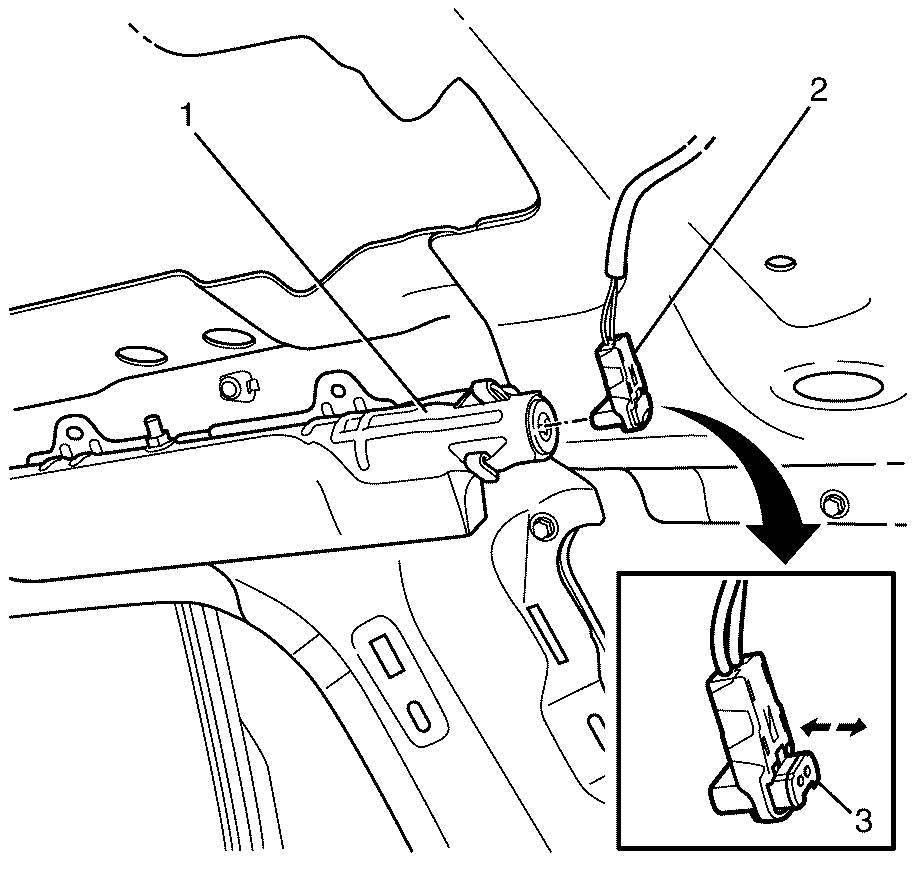
Important: The roof rail module electrical connector retaining clip (3) must be released prior to removing the roof rail module electrical connector (2).
Installation Procedure
- Remove any dirt, grease, or other impurities from the mounting surface.
- With the aid of an assistant carefully position the roof rail module up towards the roof making sure the datum pins (7) and (8) are correctly seated in place on the roof.
- Install the roof rail module bolts to the roof in the following sequence (6), (5), (4), (3), (2), (1).
- Tighten the roof rail module bolts to the roof in the following sequence (6), (5), (4), (3), (2), (1).
- With the aid of an assistant carefully hook the mounting point (3) to the roof.
- Install the roof rail module bolts to the roof in the following sequence (2), (1).
- Tighten the roof rail module bolts to the roof in the following sequence (2), (1).
- Install the roof rail module electrical connector (2) to the roof rail module (1).
- Engage the roof rail module electrical connector retaining clip (3) into the roof rail module electrical connector (2).
- Install the headliner. Refer to Headlining Trim Panel Replacement.
- Enable the SIR system. Refer to SIR Disabling and Enabling.
- If re-programming is required. Refer to Control Module References.
Caution: Refer to SIR Caution in the Preface section.
Caution: Refer to SIR Inflator Module Handling and Storage Caution in the Preface section.
Caution: In order to prevent accidental deployment of the air bag which could cause personal injury, do not dispose of an undeployed inflator module as normal shop waste. The undeployed inflator module contains substances that could cause severe illness or personal injury if the sealed container is damaged during disposal. Use the following deployment procedures to safely dispose of an undeployed inflator module. Failure to dispose of an inflator module as instructed may be a violation of federal, state, province, or local laws.
Notice: Refer to Fastener Notice in the Preface section.

Tighten
Tighten the bolts to 7 N·m (62 lb in).

Tighten
Tighten the bolts to 7 N·m (62 lb in).

Important : Make sure the roof rail module electrical connector retaining clip (3) seats into the roof rail module electrical connector (2).
