Removal Procedure
Notice: The following procedure covers the removal and the installation of the gearshift assembly. The gearshift comes as an assembly, and is not to be serviced as individual components.
Tools Required
| • | J 3289-20 Bench Mount |
| • | J 37337 Transmission Support and Fixture Tools |
- Drain the oil from the transmission. Refer to Oil Drain and Fill .
- Remove the transmission from the vehicle. Refer to Transmission Removal .
- Install the J 37337 Transmission Support and Fixture Tools and the J 3289-20 Bench Mount.
- Rotate the transmission vertically.
- Shift the transmission into 1ST speed gear.
- Remove the following parts:
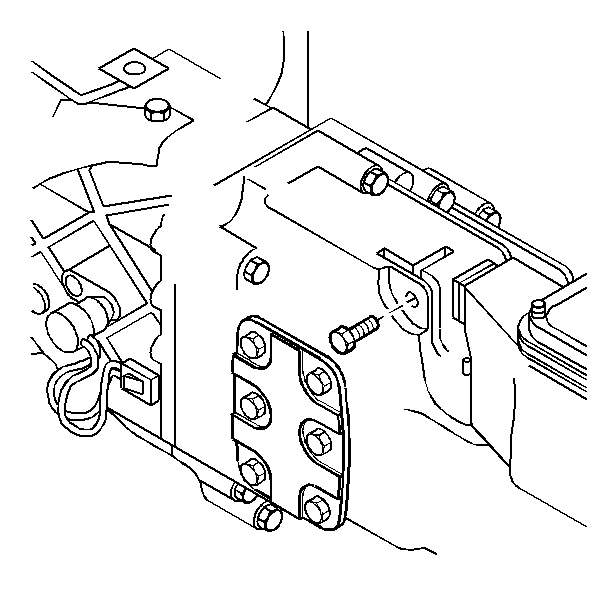
- Remove the rear support bracket bolts and the rear support bracket.
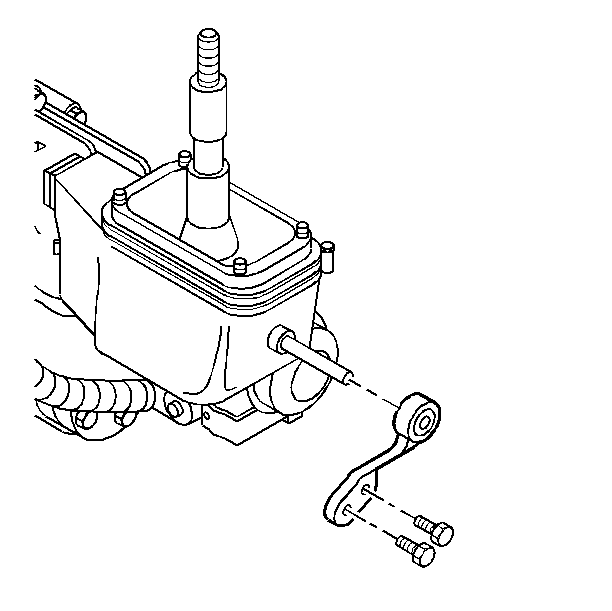
- Remove the gear shift control arm bolt.

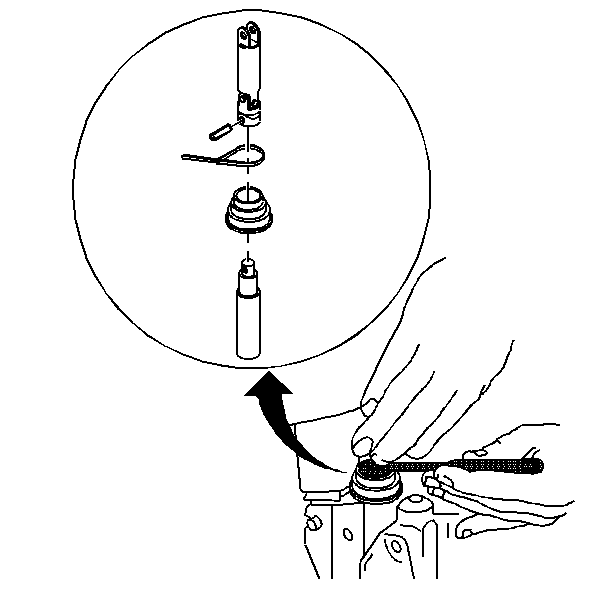
| 6.1. | The cable tie |
| 6.2. | The gear shift shaft pin (Use a drift.) |
Pull the boot back in order to expose the gear shift rod.
Slide the snap ring on the gear shift rod to expose the gear shift shaft pin.


Remove the gear shift assembly from the transmission.
Installation Procedure
Tools Required
| • | J 3289-20 Bench Mount |
| • | J 37337 Support and Fixture Tools |
- Install the J 37337 Support and Fixture Tools and the J 3289-20 Bench Mount.
- Rotate the transmission vertically.
- Install the following parts:
- Install the gearshift shaft pin.
- Assemble the gearshift rod with the linkage pin to the gearshift shaft.
- Install the snap ring into the gearshift rod groove.
- Install a new cable tie.
- Install the rear support bracket and the two bolts.
- Remove the J 37337 Support and Fixture Tools and theJ 3289-20 Bench Mount.
- Shift the transmission into neutral gear.
- Install the transmission in the vehicle. Refer to Transmission Installation .
- Fill the transmission with oil. Refer to Oil Drain and Fill .

| 3.1. | The gearshift assembly to the transmission |
Align the gearshift rod with the gearshift shaft.
| 3.2. | The control arm bolt |
Tighten
The control arm bolt to 25 N·m(19 lb ft).
Notice: Use the correct fastener in the correct location. Replacement fasteners must be the correct part number for that application. Fasteners requiring replacement or fasteners requiring the use of thread locking compound or sealant are identified in the service procedure. Do not use paints, lubricants, or corrosion inhibitors on fasteners or fastener joint surfaces unless specified. These coatings affect fastener torque and joint clamping force and may damage the fastener. Use the correct tightening sequence and specifications when installing fasteners in order to avoid damage to parts and systems.


Tighten
The bolts to 25 N·m(18 Ib ft).
