Endgate Replacement Except HSV Maloo
Removal Procedure
- Support the endgate with a suitable tool.
- Remove the endgate liner. Refer to Pickup Box Endgate Liner Replacement .
- Remove the endgate latch. Refer to Endgate Lock Actuator Replacement .
- Remove the endgate overslam bumper. Refer to Pickup Box Endgate Bumper Replacement .
- Remove the rear licence lamp. Refer to Rear License Lamp Replacement .
- Remove the endgate applique. Refer to Endgate Applique Replacement .
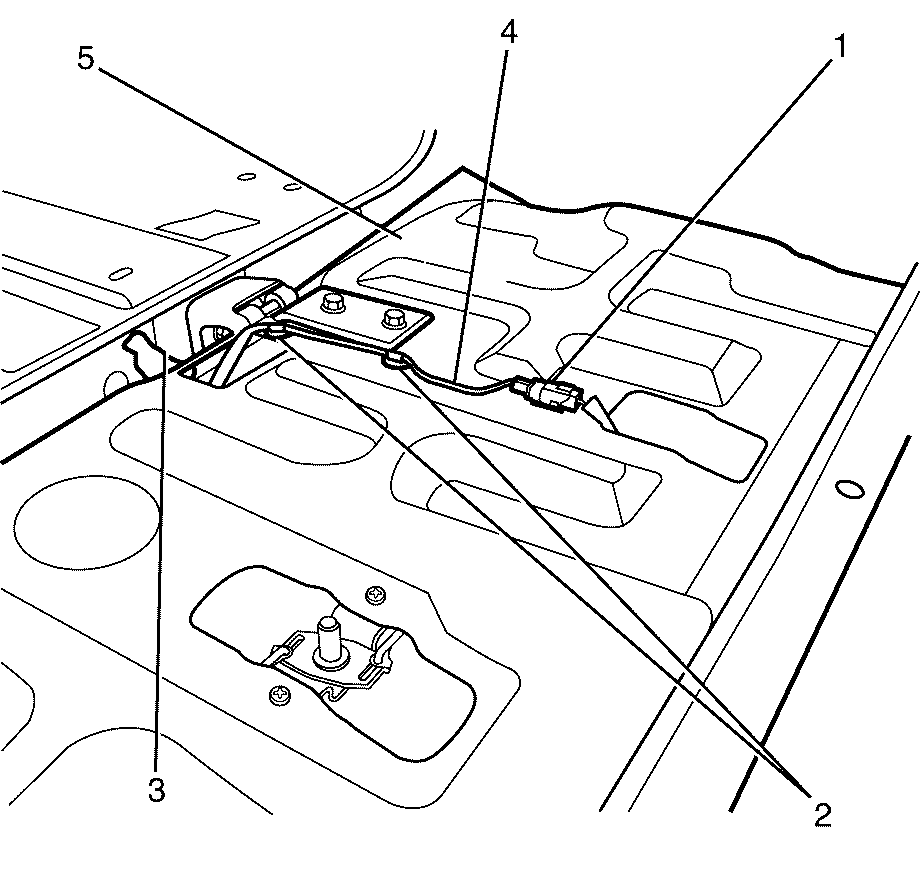
- Remove the endgate wiring harness to endgate retaining clips (2).
- Detach the endgate wiring harness grommet (3) from the endgate access hole and thread the endgate wiring harness (4) through.
- Remove the endgate wiring harness (4) from the endgate (5).
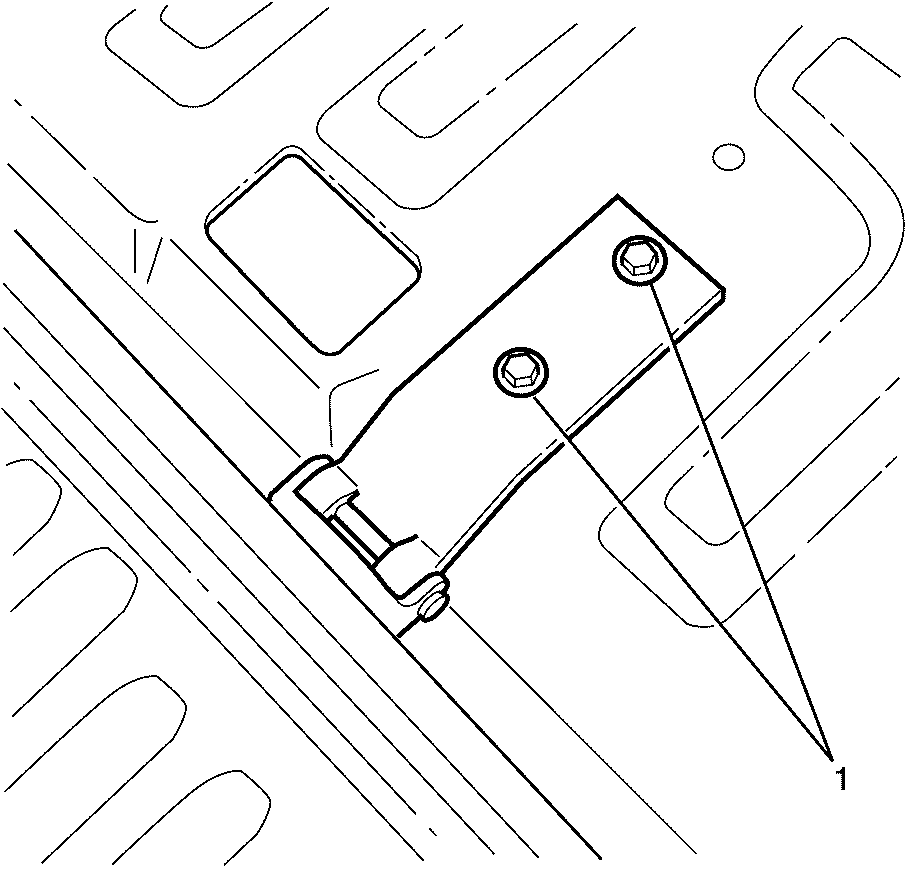
- With the aid of an assistant, remove the endgate to endgate hinge retaining bolts (1). Repeat for opposite side.
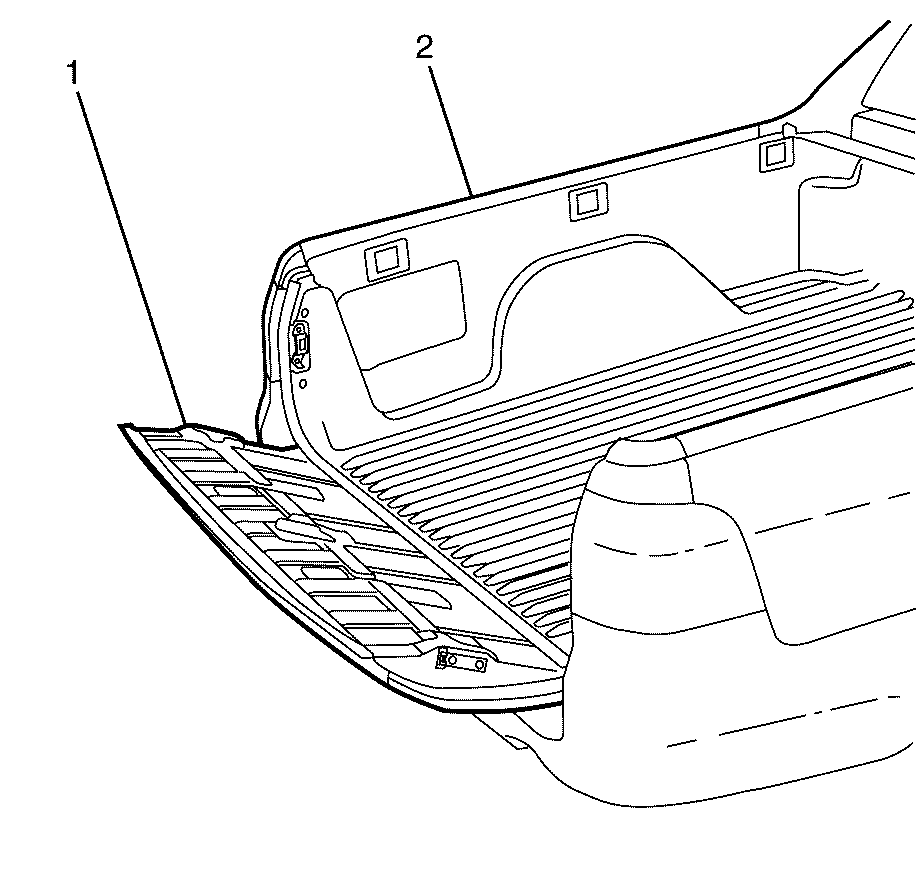
- Remove the endgate (1) from the vehicle (2).
Important: Use a suitable tool to support the endgate during the replacement procedure, this will prevent the endgate and body from being damaged.


Installation Procedure
- Support the endgate with a suitable tool.
- With the aid of an assistant, install the endgate (1) to the vehicle (2).
- With the aid of an assistant, install the endgate to endgate hinge retaining bolts (1). Repeat for opposite side.
- Adjust the endgate as necessary. Refer to Endgate Adjustment .
- Install the endgate wiring harness (4) to the endgate (5).
- Thread the endgate wiring harness (4) through the endgate access hole.
- Install the endgate wiring harness grommet (3).
- Install the endgate wiring harness to endgate retaining clips (2).
- Install the endgate applique. Refer to Endgate Applique Replacement .
- Install the rear licence lamp. Refer to Rear License Lamp Replacement .
- Install the endgate overslam bumper. Refer to Pickup Box Endgate Bumper Replacement .
- Install the endgate latch. Refer to Endgate Lock Actuator Replacement .
- Install the endgate liner. Refer to Pickup Box Endgate Liner Replacement .
- Remove the suitable support tool from the vehicle.

Important: Use a suitable tool to support the endgate during the replacement procedure, this will prevent the endgate and body from being damaged.

Important: The endgate to endgate hinge retaining bolts (1) must not be fully tightened at this stage.
Do not fully tighten at this stage.

Endgate Replacement HSV Maloo
Removal Procedure
- Disconnect the battery ground cable. Refer to Battery Negative Cable Disconnection and Connection.
- Raise the hard tonneau cover.
- Remove the endgate rail cover. Refer to Endgate Upper Finish Molding Endcap Protective Cover Replacement.
- Remove the endgate trim panels. Refer to Customer Concern Verification Sheets .
- Remove the rear licence lamp. Refer to Rear License Lamp Replacement.
- Lower the endgate.
- Remove the endgate liner. Refer to Pickup Box Endgate Liner Replacement.
- Remove the hard tonneau cover catch. Refer to Customer Concern Verification Sheets .
- Remove the endgate overslam bumper. Refer to Pickup Box Endgate Bumper Replacement.
- Disconnect the endgate harness electrical connector (1).
- Remove the endgate wiring harness to endgate retaining clips (2).
- Detach the endgate wiring harness grommet (3) from the endgate access hole and thread the endgate wiring harness (4) through.
- Remove the endgate wiring harness (4) from the endgate (5).
- Disengage the hard tonneau manual release cables. Refer to Customer Concern Verification Sheets.
- With the aid of an assistant, remove the endgate to endgate hinge retaining bolts (1). Repeat for opposite side.
- Remove the endgate (1) from the vehicle (2).
Caution: Refer to Battery Disconnect Caution in the Preface section.
Caution: Refer to Safety Glasses Caution in the Preface section.

Important: Use a suitable non-marking tool to support the endgate during the replacement procedure, this will prevent the endgate and body from being damaged.


Installation Procedure
- Support the endgate with a suitable tool.
- With the aid of an assistant, install the endgate (1) to the vehicle (2).
- With the aid of an assistant, install the endgate to endgate hinge retaining bolts (1). Repeat for opposite side.
- Adjust the endgate as necessary. Refer to Endgate Adjustment.
- Install the endgate wiring harness (4) to the endgate (5).
- Thread the endgate wiring harness (4) through the endgate access hole.
- Install the endgate wiring harness grommet (3).
- Install the endgate wiring harness to endgate retaining clips (2).
- Connect the endgate harness electrical connector (1).
- Install the hard tonneau cover catch. Refer to Customer Concern Verification Sheets.
- Engage the hard tonneau manual release cables. Refer to Customer Concern Verification Sheets.
- Install the endgate overslam bumper. Refer to Pickup Box Endgate Bumper Replacement.
- Install the endgate liner. Refer to Pickup Box Endgate Liner Replacement.
- Raise and close the endgate.
- Install the rear licence lamp. Refer to Rear License Lamp Replacement.
- Install the endgate rail cover. Refer to Endgate Upper Finish Molding Endcap Protective Cover Replacement.
- Install the endgate trim panels. Refer to Customer Concern Verification Sheets.
- Lower the hard tonneau cover and check for clearance.
- Adjust the endgate as necessary. Refer to Endgate Adjustment.
- Connect the battery ground cable. Refer to Battery Negative Cable Disconnection and Connection.

Important: Use a suitable non-marking tool to support the endgate during the replacement procedure, this will prevent the endgate and body from being damaged.

Important: The endgate to endgate hinge retaining bolts (1) must not be fully tightened at this stage.
Do not fully tighten at this stage.

