Front Suspension Crossmember Replacement FWD
Removal Procedure
Important: If you are removing the front suspension
crossmember in order to gain access to other components, you may remove the following
components together as a unit:
| • | The front suspension crossmember |
| • | The 2 lower control arms |
| • | The front stabilizer shaft |
| • | The steering gear, if necessary |
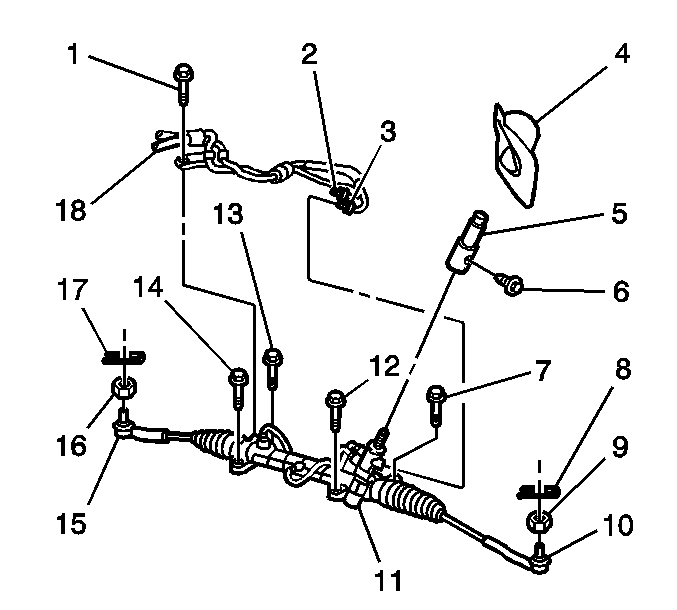
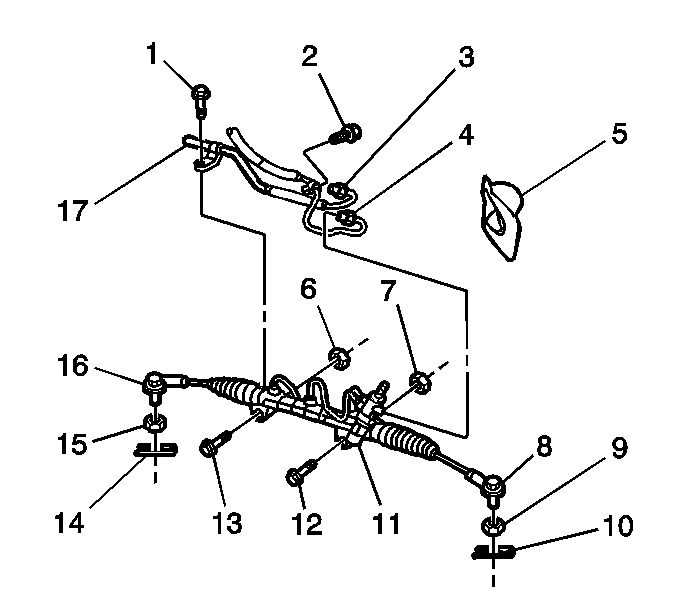
- If you are removing the crossmember WITH the steering gear, remove the following
components. Refer to
Steering Gear Replacement
in
Power Steering.
| • | The lower steering shaft coupling bolt |
| • | The steering column hole cover |
| • | The 2 outer tie rod ends |
| • | The pressure and return pipes |
- Install the engine support fixture. Refer to
Engine Support Fixture
in Engine Mechanical - 1.8L (LV6) or to
Engine Support Fixture
in Engine Mechanical -
1.8L (LNK).
- Raise and support the vehicle. Refer to
Lifting and Jacking the Vehicle
in General Information.
- Remove the front tire and wheel assemblies from the vehicle. Refer to
Tire and Wheel Removal and Installation
in
Tires and Wheels.
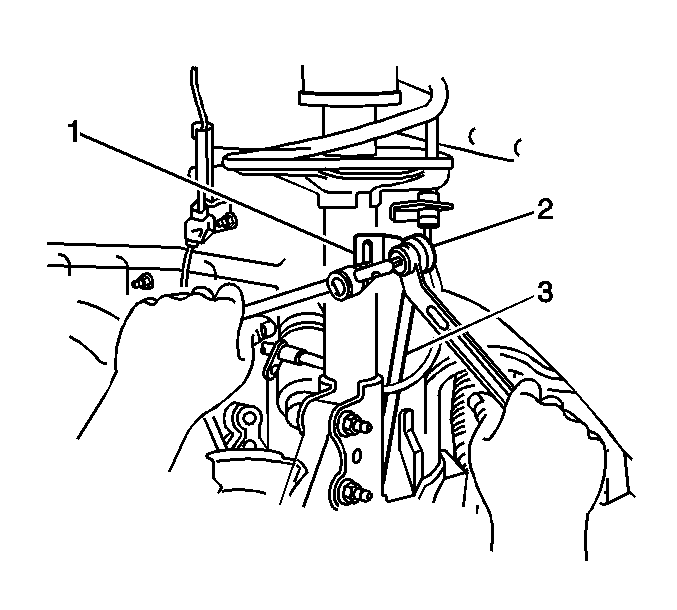
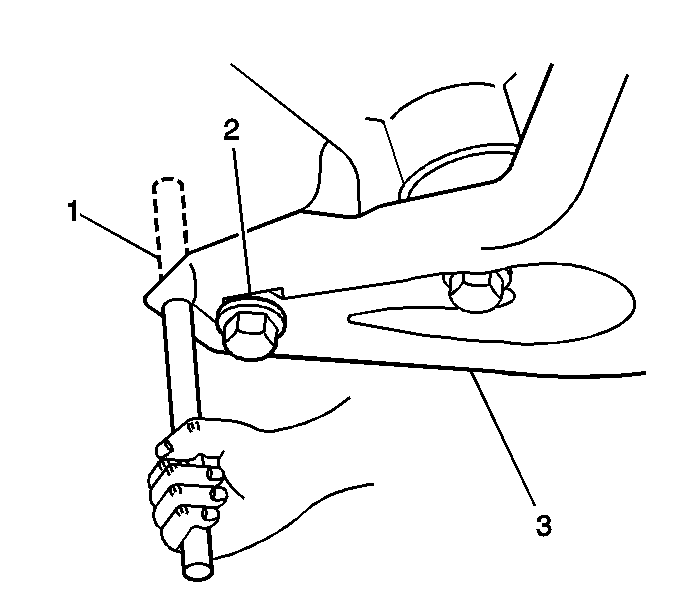
- Use a 6 mm wrench in order to hold
the left front stabilizer shaft link stud. Remove the nut from the stud in order to
separate the link (3) from the left front strut.
- Use a 6 mm wrench in order to hold the right front stabilizer shaft
link stud. Remove the nut from the stud in order to separate the link from the right
front strut.
- Remove the left engine splash shield. Refer to
Engine Splash Shield Replacement - Left Side
in Body Front End.
- Remove the right engine splash shield. Refer to
Engine Splash Shield Replacement - Right Side
in Body Front End.
- Remove the following components from the
left control arm:
- Remove the following components from the right control arm:
- If you are removing the crossmember WITHOUT
the steering gear, complete the following steps:
| 11.1. | Use wire in order to suspend the steering gear (11). |
| 11.2. | Remove the 4 bolts (7, 12, 13, 14). |
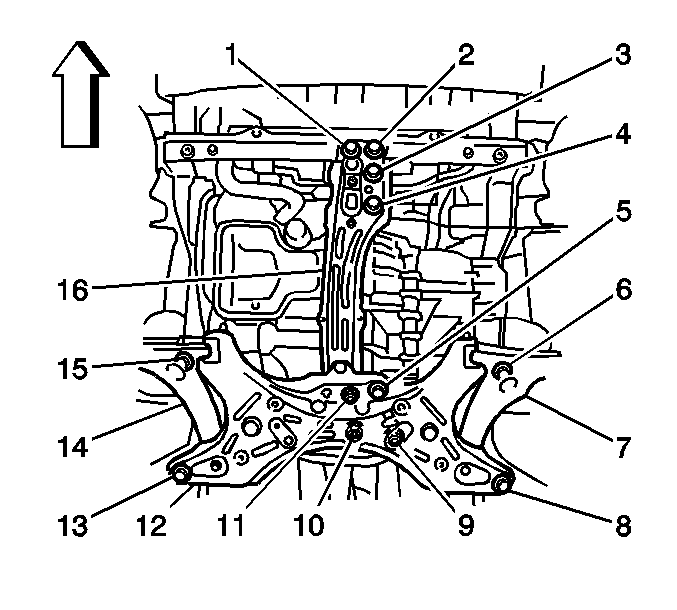
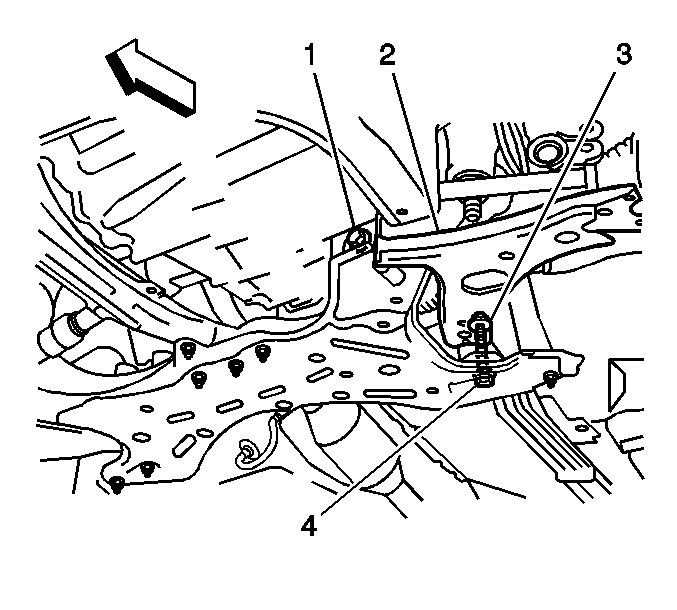
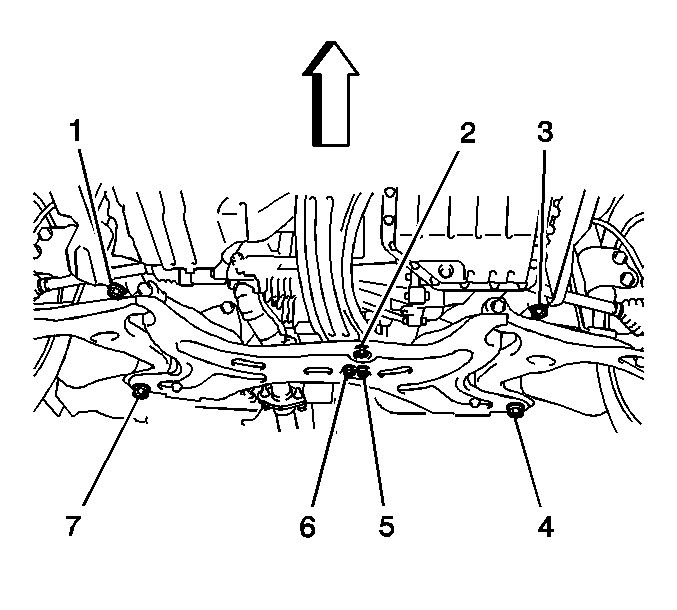
- Remove the 5 bolts (1, 2,
3, 4, 5).
- Remove the 3 nuts (9, 10, 11).
- Support the crossmember with a jack.
- Remove the 4 bolts (6, 8, 13, 15).
- Use the jack in order to lower the crossmember.
Important: If you are replacing the components on the
crossmember, continue with this procedure.
- Remove the 2 bolts and the trans support from the crossmember.
- Remove the 2 control arms. Refer to
Lower Control Arm Replacement
.
- Remove the following components from the crossmember. Refer to
Stabilizer Shaft Replacement
.
| • | The 2 stabilizer shaft link nuts |
| • | The 2 stabilizer shaft links |
| • | The 4 stabilizer clamp bolts |
| • | The 2 stabilizer clamps |
| • | The 2 stabilizer shaft insulators |
- If you removed the crossmember WITH the steering gear, remove the steering
gear from the crossmember. Refer to
Steering Gear Replacement
in Power Steering System.
Installation Procedure
- If you are installing the crossmember WITH the steering gear, install
the steering gear to the crossmember. Refer to
Steering Gear Replacement
in Power Steering System.
- Install the following components to the crossmember. Refer to
Stabilizer Shaft Replacement
.
| • | The 2 stabilizer shaft link nuts |
| • | The 2 stabilizer shaft links |
| • | The 4 stabilizer clamp bolts |
| • | The 2 stabilizer clamps |
| • | The 2 stabilizer shaft insulators |
Important: DO NOT tighten the nut and bolts completely.
The weight of the vehicle must be on the tire and wheel assemblies before tightening
the nut and the bolts.
- Install the following components to the crossmember:
| • | The left lower control arm (2) |
Important: DO NOT tighten the nut and bolts completely.
The weight of the vehicle must be on the tire and wheel assemblies before tightening
the nut and the bolts.
- Install the following components to the crossmember:
| • | The right lower control arm |
Notice: Refer to Fastener Notice in the Preface section.
- Install the trans support and the 2 bolts to the crossmember.
Tighten
Tighten the bolts to 52 N·m (38.4 lb ft).
- Use a jack in order to raise and support the crossmember with the attached
components as a unit.
- Insert a wood dowel (1) into the
hole in the right side of the crossmember (3) and the hole in the body.
- Use the dowel in order to align the bolt holes.
- Install the 2 bolts (1, 2)
to the crossmember.
- Insert the dowel into the hole in the left side of the crossmember and
the hole in the body.
- Use the dowel in order to align the bolt holes.
- Install the 2 bolts to the crossmember (8,
6).
- Insert the dowel into the hole in the right side of the crossmember and
the hole in the body.
- Use the dowel in order to align the bolt holes.
- Install the bolt (13).
Tighten
Tighten the bolt to 157 N·m (115.8 lb ft).
- Install the bolt (15).
Tighten
Tighten the bolt to 113 N·m (83.3 lb ft).
- Insert the dowel into the hole in the left side of the crossmember and
the hole in the body.
- Use the dowel in order to align the bolt holes.
- Install the bolt (8).
Tighten
Tighten the bolt to 157 N·m (115.8 lb ft).
- Install the bolt (6).
Tighten
Tighten the bolt to 113 N·m (83.3 lb ft).
- Remove the jack from the crossmember.
- Install the 3 nuts (9, 10, 11).
Tighten
Tighten the nuts to 52 N·m (38.4 lb ft).
- Install the 5 bolts (1, 2, 3, 4, 5).
Tighten
Tighten the bolts to 52 N·m (38.4 lb ft).
- If you are installing the crossmember WITHOUT
the steering gear, complete the following steps:
| 24.1. | Install the 4 bolts (7, 12, 13, 14). |
Tighten
Tighten the bolts to 58 N·m (42.8 lb ft).
| 24.2. | Remove the wire from the steering gear (11). |
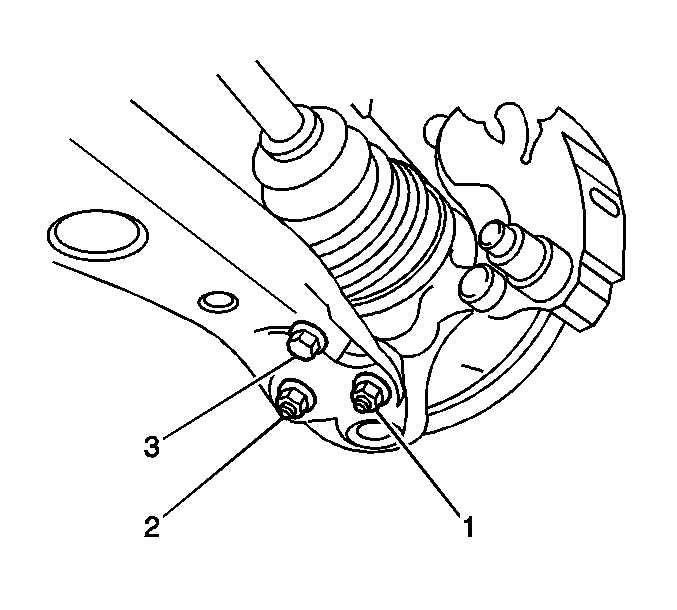
- Install the following to the left front
control arm:
Tighten
Tighten the 2 nuts and the bolt to 89 N·m
(65.6 lb ft).
- Install the following to the right front control arm:
Tighten
Tighten the 2 nuts and the bolt to 89 N·m
(65.6 lb ft).
- Install the left engine splash shield. Refer to
Engine Splash Shield Replacement - Left Side
in Body Front End.
- Install the right engine splash shield. Refer to
Engine Splash Shield Replacement - Right Side
in Body Front End.
- Use a 6 mm wrench in order to hold
the left front stabilizer shaft link stud (2) to the stabalizer link (3).
Install the nut and the stud to the strut bracket (1).
Tighten
Tighten the nut to 74 N·m (54.6 lb ft).
- Use a 6 mm wrench in order to hold the right front stabilizer shaft
link stud (2) to the stabalizer link (3). Install the nut and the stud
to the strut bracket (1).
Tighten
Tighten the nut to 74 N·m (54.6 lb ft).
- Install the front tire and wheel assemblies to the vehicle. Refer to
Tire and Wheel Removal and Installation
in Tires and
Wheels.
- Lower the vehicle.
- Remove the engine support fixture. Refer to
Engine Support Fixture
in Engine Mechanical - 1.8L (LV6) or
Engine Support Fixture
in Engine Mechanical - 1.8L
(LNK).
- If you are installing the crossmember WITH the steering gear, install
the following components. Refer to
Steering Gear Replacement
in Power Steering System.
| • | The lower steering shaft coupling bolt |
| • | The steering column hole cover |
| • | The 2 outer tie rod ends |
| • | The pressure and return pipes |
- With the weight of the vehicle on the tire and wheel assemblies, push
down on the front bumper 3 times in order to bounce the vehicle and stabilize
the suspension.
- Install the nut (3) and the 2 bolts (1,4)
on the left lower control arm.
Tighten
Tighten the nut and the 2 bolts to 137 N·m
(101.0 lb ft).
- Install the nut and the 2 bolts on the right lower control arm.
Tighten
Tighten the nut and the 2 bolts to 137 N·m
(101.0 lb ft).
- Measure the wheel alignment. Adjust if necessary. Refer to
Wheel Alignment Measurement
in Wheel Alignment.
Front Suspension Crossmember Replacement AWD
Removal Procedure
Important: If you are removing the front suspension
crossmember in order to gain access to other components, you may remove the following
components together as a unit:
| • | The front suspension crossmember |
| • | The 2 lower control arms |
| • | The front stabilizer shaft |
| • | The steering gear, if necessary |
- If you are removing the steering gear WITH the crossmember, remove the following
components. Refer to
Steering Gear Replacement
in Power Steering System.
| • | The lower steering shaft coupling bolt |
| • | The steering column hole cover |
| • | The 2 outer tie rod ends |
| • | The pressure and return pipes |
- Install the engine support fixture. Refer to
Engine Support Fixture
in Engine Mechanical - 1.8L (LV6).
- Raise and support the vehicle. Refer to
Lifting and Jacking the Vehicle
in General Information.
- Remove the front tire and wheel assemblies from the vehicle. Refer to
Tire and Wheel Removal and Installation
in Tires and
Wheels.
- Use a 6 mm wrench in order to hold
the left front stabilizer shaft link stud. Remove the nut from the stud in order to
separate the link (3) from the left front strut.
- Use a 6 mm wrench in order to hold the right front stabilizer shaft
link stud. Remove the nut from the stud in order to separate the link from the right
front strut.
- Remove the left engine splash shield. Refer to
Engine Splash Shield Replacement - Left Side
in Body Front End.
- Remove the right engine splash shield. Refer to
Engine Splash Shield Replacement - Right Side
in Body Front End.
- Remove the following components from the
left control arm:
- Remove the following components from the right control arm:
- If you are removing the crossmember WITHOUT
the steering gear, complete the following steps:
| 11.1. | Use wire in order to suspend the steering gear (11). |
| 11.2. | Remove the 2 nuts (6, 7) and the 2 bolts (12, 13). |
- Remove the 2 nuts (2, 5)
and the bolt (6).
- Support the crossmember with a jack.
- Remove the 4 bolts (1, 3, 4, 7).
- Use the jack in order to lower the crossmember.
Important: If you are replacing the components on front
suspension crossmember, continue with this procedure.
- Remove the 2 control arms. Refer to
Lower Control Arm Replacement
in Front Suspension.
- Remove the following components from the crossmember. Refer to
Stabilizer Shaft Replacement
in Front Suspension.
| • | The 2 stabilizer shaft link nuts |
| • | The 2 stabilizer shaft links |
| • | The 4 stabilizer shaft insulator clamp bolts |
| • | The 2 stabilizer shaft insulator clamps |
| • | The 2 stabilizer shaft insulators |
- If you removed the crossmember WITH the steering gear, remove the steering
gear from the crossmember. Refer to
Steering Gear Replacement
in Power Steering System.
Installation Procedure
- If you are installing the crossmember WITH the steering gear, install
the steering gear to the crossmember. Refer to
Steering Gear Replacement
in Power Steering System.
- Install the following components to the crossmember. Refer to
Stabilizer Shaft Replacement
in Front Suspension.
| • | The 2 stabilizer shaft link nuts |
| • | The 2 stabilizer shaft links |
| • | The 4 stabilizer shaft insulator clamp bolts |
| • | The 2 stabilizer shaft insulator clamps |
| • | The 2 stabilizer shaft insulators |
Important: DO NOT tighten the nut and bolts completely.
The weight of the vehicle must be on the tire and wheel assemblies before tightening
the nut and the bolts.
- Install the following components to the crossmember:
| • | The left lower control arm (2) |
Important: DO NOT tighten the nut and bolts completely.
The weight of the vehicle must be on the tire and wheel assemblies before tightening
the nut and the bolts.
- Install the following components to the crossmember:
| • | The right lower control arm |
- Use a jack in order to raise and support the crossmember with the attached
components as a unit.
- Insert a wood dowel (1) into the
hole in the right side of the crossmember (3) and the hole in the body.
- Use the dowel in order to align the bolt holes.
- Install the 2 bolts (1, 2)
to the crossmember.
- Insert a wood dowel into the hole in the left side of the crossmember
and the hole in the body.
- Use the dowel in order to align the bolt holes.
- Install the 2 bolts to the crossmember (3, 4).
- Insert a wood dowel into the hole in the right side of the crossmember
and the hole in the body.
- Use the dowel in order to align the bolt holes.
Notice: Refer to Fastener Notice in the Preface section.
- Install the bolt (7).
Tighten
Tighten the bolt to 157 N·m (115.8 lb ft).
- Install the bolt (1).
Tighten
Tighten the bolt to 113 N·m (83.3 lb ft).
- Insert a wood dowel into the hole in the left side of the crossmember
and the hole in the body.
- Use the dowel in order to align the bolt holes.
- Install the bolt (4).
Tighten
Tighten the bolt to 157 N·m (115.8 lb ft).
- Install the bolt (3).
Tighten
Tighten the bolt to 113 N·m (83.3 lb ft).
- Remove the jack from the crossmember.
- Install the 2 nuts (2, 5) and the bolt (6).
Tighten
Tighten the nuts and the bolt to 52 N·m
(38.4 lb ft).
- If you are installing the crossmember WITHOUT
the steering gear, complete the following steps:
| 22.1. | Install the 2 nuts (6, 7) and the 2 bolts (12, 13). |
Tighten
Tighten the bolts to 127 N·m (93.7 lb ft).
| 22.2. | Remove the wire from the steering gear (11). |
- Install the following to the left front
control arm:
Tighten
Tighten the 2 nuts and the bolt to 89 N·m
(65.6 lb ft).
- Install the following to the right front control arm:
Tighten
Tighten the 2 nuts and the bolt to 89 N·m
(65.6 lb ft).
- Install the left engine splash shield. Refer to
Engine Splash Shield Replacement - Left Side
in Body Front End.
- Install the right engine splash shield. Refer to
Engine Splash Shield Replacement - Right Side
in Body Front End.
- Use a 6 mm wrench in order to hold
the left front stabilizer shaft link stud. Install the nut and the stud to the strut
bracket (1).
Tighten
Tighten the nut to 74 N·m (54.6 lb ft).
- Use a 6 mm wrench in order to hold the right front stabilizer shaft
link stud. Install the nut and the stud to the strut bracket.
Tighten
Tighten the nut to 74 N·m (54.6 lb ft).
- Install the front tire and wheel assemblies to the vehicle. Refer to
Tire and Wheel Removal and Installation
in Tires and
Wheels.
- Lower the vehicle.
- Remove the engine support fixture. Refer to
Engine Support Fixture
in Engine Mechanical - 1.8L (LV6).
- If you are installing the crossmember WITH the steering gear, install
the following components. Refer to
Steering Gear Replacement
in Power Steering System.
| • | The lower steering shaft coupling bolt |
| • | The steering column hole cover |
| • | The 2 outer tie rod ends |
| • | The pressure and return pipes |
- With the weight of the vehicle on the tire and wheel assemblies, push
down on the front bumper 3 times in order to bounce the vehicle and stabilize
the suspension.
- Install the nut (3) and the 2 bolts (1, 4)
on the left lower control arm.
Tighten
Tighten the nut and the 2 bolts to 137 N·m
(101 lb ft).
- Install the nut and the 2 bolts on the right lower control arm.
Tighten
Tighten the nut and the 2 bolts to 137 N·m
(101 lb ft).
- Measure the wheel alignment. Adjust if necessary. Refer to
Wheel Alignment Measurement
in Wheel Alignment.
