GM Service Manual Online
For 1990-2009 cars only

Tools Required

    • J 36854 Heavy Duty Automotive Engine Stand
    • J 36660-A Torque Angle Meter

Removal Procedure

    Caution: Refer to Battery Disconnect Caution in the Preface section.

  1. Disconnect the negative battery cable.
  2. From inside the vehicle, disconnect the 2 engine control module (ECM) connectors.
  3. Disconnect the 2 cowl wire electrical connectors from the connector mounting bracket.
  4. Pull the engine harness wire from the passenger compartment.

  5. Object Number: 856569  Size: SH
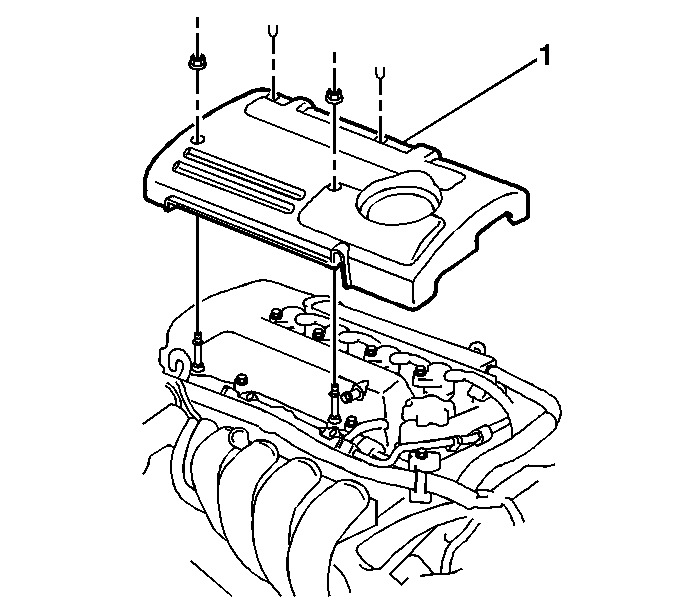
  6. Remove the 2 engine cover fasteners.
  7. Remove the 2 engine cover plastic retainers.
  8. Remove the engine cover (1) from the engine.
  9. Relieve the fuel pressure. Refer to Fuel Pressure Relief in Engine Controls.
  10. Drain the cooling system. Refer to Cooling System Draining and Filling in Engine Cooling.
  11. Drain the engine oil.
  12. Remove the serpentine drive belt. Refer to Drive Belt Replacement .
  13. If vehicle is equipped with A/C, remove the A/C compressor bolts and set A/C compressor aside. Refer to Air Conditioning Compressor Replacement in Heating, Ventilation and Air Conditioning.
  14. If vehicle is equipped with a manual transmission, remove the following components:
  15. • The crankshaft pulley--Refer to Crankshaft Pulley Replacement .
    • The drive belt tensioner--Refer to Drive Belt Tensioner Replacement .

    Object Number: 234418  Size: SH
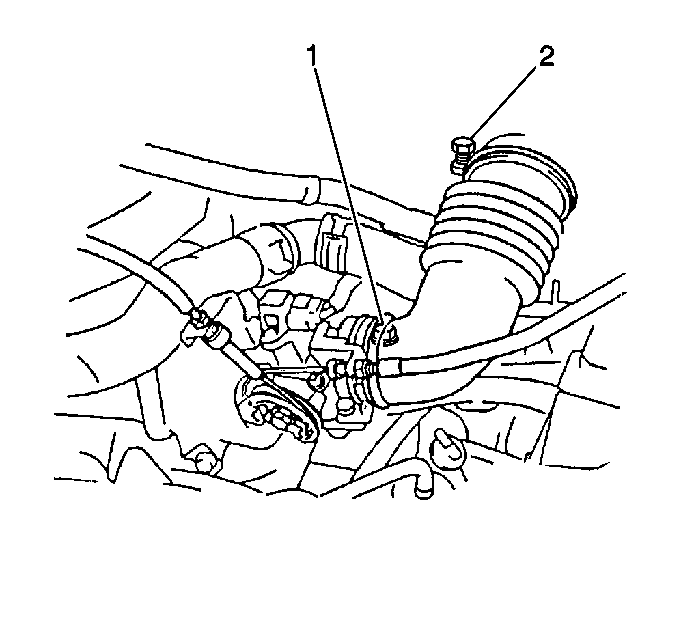
  16. Remove the accelerator cable from the throttle body (1).
  17. Remove the accelerator cable bracket from the throttle body.
  18. Disconnect the intake air temperature (IAT) sensor.
  19. Remove the air cleaner hose and cap assembly as follows:
  20. • Disconnect the mass air flow (MAF) sensor connector.
    • Disconnect three vacuum hoses from the air cleaner.
    • Disconnect the air intake hoses from the throttle body.
    • Unclip and remove the air cleaner cap.
  21. Remove the air filter.
  22. Disconnect the wire harness retaining clip from the air cleaner lower case.
  23. Remove the following items from the air cleaner case:
  24. • The 1 bolt
    • The vacuum switching valve (VSV) bracket

    Object Number: 236881  Size: SH
  25. Remove the following items:
  26. • The 3 bolts
    • The air cleaner lower box (3)
  27. Disconnect the cruise control actuator electrical connector.
  28. Remove the fuel line hose clamp.
  29. Disconnect the fuel hose from the fuel line. Refer to Fuel Injection Fuel Rail Assembly Replacement in Engine Controls.
  30. Disconnect the heater hose from the water by-pass pipe.
  31. Disconnect the heater hose from the water hose union on the cylinder head.
  32. Disconnect the brake booster vacuum hose from the brake booster.
  33. Remove the radiator outlet hose. Refer to Radiator Outlet Hose Replacement in Engine Cooling.
  34. Remove the radiator inlet hose. Refer to Radiator Inlet Hose Replacement in Engine Cooling.
  35. Remove the generator. Refer to Generator Replacement in Engine Electrical.
  36. Remove the radiator. Refer to Radiator Replacement in Engine Cooling.
  37. Remove the engine relay box cover.

  38. Object Number: 831816  Size: SH
  39. Disconnect the 3 engine compartment relay box connectors (1, 2, 3).

  40. Object Number: 880041  Size: SH
  41. Disconnect 2 ground cables (1, 2) from front left side of engine compartment.

  42. Object Number: 831818  Size: SH
  43. Disconnect the 2 wire harness clamps.
  44. If equipped with manual transaxle, disconnect the clutch actuator cylinder. Refer to Clutch Actuator Cylinder Replacement in Clutch.

  45. Object Number: 818634  Size: SH
  46. Disconnect the transaxle control cables from the transaxle.
  47. 37.1. Unclip the cable (1) from the mounting bracket.
    37.2. Disconnect the transaxle control cables (2) from the transaxle.

    Object Number: 831944  Size: SH
  48. If equipped with automatic transaxle, remove the shift cable from the transaxle.
  49. 38.1. Unclip the cable from the mounting bracket.
    38.2. Remove the shift cable nut.

    Object Number: 880231  Size: SH
  50. Unclip the wire harness (1), then remove the shift cable mounting bracket bolt (2).
  51. Disconnect the oil cooler hoses.
  52. On all models, remove the front drive axle. Refer to Front Wheel Drive Shaft Replacement in Wheel Drive Shafts.
  53. If equipped with AWD, remove the propeller shaft. Refer to Two-Piece Propeller Shaft Replacement in Propeller Shaft.
  54. Raise and properly support the vehicle. Refer to Lifting and Jacking the Vehicle in General Information.
  55. Remove the right engine splash shield. Refer to Engine Splash Shield Replacement - Right Side in Body Front End.
  56. Remove left engine splash shield. Refer to Engine Splash Shield Replacement - Left Side in Body Front End.

  57. Object Number: 880297  Size: SH
  58. Place a drain pan, then disconnect the power steering lines (1) and drain the power steering system.
  59. Remove the front exhaust pipe. Refer to Front Pipe Replacement in Engine Exhaust.
  60. Disconnect the steering intermediate shaft assembly from under the dash panel. Refer to Intermediate Steering Shaft Replacement in Steering Wheel and Column.
  61. Remove the right and left side driveshaft locknut.
  62. Separate the left and right side tie rod end.
  63. Disconnect the front stabilizer link assembly from the strut.
  64. Remove three lower ball joint-to-control arm assembly nuts. Refer to Lower Control Arm Ball Joint Replacement in Front Suspension.

  65. Object Number: 832008  Size: SH
  66. Set the engine lift, then remove the left side mounting insulator bolt and nut.

  67. Object Number: 832150  Size: SH
  68. Remove the 1 bolt and 2 nuts from the right side engine mount.

  69. Object Number: 832153  Size: SH
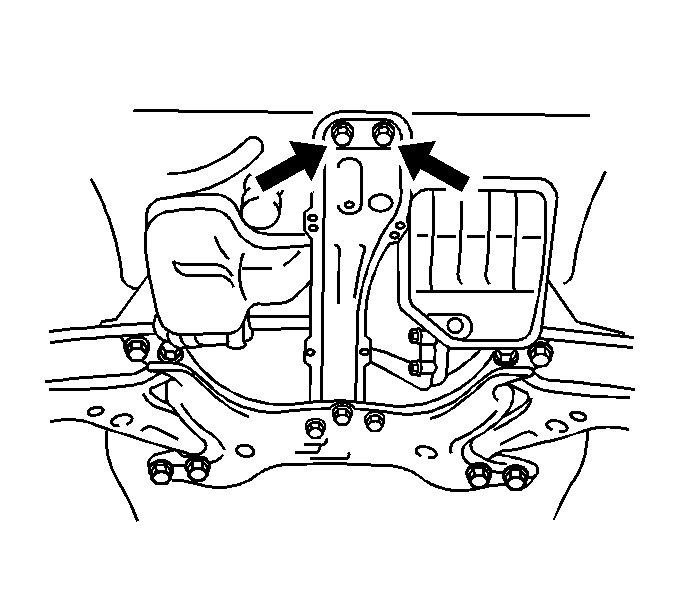
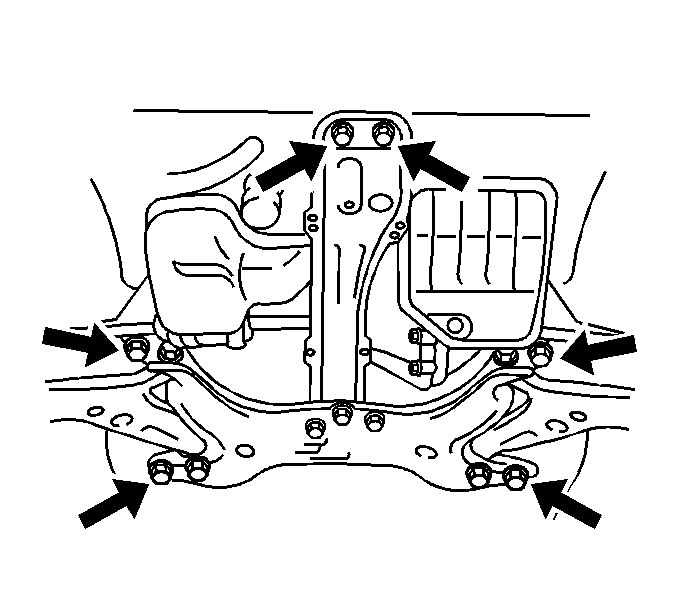
  70. Remove the 6 crossmember bolts.
  71. Lower the engine and transaxle assembly.

Installation Procedure

  1. Raise the engine and transaxle assembly.
  2. Object Number: 832153  Size: SH
  3. Temporarily install the 6 crossmember bolts.
  4. Notice: Refer to Fastener Notice in the Preface section.
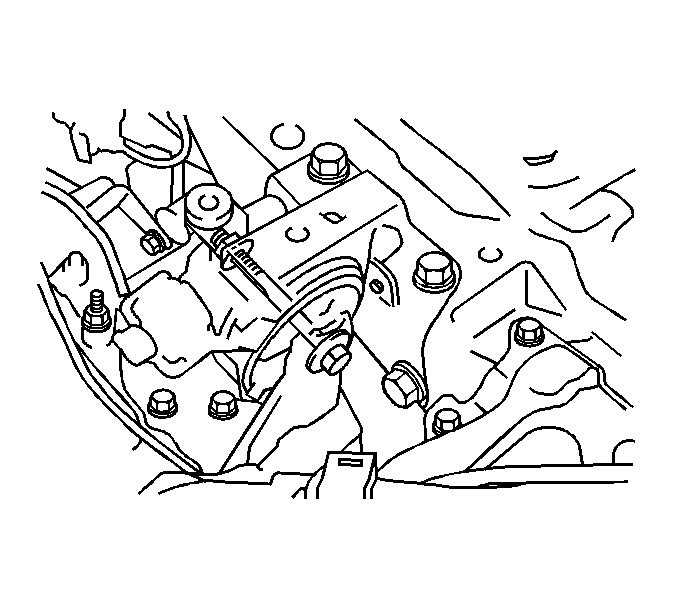

    Object Number: 832008  Size: SH
  5. Install the left side mounting insulator bolt and nut.
  6. Tighten
    Tighten the left side mounting insulator nut and bolt 80 N·m (60 lb ft).
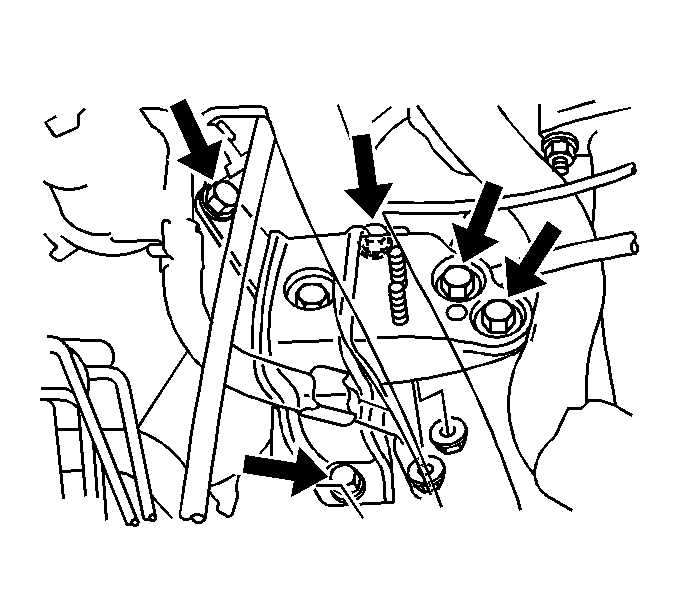

    Object Number: 832150  Size: SH
  7. Install the 5 bolts and 2 nuts from the right side engine mount, then remove the engine lift.
  8. Tighten
    Tighten the right side engine mount nuts and bolts to 52 N·m (38 lb ft).
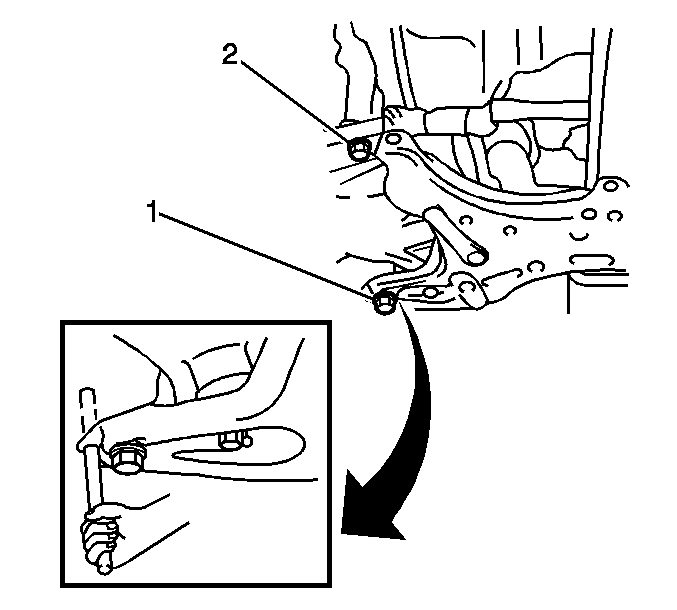

    Object Number: 832424  Size: SH
  9. Align the right side of the crossmember, then install and temporarily tighten bolt (1), then bolt (2).
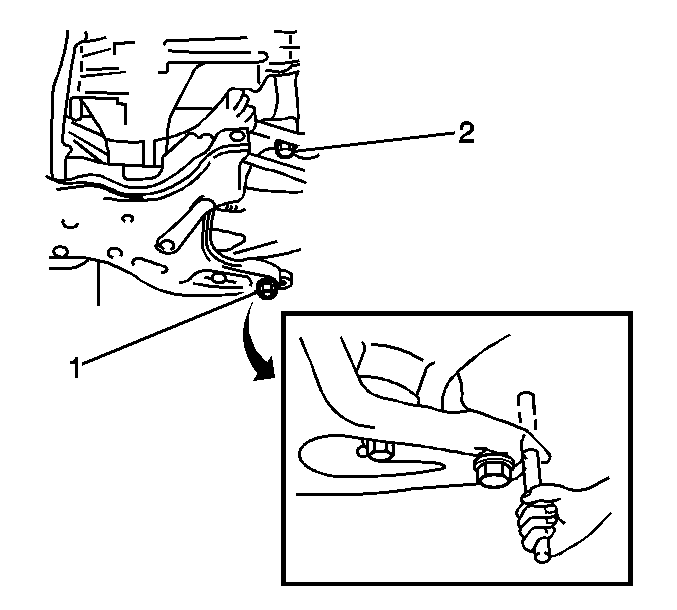
  10. Object Number: 832473  Size: SH
  11. Align the left side of the crossmember, then install and temporarily tighten bolt (1), then bolt (2).
  12. Tighten

        • Tighten the right and left side bolts (1) to 157 N·m (116 lb ft).
        • Tighten the right and left side bolts (2) to 113 N·m (83 lb ft).

    Object Number: 832924  Size: SH
  13. Install the crossmember rear bolts and tighten.
  14. Tighten
    Tighten the crossmember rear bolts to 39 N·m (29 lb ft).

  15. Connect the lower control arm assembly.
  16. Tighten
    Tighten the nuts and the bolt to 89 N·m (65.6 lb ft).

  17. Connect the front stabilizer link assembly.
  18. Tighten
    Tighten the nut to 74 N·m (54.6 lb ft).

  19. Install the left side tie rod end.
  20. Tighten
    Tighten the outer tie rod nut to 49 N·m (36.1 lb ft). Align the cotter pin slot by tightening the outer tie rod nut up to 1/6 additional turn, or 70 N·m (52 lb ft) maximum. Do not loosen the nut in order to insert the cotter pin.

  21. Install the drive shaft lock nut.
  22. Tighten
    Tighten the nut to 216 N·m (159 lb ft).

  23. Install the front exhaust pipe. Refer to Front Pipe Replacement in Engine Exhaust.
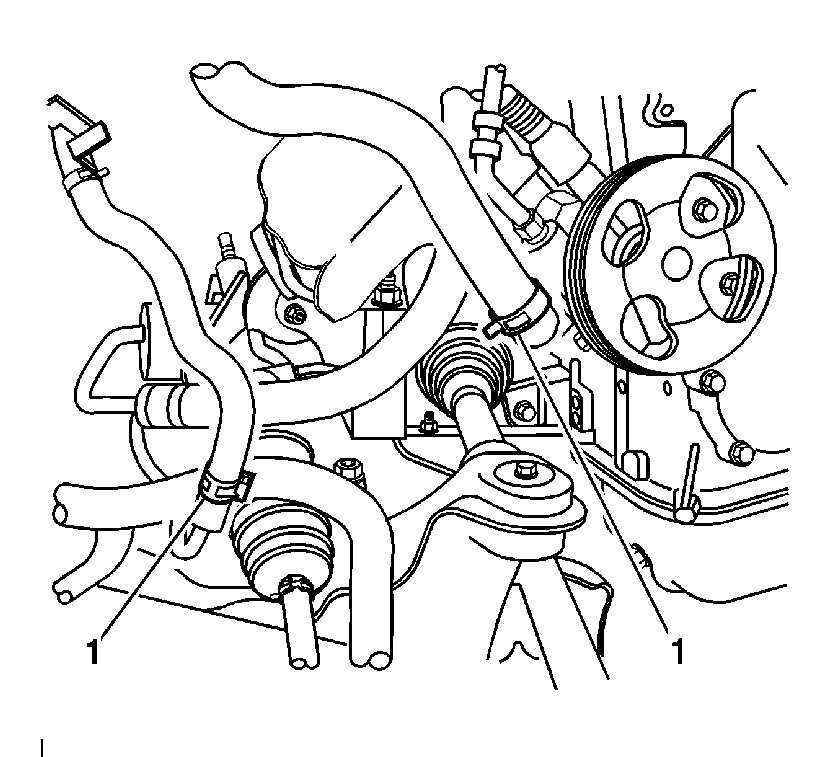
  24. Object Number: 880297  Size: SH
  25. Connect the power steering lines (1), then refill the power steering system. Refer to Checking and Adding Power Steering Fluid in Power Steering System.
  26. If equipped with AWD, install the propeller shaft. Refer to Two-Piece Propeller Shaft Replacement in Propeller Shaft.
  27. Connect the oil cooler hoses.
  28. Install the right and left engine splash shield. Refer to Engine Splash Shield Replacement - Left Side and Engine Splash Shield Replacement - Right Side in Body Front End.
  29. Lower the vehicle.
  30. Install the steering intermediate shaft assembly. Refer to Intermediate Steering Shaft Replacement in Steering Wheel and Column.
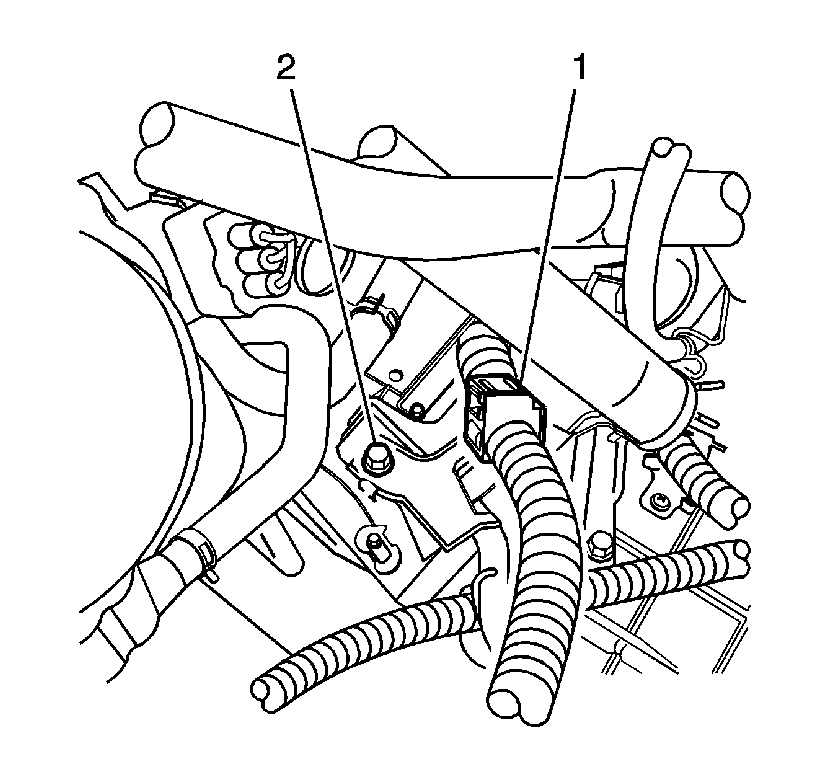
  31. Object Number: 880231  Size: SH
  32. Install the shift cable mounting bracket bolt (2) and clip the wire harness (1).
  33. Tighten
    Tighten the bolt to 12 N·m (9 lb ft).
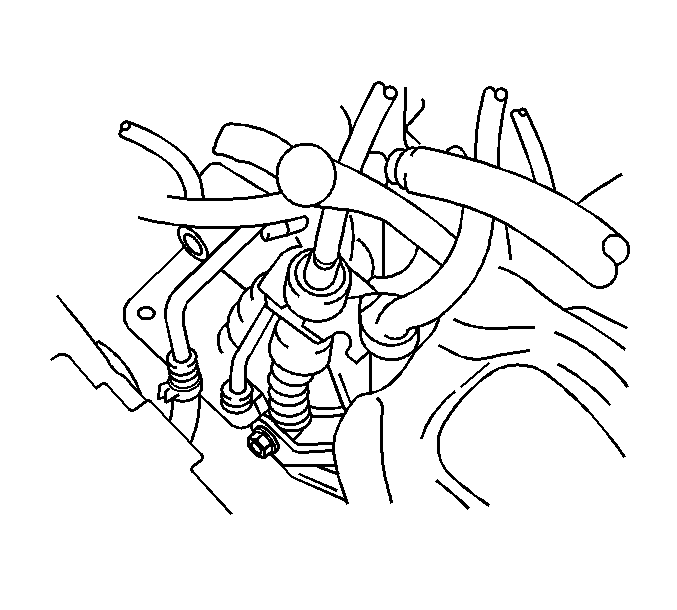

    Object Number: 831944  Size: SH
  34. If equipped with an automatic transaxle, install the shift cable to the transaxle.
  35. 20.1. Install the shift cable nut.

    Tighten
    Tighten the nut to 12 N·m (9 lb ft).

    20.2. Clip the cable to the mounting bracket.
  36. Pull the engine harness wire through the passenger compartment.
  37. Connect the 3 cowl wire electrical connectors to the connector mounting bracket.
  38. Connect the 2 ECM connectors.
  39. Connect the ground cable to the engine.
  40. Connect the ground cables to the transaxle.
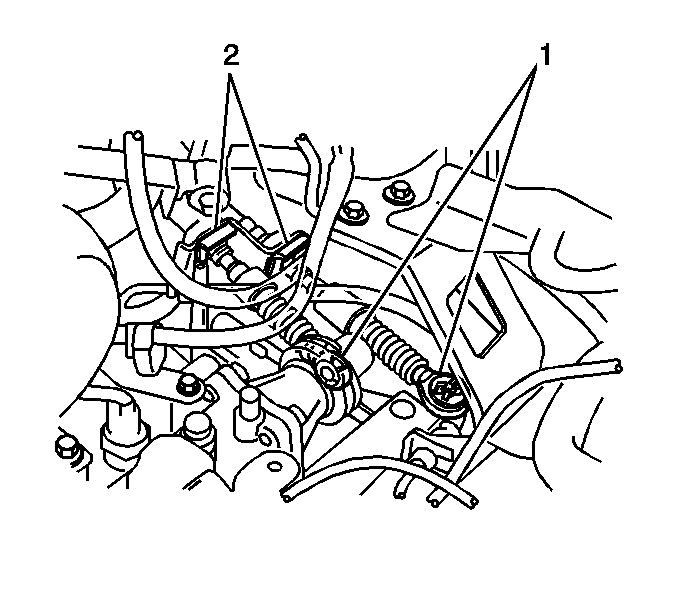
  41. Object Number: 818634  Size: SH
  42. If equipped with a manual transaxle, connect the transaxle control cables to the transaxle.
  43. 26.1. Connect the transaxle control cables (2) to the transaxle.
    26.2. Clip the cable (1) to the mounting bracket.
  44. Connect the clutch actuator cylinder. Refer to Clutch Actuator Cylinder Replacement in Clutch.
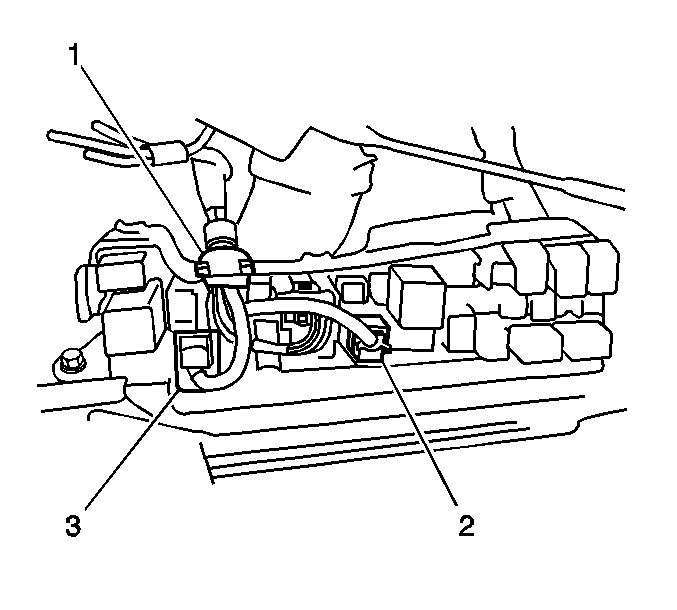
  45. Object Number: 831816  Size: SH
  46. Connect the 3 engine compartment relay box connectors (1, 2, 3).
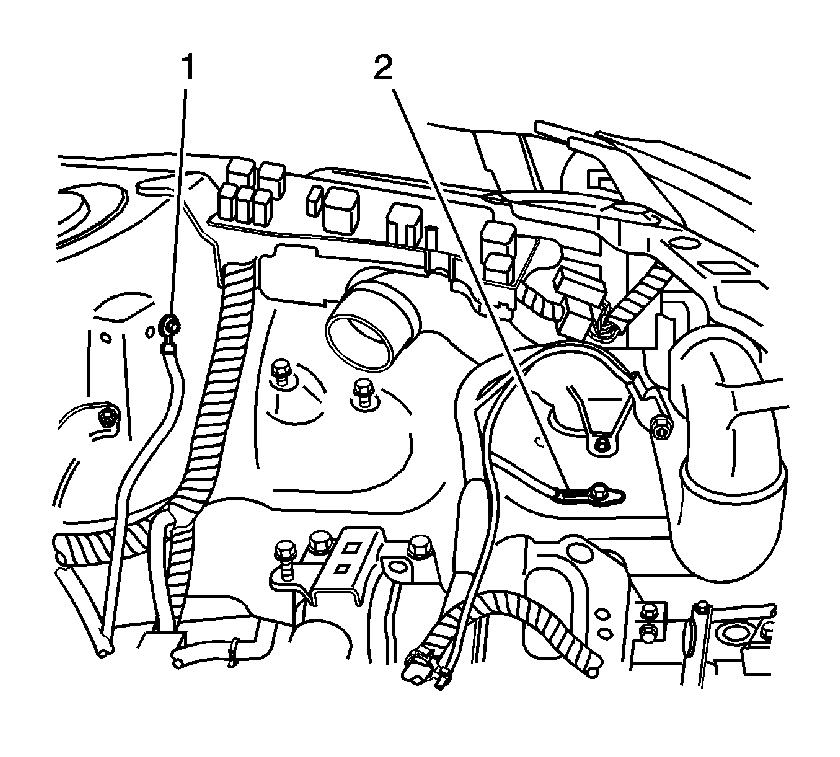
  47. Object Number: 880041  Size: SH
  48. Connect 2 ground cables (1, 2) from front left side of engine compartment.
  49. Tighten
    Tighten the bolts to 9 N·m (7 lb ft).
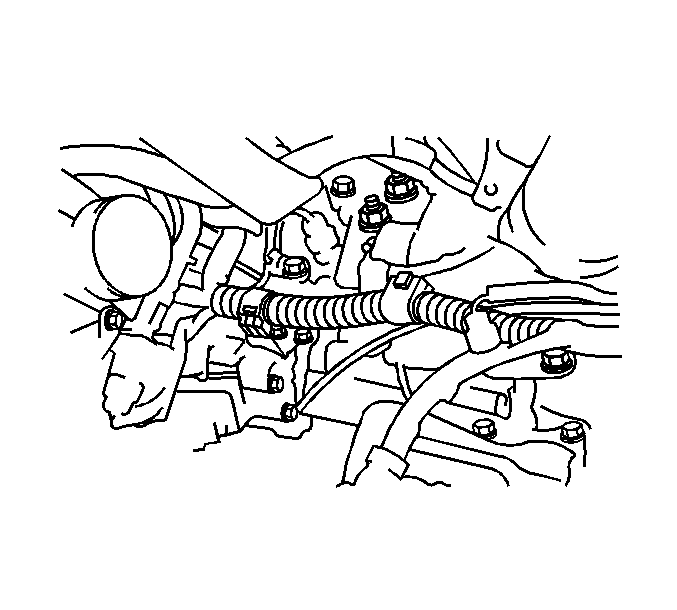

    Object Number: 831818  Size: SH
  50. Connect the 2 wire harness clamps.
  51. Install the engine relay box cover.
  52. Install the radiator. Refer to Radiator Replacement in Engine Cooling.
  53. Install the generator. Refer to Generator Replacement in Engine Electrical.
  54. Install the radiator inlet hose. Refer to Radiator Inlet Hose Replacement in Engine Cooling.
  55. Install the radiator outlet hose. Refer to Radiator Outlet Hose Replacement in Engine Cooling.
  56. Connect the brake booster vacuum hose to the brake booster.
  57. Connect the heater hose to the water hose union on the cylinder head.
  58. Connect the heater hose to the water by-pass pipe.
  59. Connect the fuel tube to the fuel pipe
  60. Install the fuel tube clamp.
  61. Connect the cruise control actuator electrical connector.
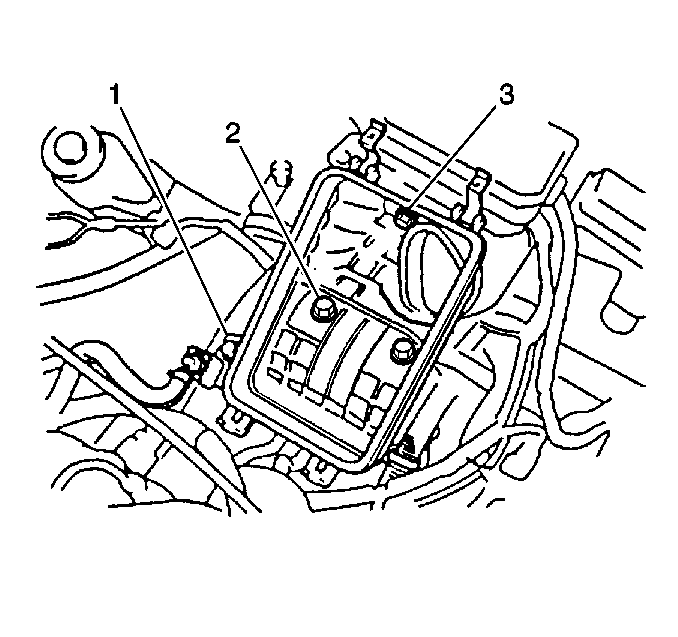
  62. Object Number: 236881  Size: SH
  63. Install the air cleaner case as follows:
  64. 42.1. Install the air cleaner, then the 3 air cleaner case bolts (2).

    Tighten
    Tighten the bolts to 7 N·m (62 lb in).

    42.2. Connect the air cleaner wire harness clamp, connector, and hose.
    42.3. Install the air filter.
  65. Install the air cleaner cover as follows:
  66. 43.1. Install the air cleaner cap and air cleaner hose assembly.
    43.2. Connect the air cleaner hose to the throttle body, then tighten the air cleaner hose clamp bolt.
    43.3. Connect the air cleaner cap to the air cleaner case, then latch the 2 air cleaner clamps.
    43.4. Connect the MAF sensor connector.
  67. Connect the IAT sensor.

  68. Object Number: 234418  Size: SH
  69. Connect the accelerator cable to the throttle body (1).
  70. Install the accelerator cable to the accelerator cable bracket.
  71. If the vehicle is equipped with a manual transmission, remove the following components:
  72. • The drive belt tensioner--Refer to Drive Belt Tensioner Replacement .
    • The crankshaft pulley--Refer to Crankshaft Pulley Replacement .
  73. If the vehicle is equipped with A/C, position the A/C compressor and install the A/C compressor bolts. Refer to Air Conditioning Compressor Replacement in Heating, Ventilation and Air Conditioning.
  74. Install the serpentine drive belt. Refer to Drive Belt Replacement .
  75. Refill the engine oil.
  76. Refill the cooling system. Refer to Cooling System Draining and Filling in Engine Cooling.
  77. Connect the negative battery cable.

  78. Object Number: 856569  Size: SH
  79. Position the engine cover (1) to the engine.
  80. Install the 2 engine cover plastic retainers.
  81. Install the 2 engine cover fasteners.
  82. Start the engine and check for fluid leaks.