Cooling Insufficient - Air Conditioning (A/C) System 1998
| Table 1: | Cabin Cooling Typical Values |
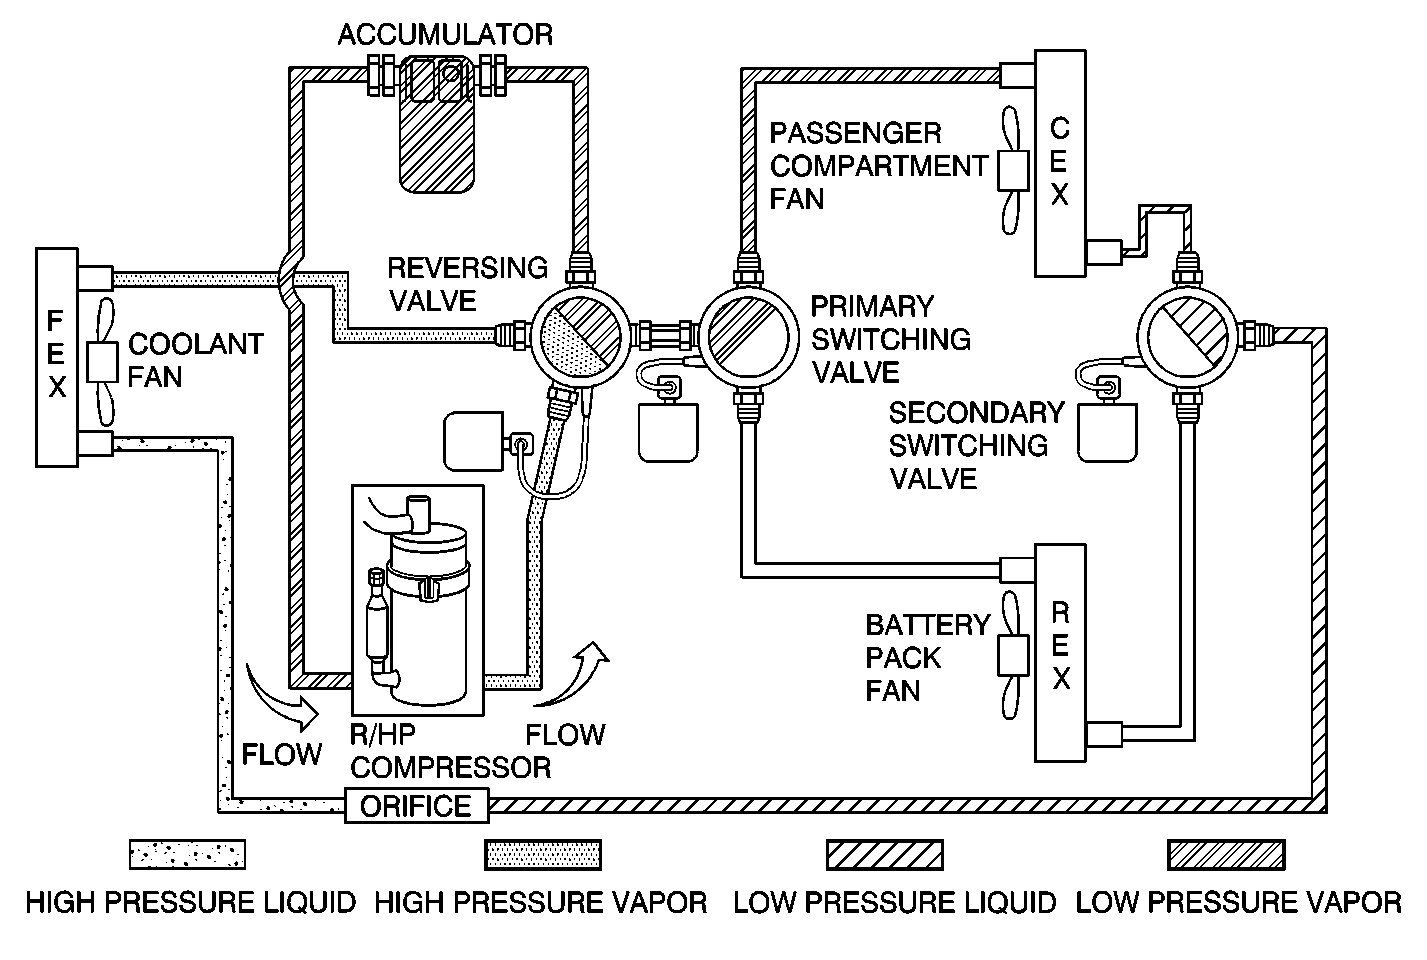
Cabin Cooling Refrigerant Diagram
Scan Tool Parameter | Data List | Units Displayed | Typical Data Value |
|---|---|---|---|
Cabin A/C Mode Purge Cycle (above 18°C (64.4°F) ) | |||
Compressor Motor | HTCM Data | amps | 2 amps |
Reversing Valve | HTCM Data | On/Off | On |
Primary Valve | HTCM Data | On/Off | Off |
Secondary Valve | HTCM Data | On/Off | Off |
Cabin A/C Mode Run Cycle (above 18°C (64.4°F) ) | |||
Compressor Motor | HTCM Data | amps | 2 amps |
Reversing Valve | HTCM Data | On/Off | On |
Primary Valve | HTCM Data | On/Off | On |
Secondary Valve | HTCM Data | On/Off | Off |
Circuit Description
Insufficient cabin cooling can be caused by many factors. If the mode door is not operating properly, improper airflow may be passing over the cabin heat exchanger (CEX). If the refrigerant charge is insufficient, the system may not be properly cooling the CEX. If any of the refrigerant valves (the reversing valve, the primary battery valve, or the secondary valve) are stuck or somehow commanded to the wrong position, the refrigerant will not flow properly.
Step | Action | Value(s) | Yes | No |
|---|---|---|---|---|
1 | Did you perform the HVAC System Check? | -- | Go to Step 2 | Go to HVAC System Check |
2 |
Does the A/C condenser cooling fan turn on? | -- | Go to Step 3 | |
3 |
Does the scan tool indicate the mode door is operating properly? | -- | Go to Step 5 | Go to Step 4 |
4 | Locate and repair problem with mode door. The mode door may be observed by removing the blower motor resistor. Did you complete the repair? | -- | Go to HVAC System Check | -- |
5 |
Does the scan tool display the specified values? | Stop, 3.5 Volts 38 Steps -10 steps | Go to Step 6 | Go to Step 4 |
6 | Connect high and low side refrigerant pressure gauges. Both pressures should be approximately equal. Are both pressures above the specified value? | 350 kPa | Go to Step 10 | Go to Step 7 |
7 | Are both pressures between the specified values? | 70-350 kPa | Go to Step 8 | Go to Step 9 |
8 |
Did you complete the repair? | -- | Go to HVAC System Check | -- |
9 |
Did you complete the repair? | -- | Go to HVAC System Check | -- |
10 |
Important:: This test was designed for typical garage conditions: 20-30°C (68-86°F) and no sunload. Normal discharge air temperature is typically at least 10°C (50°) cooler than ambient temperature for cabin air conditioning mode. Follow this test procedure exactly.
Is there a noticeable temperature difference? | -- | Go to Step 12 | Go to Step 11 |
11 | Orifice (expansion) tube is missing, damaged, or shifted.
Is the discharge temperature within specifications? | 10°C (50°F) below ambient temperature | Go to HVAC System Check | Go to Step 10 |
12 | Refer to A/C System Performance Chart in HVAC Compressor Controls System Check . Are the low and high side pressures within specifications? | -- | Go to Step 14 | Go to Step 13 |
13 | Refer to A/C System Performance Chart in HVAC Compressor Controls System Check . Is the high side pressure above specifications? | -- | Go to Step 15 | Go to Step 18 |
14 | All components of the refrigerant system are functioning properly. If insufficient performance exists, air delivery system is at fault. Do you want to perform the HVAC Air Delivery System Check? | -- | -- | |
15 |
Is the tube cold? | -- | Go to Step 16 | Go to Step 17 |
16 | Restriction in high side.
Did you complete the repair? | -- | Go to Step 10 | -- |
17 | Refrigerant overcharge or air in the system.
Did you complete the repair? | -- | Go to Step 10 | -- |
18 | Are the compressor high and low side pressures within 210 kPa of each other? | -- | Go to Step 19 | |
19 | Is the low side pressure 175-245 kPa? | -- | Go to Step 20 | Go to Step 10 |
20 | Refrigerant undercharged. Add 1 lb. of refrigerant to system. Does performance improve? | -- | Go to Step 21 | Go to Step 22 |
21 |
Did you complete the repair? | -- | Go to Step 10 | -- |
22 |
Did you complete the repair? | -- | Go to Step 10 | -- |
