Caution: Unless directed otherwise, the ignition and start switch must be in the OFF or LOCK position, and all electrical loads must be OFF before servicing
any electrical component. Disconnect the negative battery cable to prevent an electrical spark should a tool or equipment come in contact with an exposed electrical terminal. Failure to follow these precautions may result in personal injury and/or damage to
the vehicle or its components.
- Disconnect the negative battery cable.
- On vehicles equipped with manual transmission, remove the shift
lever. Refer to
Control Lever and/or Boot Replacement
in Manual Transmission.
- On vehicles equipped with automatic transmission, shift the transmission
to the "1" position.
- Remove the left instrument panel sound insulator. Refer to
Instrument Panel Insulator Panel Replacement - Left Side
.
- Remove the right instrument panel sound insulator. Refer to
Instrument Panel Insulator Panel Replacement - Right Side
.
- Remove the center instrument panel sound insulator. Refer to
Instrument Panel Insulator Panel Replacement
.
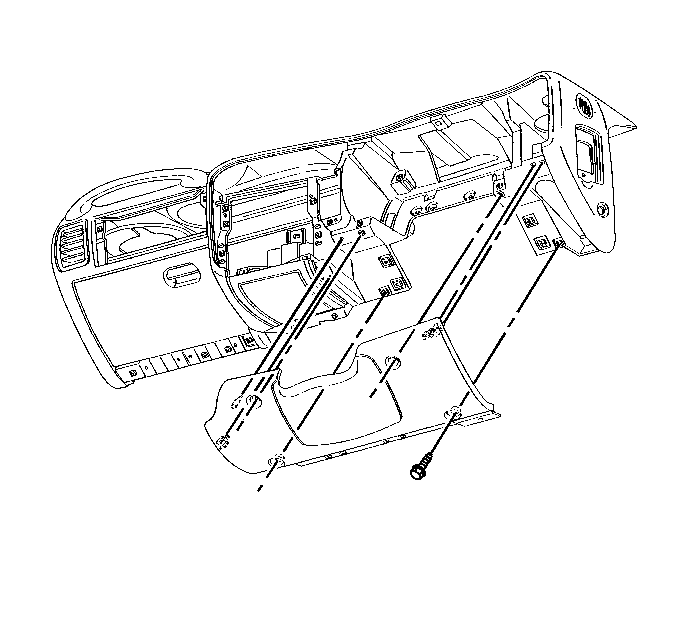
- Remove the knee bolster trim panel. Refer to
Driver Knee Bolster Panel Replacement
.

Caution: This vehicle is equipped with a Supplemental Inflatable Restraint (SIR) System. Failure to follow the correct procedure could cause the following conditions:
| • | Unnecessary SIR system repairs |
| • | Refer to SIR Component Views in order to determine if you are performing service on or near the SIR components or the SIR wiring. |
| • | If you are performing service on or near the SIR components or the SIR wiring, disable the SIR system. Refer to Disabling the SIR System. |
- Disable the passenger SIR system connector. Refer to
Disabling the SIR System
in SIR.
- Remove the knee bolster. Refer to
Knee Bolster Replacement
.
- Remove the instrument panel accessory trim plate. Refer to
Instrument Panel Accessory Trim Plate Replacement
.
- Remove the radio. Refer to
Radio Replacement
in Entertainment.
- Remove the cluster. Refer to
Instrument Cluster Replacement
.
- Remove the HVAC control module. Refer to
HVAC Control Module Replacement
in HVAC Systems - Automatic.
- Disconnect the steering column electrical connector from the body
wiring harness. Refer to
Steering Column Replacement
in Steering Wheel and Column.
- Remove the steering column mounting nuts and allow the column
to lay down on the seat. Refer to
Steering Column Replacement
in Steering Wheel and Column.

- Remove the left and right
speaker grilles. Refer to
Radio Front Speaker Replacement
in Entertainment.
- Use a flat-bladed tool in order to remove the windshield defroster
grille. Retain the grille for use on the next IP carrier.
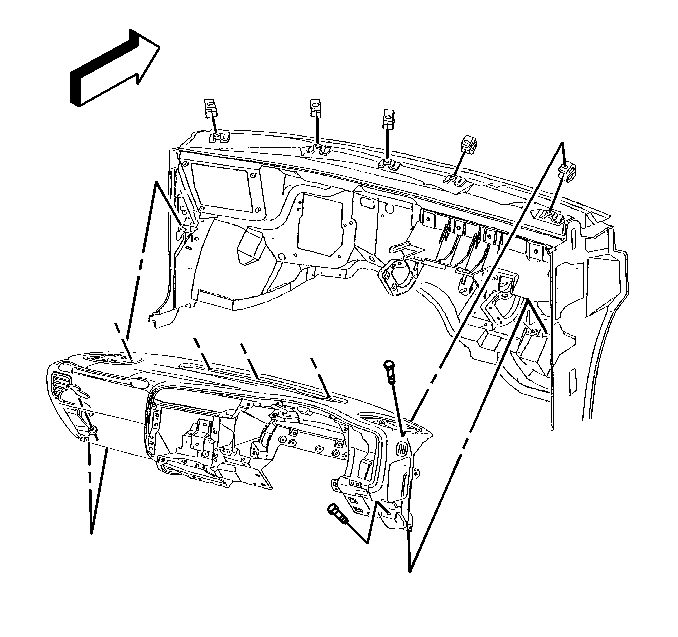
- Remove the top instrument panel screws underneath the windshield
defroster grille.
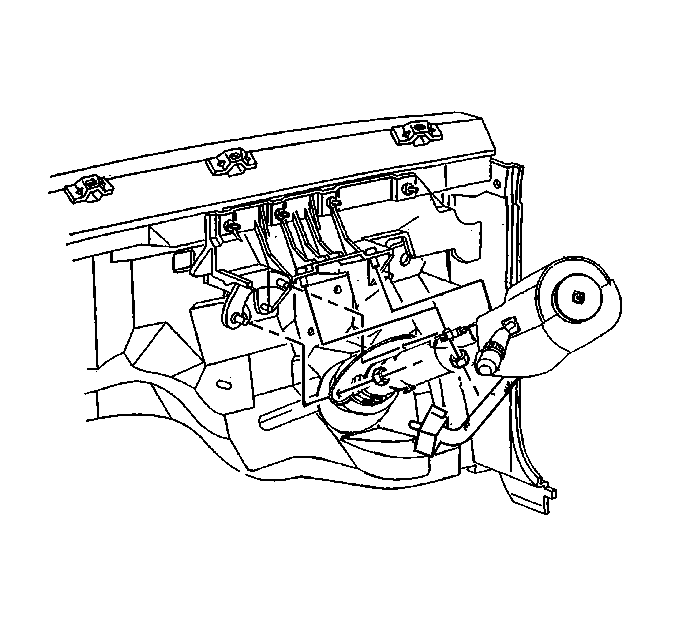
- Remove the lower right instrument panel mounting bolt.
- Open the instrument panel storage compartment door.
- Push the J spring up in order to open the instrument storage compartment
door out and down. Refer to
Instrument Panel Compartment Door Replacement
.
- Reach through the instrument panel storage compartment opening
and perform the following steps:
| 22.1. | Remove the lower left instrument panel mounting bolt. |
| 22.2. | Remove the screw retaining the instrument panel electrical connector
to the body connector block located below the HVAC air inlet vacuum actuator. |
| 22.3. | Disconnect the instrument panel electrical connector from the
body connector. |
| 22.4. | Close the instrument panel storage compartment door. |
- Disconnect the instrument panel wiring connector from the body
wiring connect located at lower right side of the instrument panel.
- Remove the body control module. Refer to
Body Control Module Replacement
in Body Control System.

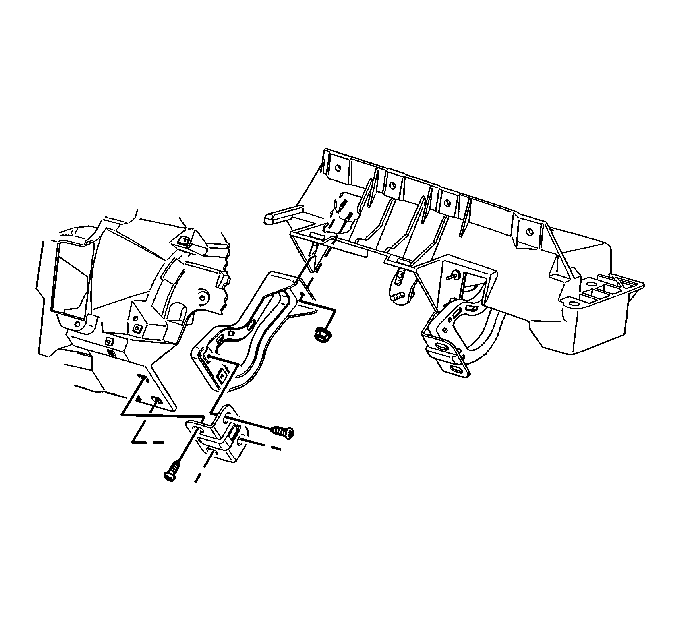
- Remove the bolts retaining
the knee bolster bracket to the instrument panel intermediate bracket.
Important: Place protective material on top of steering column and on top of the
center floor console to prevent damage to the instrument panel when tilting
panel down.
- Tilt the instrument panel down.
- Disconnect the antenna cable from the back of the radio.
- Remove the antenna cable retainers from the instrument panel.
Refer to
Radio Antenna Cable Extension Cable Replacement
in Entertainment.
- With the help of an assistant, remove the instrument panel from
the vehicle.
- If replacing the instrument panel, remove the following components:
| 30.4. | Remove the knee bolster intermediate brackets. |
| 30.5. | Remove the wiring harness assembly from the instrument panel. |

- Install the following
components if removed:
| 1.1. | Install the wiring harness assembly to the instrument panel. |
Notice: Use the correct fastener in the correct location. Replacement fasteners
must be the correct part number for that application. Fasteners requiring
replacement or fasteners requiring the use of thread locking compound or sealant
are identified in the service procedure. Do not use paints, lubricants, or
corrosion inhibitors on fasteners or fastener joint surfaces unless specified.
These coatings affect fastener torque and joint clamping force and may damage
the fastener. Use the correct tightening sequence and specifications when
installing fasteners in order to avoid damage to parts and systems.
| 1.2. | Install the knee bolster intermediate brackets. |
Tighten
Tighten the knee bolster intermediate bracket bolts to 6.3 N·m
(56 lb in).
- With the help of an assistant, install the instrument panel to
the vehicle.
- Install the antenna cable retainers to the instrument panel. Refer
to
Radio Antenna Cable Extension Cable Replacement
in Entertainment.
- Connect the antenna cable to the back of the radio.
- Tilt the instrument panel forward into position.
- Install the bolts retaining the knee bolster bracket to the instrument
panel knee bolster intermediate bracket.
Tighten
Tighten the bolts to 6.3 N·m (56 lb in).

- Install the body control
module. Refer to
Body Control Module Replacement
in Body Control System.
- Connect the instrument panel wiring connector to the body wiring
connect located at lower right side of the instrument panel.
- Open the instrument panel storage compartment door.
- Push the J spring up in order to open the instrument storage compartment
door out and down. Refer to
Instrument Panel Compartment Door Replacement
.
- Reach through the instrument panel storage compartment opening
and perform the following:
| • | Install the lower left instrument panel mounting bolt. |
Tighten
Tighten the lower left-side instrument panel mounting bolt to 7.5 N·m
(66 lb in).
| • | Connect the instrument panel electrical connector to the body
connector located below the HVAC air inlet vacuum actuator. |
| • | Install the screw retaining the instrument panel electrical connector
to the body connector block. |
| • | Close the instrument panel storage compartment door. |
- Install the lower right instrument panel mounting bolt.
Tighten
Tighten the lower right-side instrument panel mounting bolt to 11.5 N·m
(102 lb in).

- Install the steering column
mounting nuts. Refer to
Steering Column Replacement
in Steering Wheel and Column.
- Install the top instrument panel screws underneath the windshield
defroster grille.
Tighten
Tighten the screws to 1.9 N·m (17 lb in).
- Install the windshield defroster grille.
- Install the left and right speaker grilles. Refer to
Radio Front Speaker Replacement
in Entertainment.
- Connect the steering column electrical connector to the body wiring
harness. Refer to
Steering Column Replacement
in Steering Wheel and Column.
- Install the HVAC control module. Refer to
HVAC Control Module Replacement
in HVAC Systems - Automatic.
- Install the cluster. Refer to
Instrument Cluster Replacement
.
- Install the radio. Refer to
Radio Replacement
in Entertainment.
- Install the instrument panel accessory trim plate. Refer to
Instrument Panel Accessory Trim Plate Replacement
.
- Install the knee bolster. Refer to
Knee Bolster Replacement
.
Caution: This vehicle is equipped with a Supplemental Inflatable Restraint (SIR) System. Failure to follow the correct procedure could cause the following conditions:
| • | Unnecessary SIR system repairs |
| • | Refer to SIR Component Views in order to determine if you are performing service on or near the SIR components or the SIR wiring. |
| • | If you are performing service on or near the SIR components or the SIR wiring, disable the SIR system. Refer to Disabling the SIR System. |
- Enable the passenger SIR system connector. Refer to
Enabling the SIR System
in SIR.

- Install the knee bolster
trim panel. Refer to
Driver Knee Bolster Panel Replacement
.
- Install the center instrument panel sound insulator. Refer to
Instrument Panel Insulator Panel Replacement
.
- Install the right instrument panel sound insulator. Refer to
Instrument Panel Insulator Panel Replacement - Right Side
.
- Install the left instrument panel sound insulator. Refer to
Instrument Panel Insulator Panel Replacement - Left Side
.
- On vehicle equipped with automatic transmission, shift the transmission
to the PARK position.
- On vehicles equipped with manual transmission, install the shift
lever. Refer to
Control Lever and/or Boot Replacement
in Manual Transmission.
Caution: Unless directed otherwise, the ignition and start switch must be in the OFF or LOCK position, and all electrical loads must be OFF before servicing
any electrical component. Disconnect the negative battery cable to prevent an electrical spark should a tool or equipment come in contact with an exposed electrical terminal. Failure to follow these precautions may result in personal injury and/or damage to
the vehicle or its components.
- Connect the negative battery cable.


