For 1990-2009 cars only
Camshaft Replacement Except 6.2L (LS9) and 7.0L
Special Tools
| • | EN-47812 Installer Bolt |
| • | EN-47813 Front Cover Bolt |
Removal Procedure
- Remove the engine assembly. Refer to Engine Replacement.
- Remove the crankshaft balancer. Refer to Crankshaft Balancer Removal.
- Remove the oil level indicator tube. Refer to Oil Level Indicator and Tube Removal.
- Remove the left and right exhaust manifolds. Refer to Exhaust Manifold Removal - Left Side and Exhaust Manifold Removal - Right Side.
- Remove the water pump. Refer to Water Pump Removal.
- Remove the intake manifold. Refer to Intake Manifold Removal.
- Remove the left and right valve rocker arm covers. Refer to Valve Rocker Arm Cover Removal - Left Side and Valve Rocker Arm Cover Removal - Right Side.
- Remove the valve rocker arms and push rods. Refer to Valve Rocker Arm and Push Rod Removal.
- Remove the left and right cylinder heads. Refer to Cylinder Head Removal - Left Side and Cylinder Head Removal - Right Side.
- Remove the valve lifters. Refer to Valve Lifter Removal.
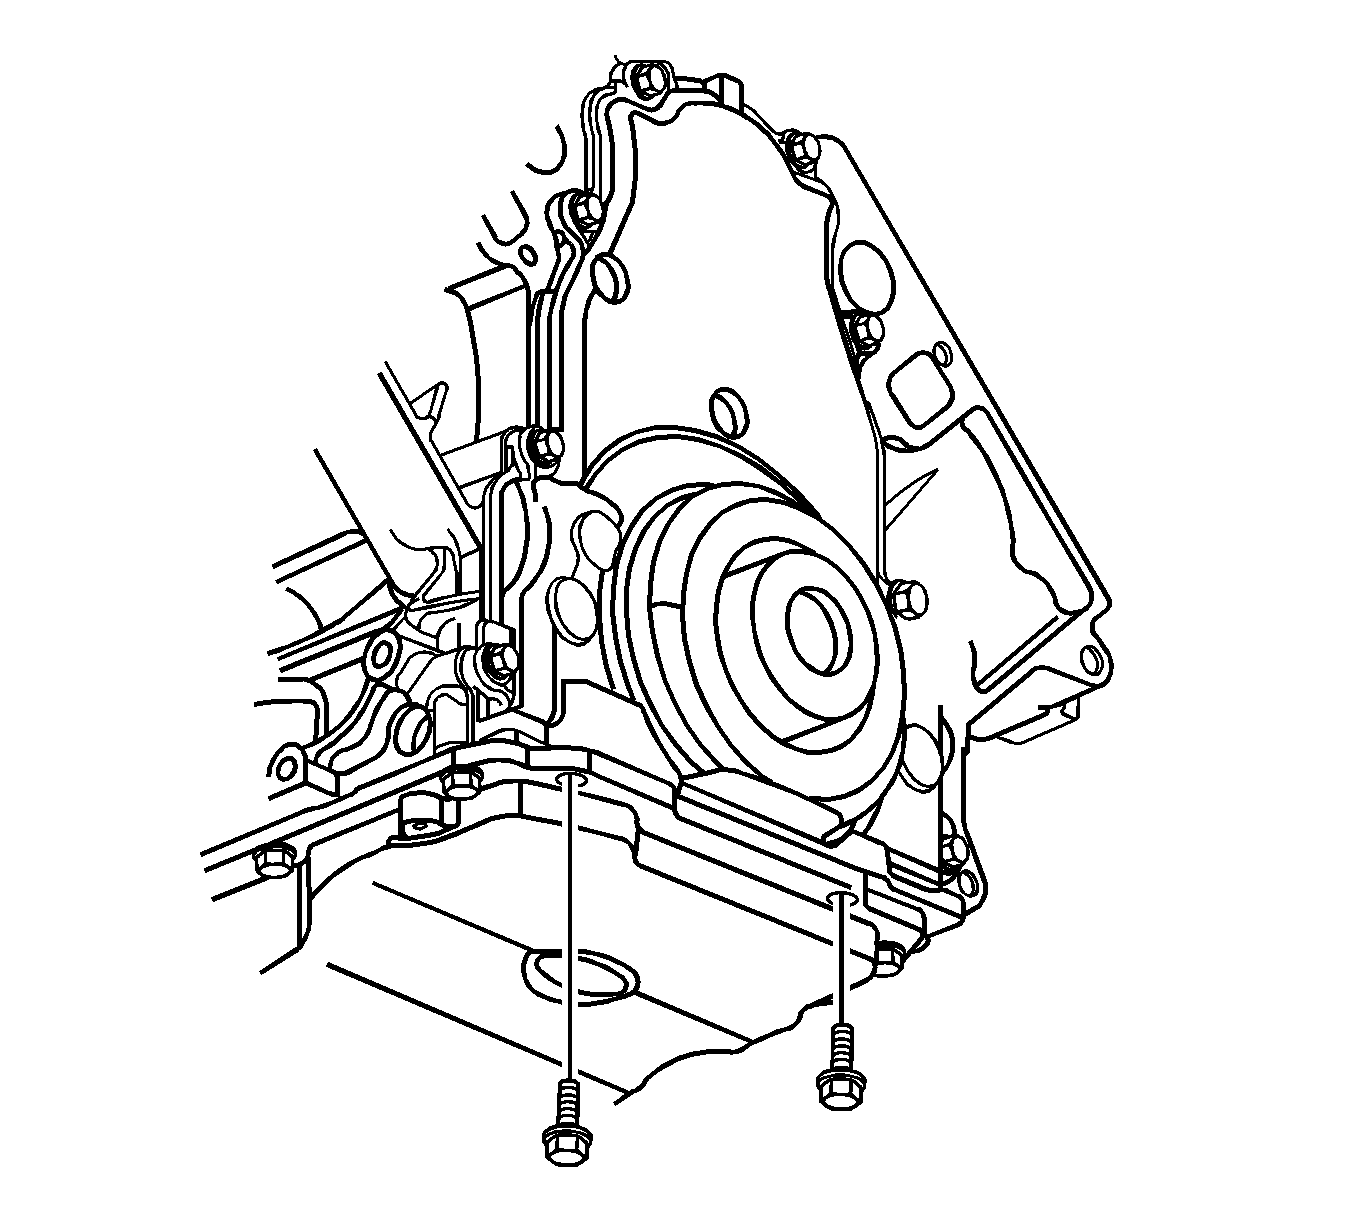
- Remove the oil pan-to-front cover bolts.
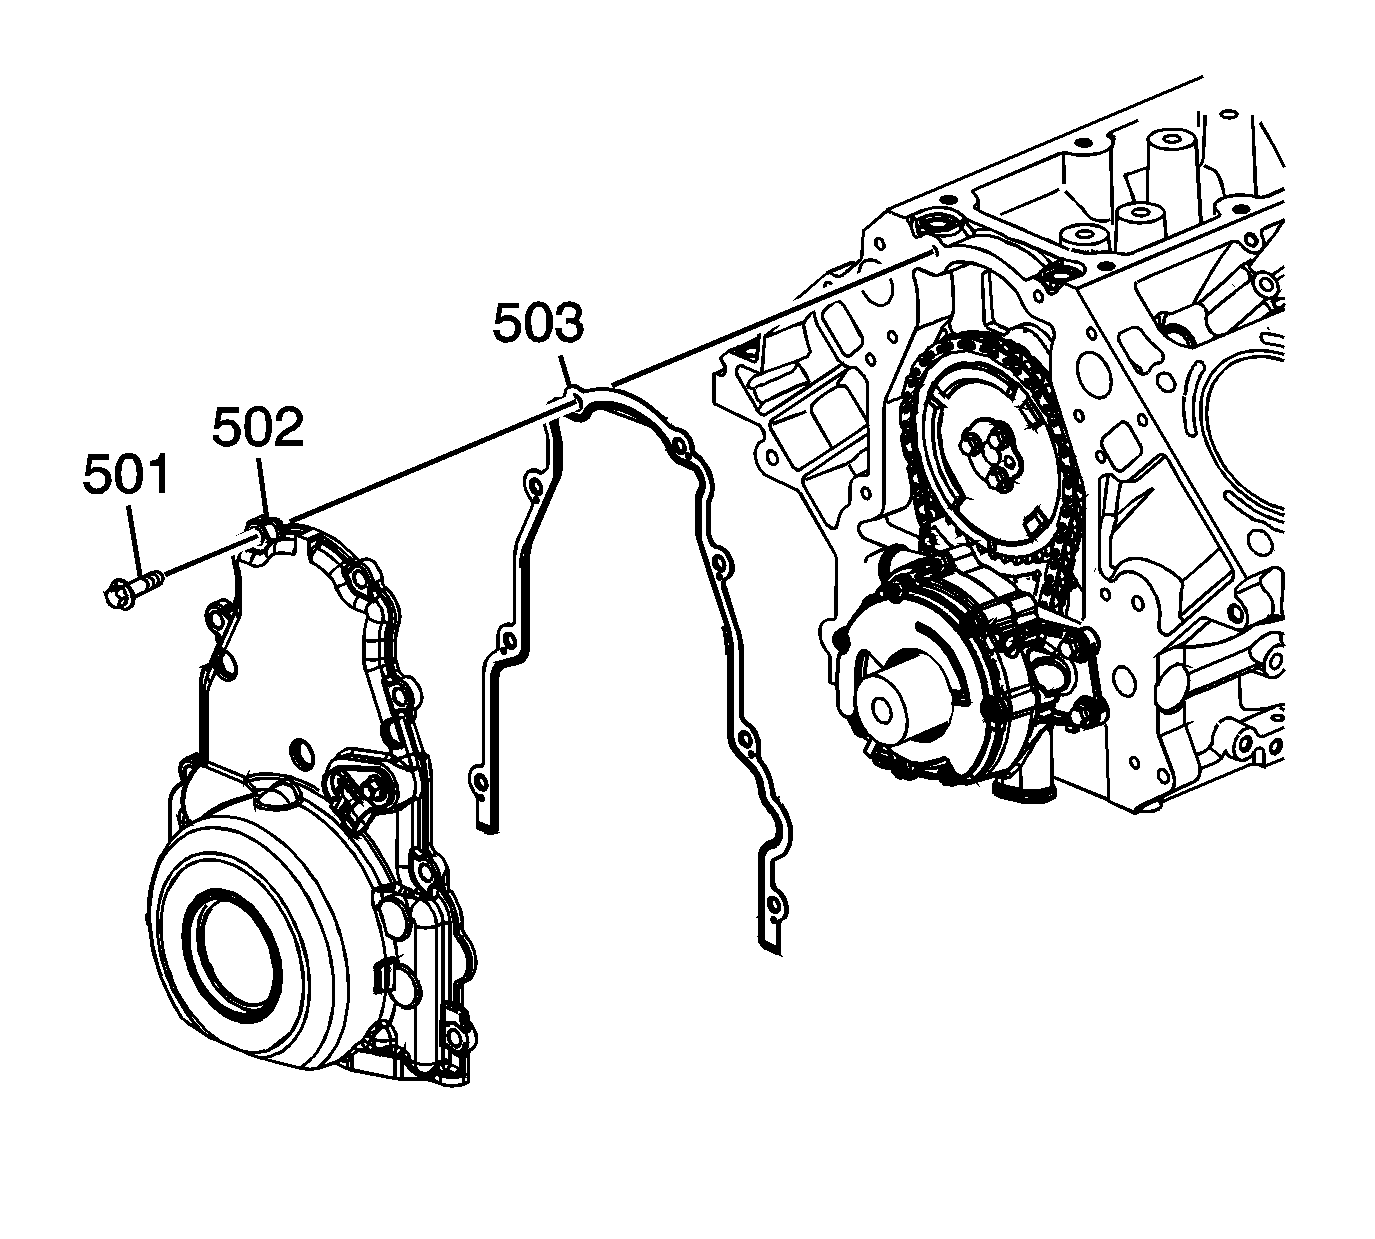
- Remove the front cover bolts (501).
- Remove the front cover (502) and gasket (503). Discard the old gasket.
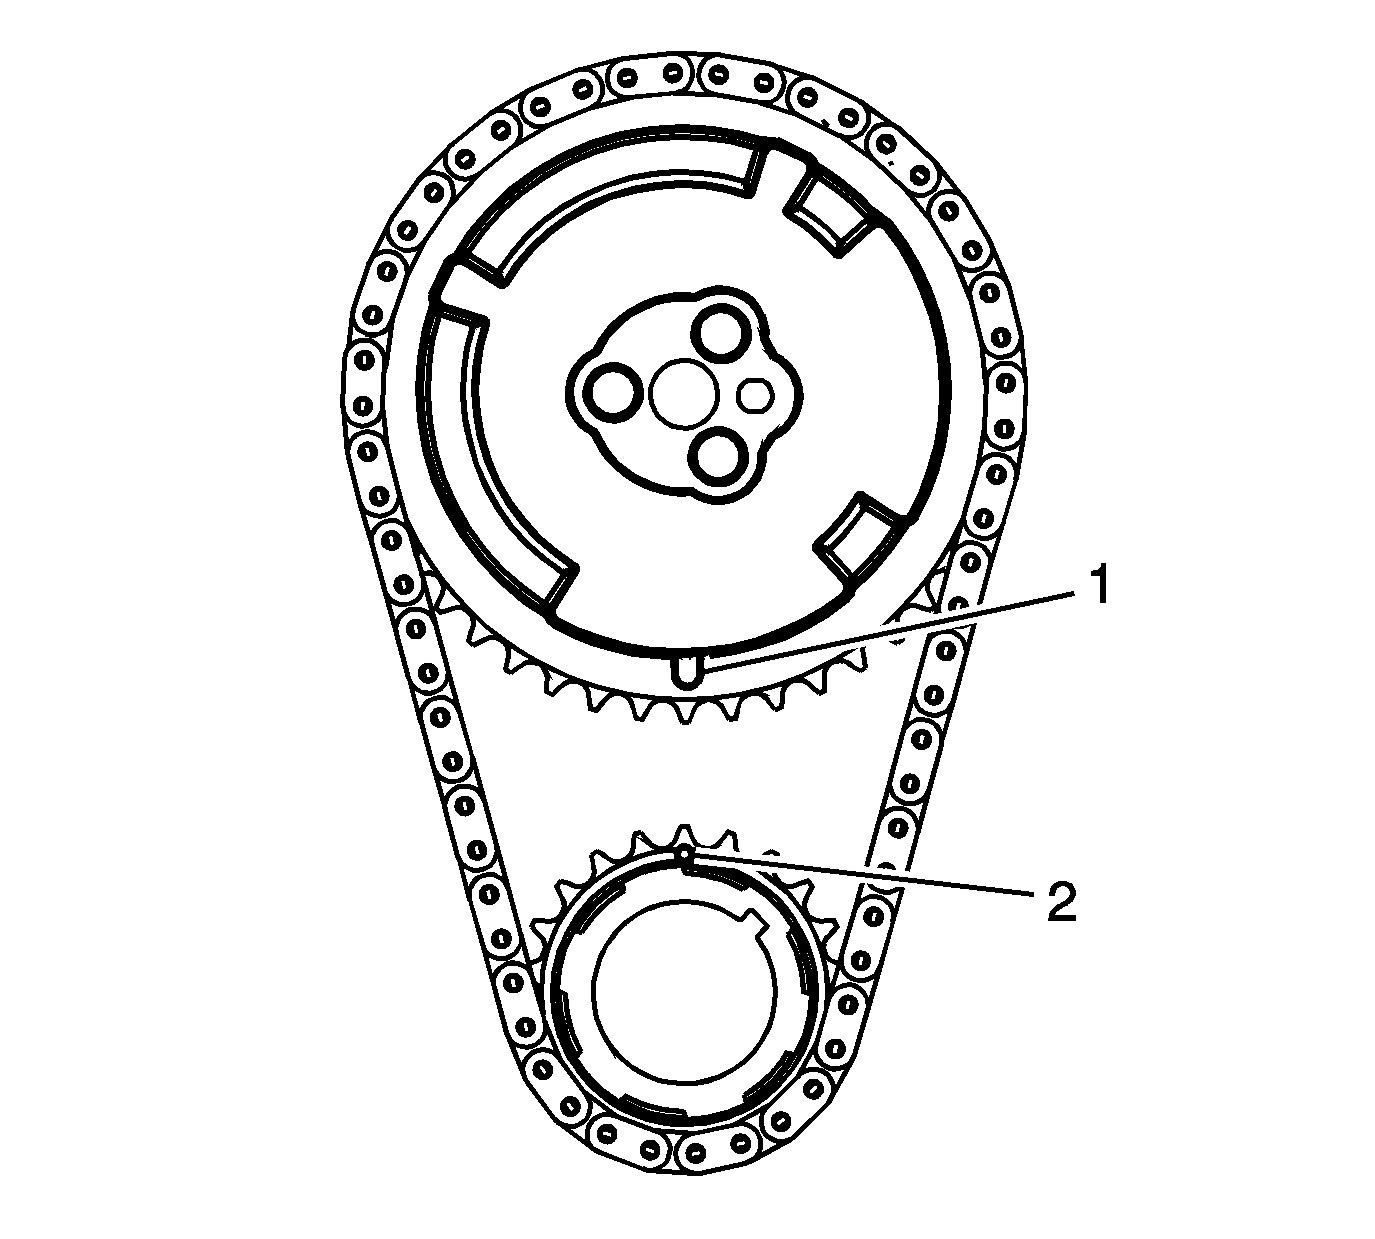
- Rotate the engine in order to align the timing marks (1, 2).
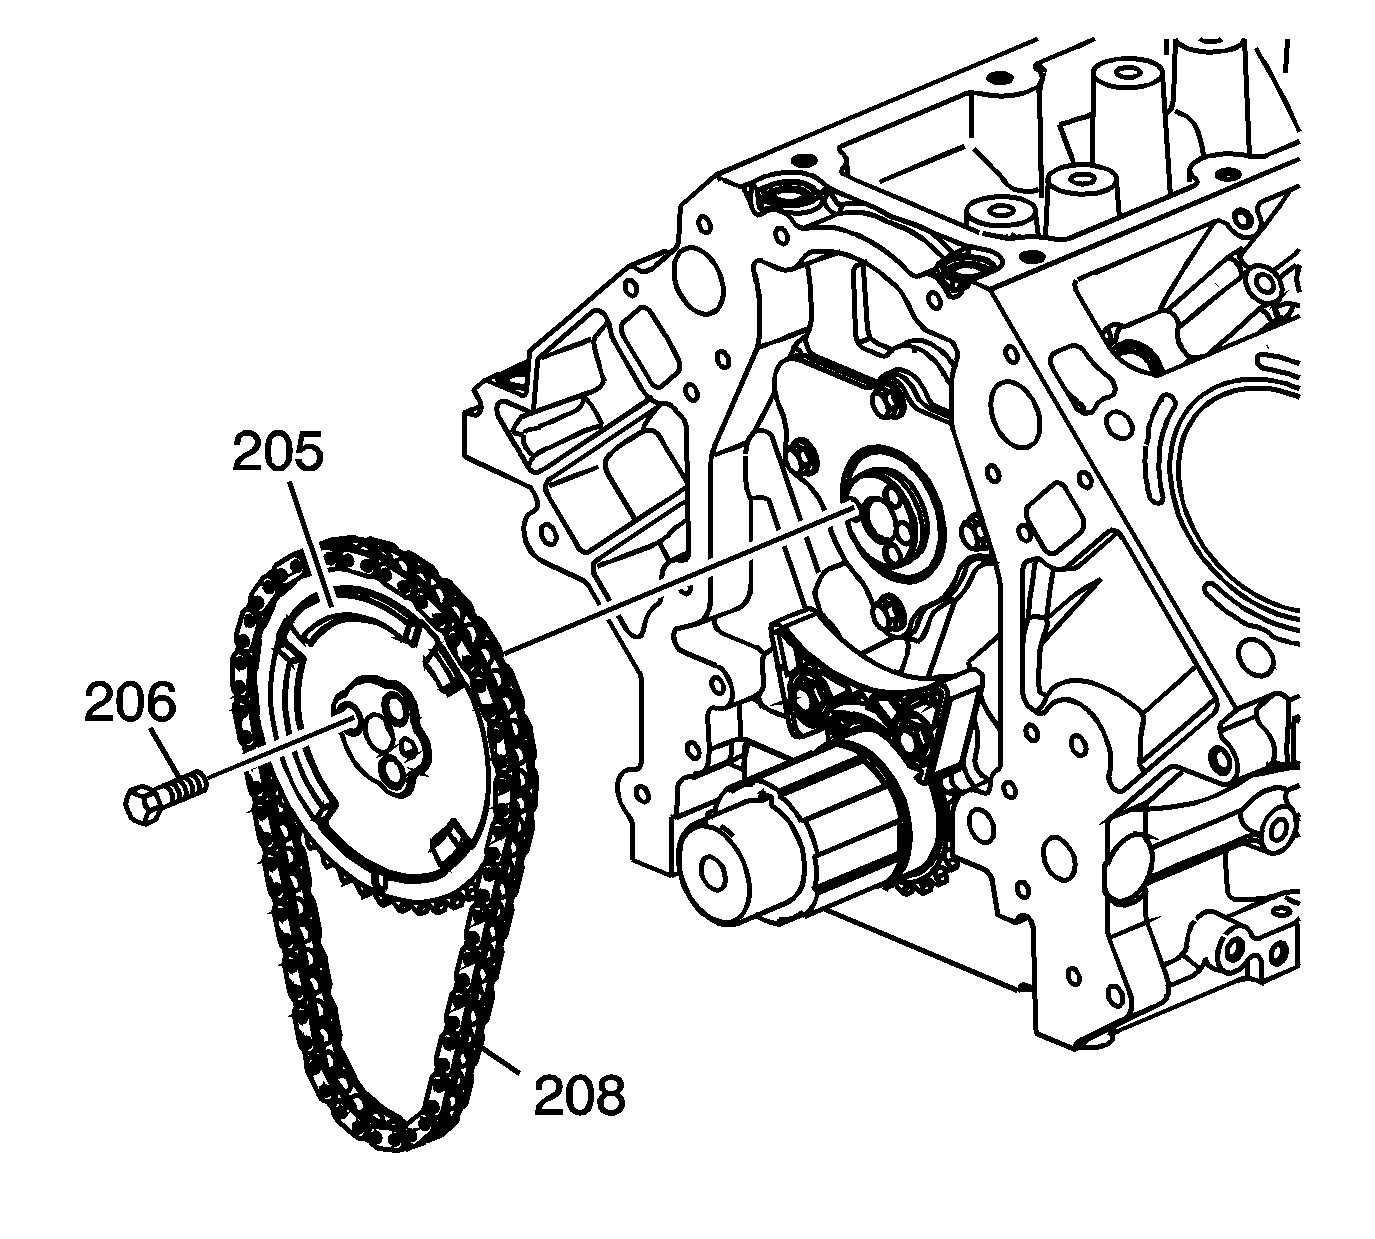
- Remove the camshaft sprocket bolts (206).
- Remove the timing chain (208) from the camshaft sprocket (205), and allow the timing chain to rest on the crankshaft sprocket.
- Remove the camshaft. Refer to Camshaft Removal.
Installation Procedure
- Install the camshaft. Refer to Camshaft Installation.
- Install the camshaft sprocket and timing chain.
- Align the camshaft sprocket alignment mark in the 6 o'clock position (1).
- Install the camshaft sprocket bolts.
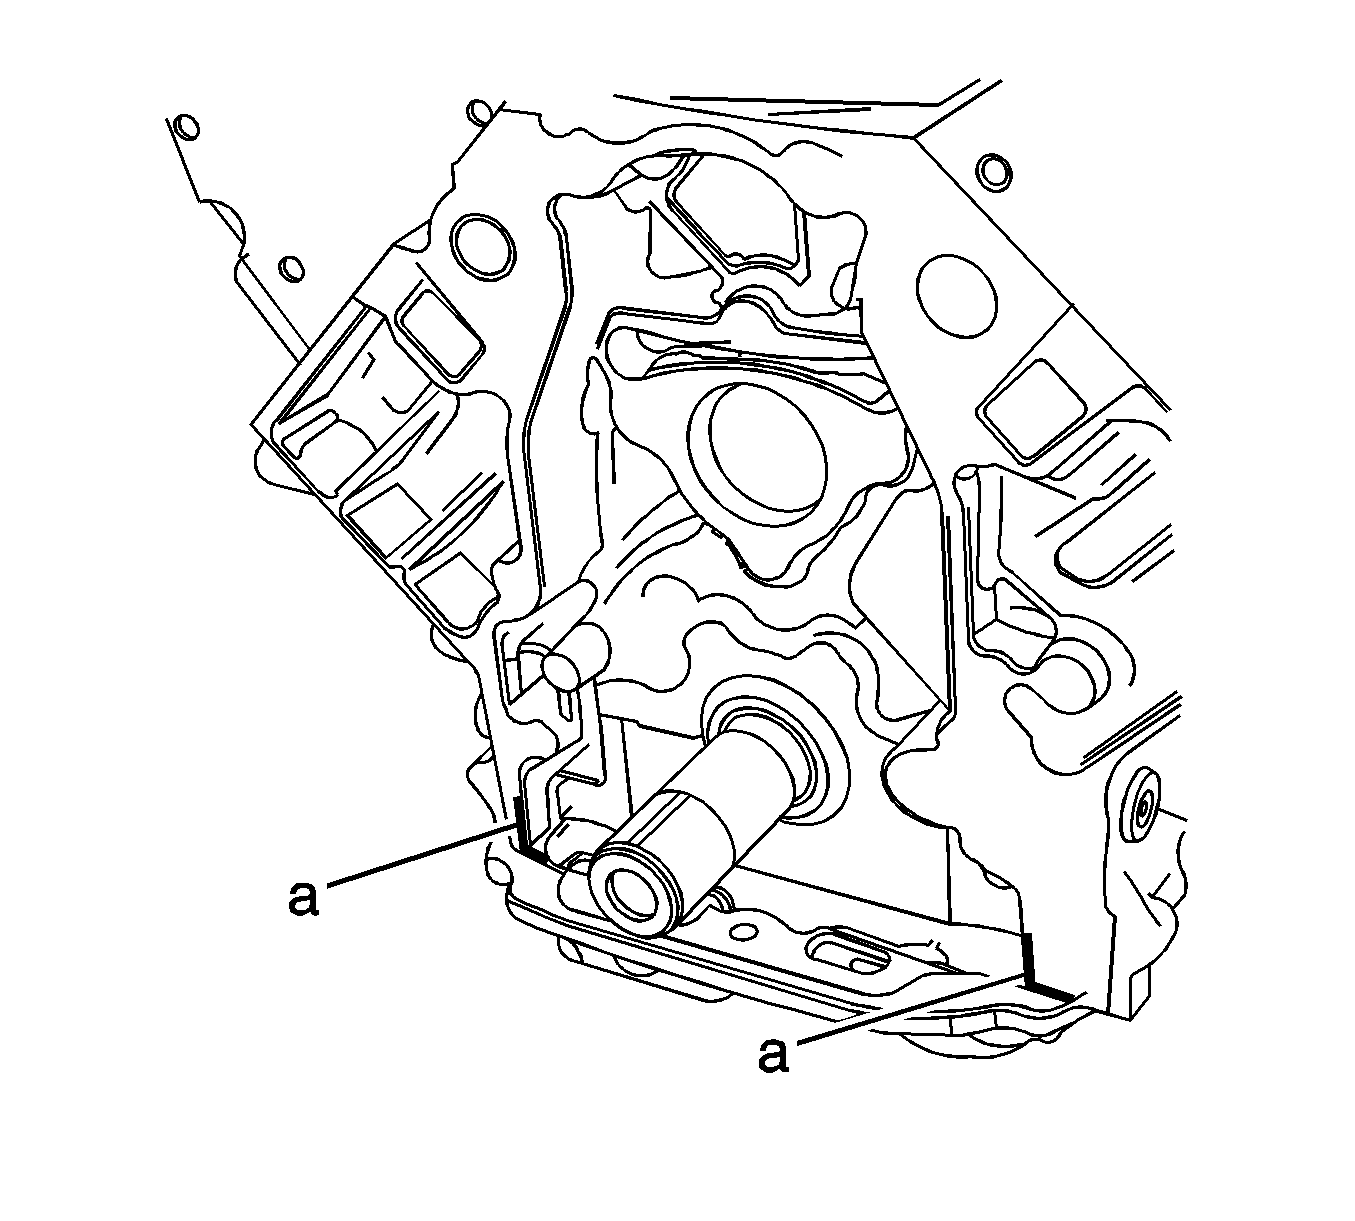
- Apply a 5 mm (0.2 in) bead of sealant 20 mm (0.8 in) long to the oil pan to engine block junction (a). Refer to Adhesives, Fluids, Lubricants, and Sealers for the correct part number.
- Install the front cover (502) and a new gasket (503).
- Install the front cover bolts until snug.
- Install the oil pan-to-front cover bolts until snug.
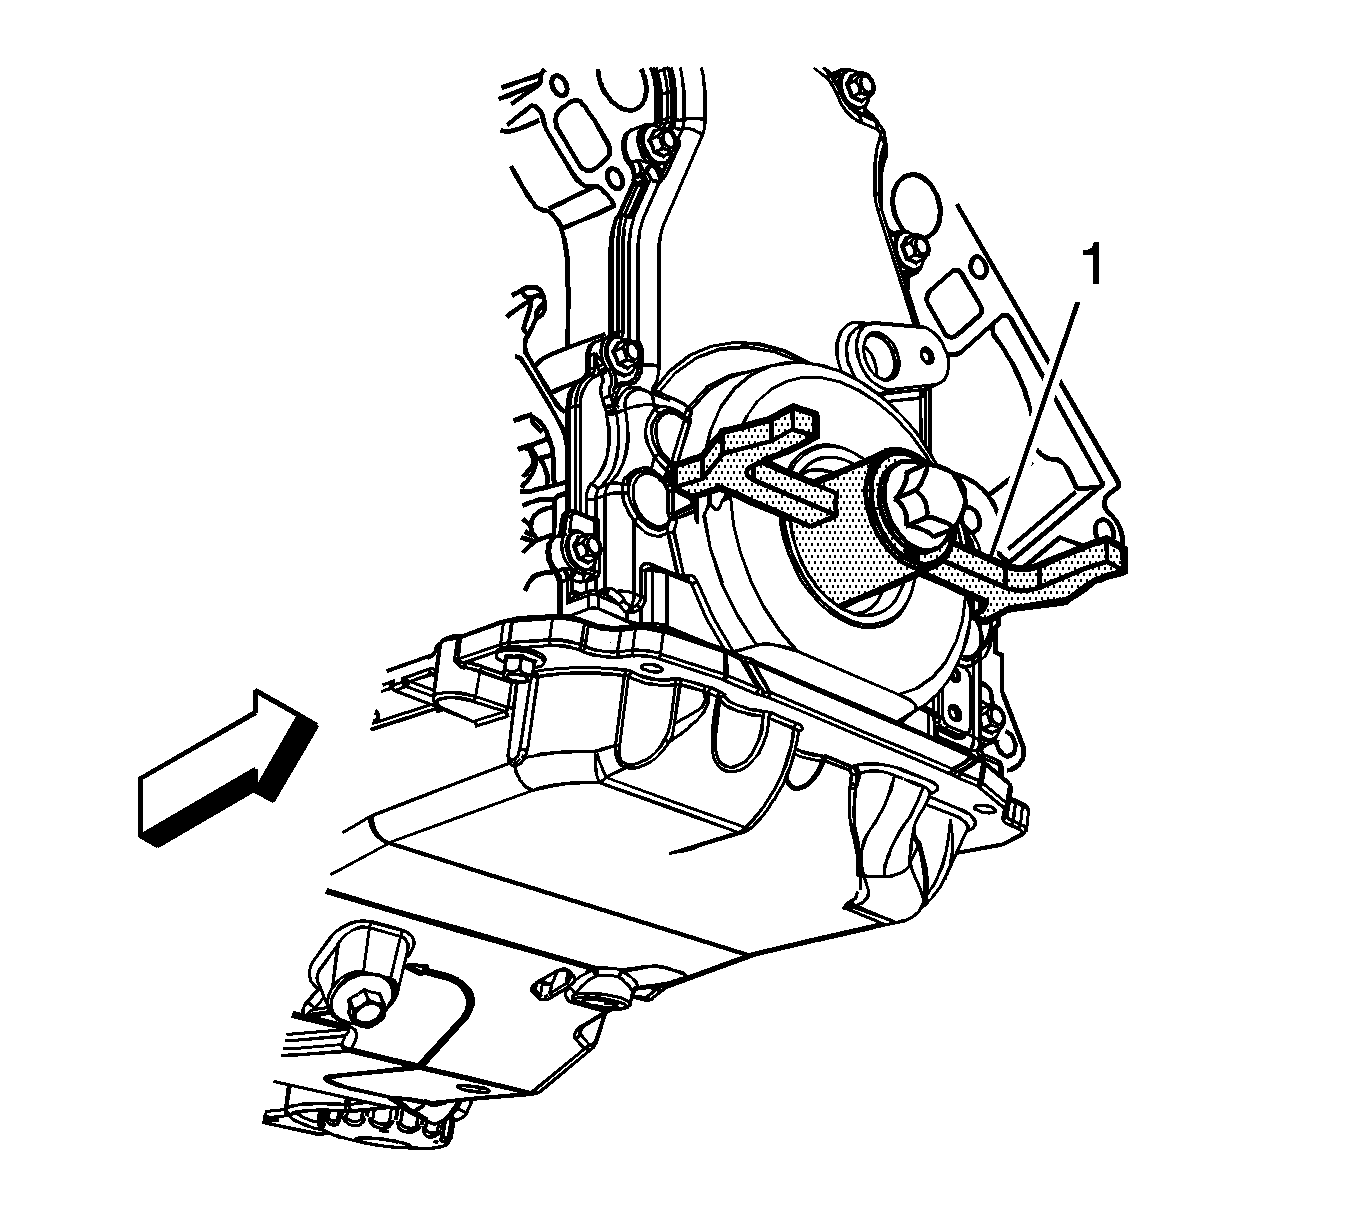
- Install the EN-47812 and EN-47813 .
- Install the crankshaft balancer bolt until snug. Do not overtighten.
- Tighten the oil pan-to-front cover bolts to 25 N·m (18 lb ft).
- Tighten the engine front cover bolts to 25 N·m (18 lb ft).
- Install a NEW crankshaft front oil seal. Refer to Crankshaft Front Oil Seal Installation.
- Install the valve lifters. Refer to Valve Lifter Installation.
- Install the right and left cylinder heads. Refer to Cylinder Head Installation - Right Side and Cylinder Head Installation - Left Side.
- Install the valve rocker arms and push rods. Refer to Valve Rocker Arm and Push Rod Installation.
- Install the right and left valve rocker arm covers. Refer to Valve Rocker Arm Cover Installation - Right Side and Valve Rocker Arm Cover Installation - Left Side.
- Install the intake manifold. Refer to Intake Manifold Installation.
- Install the water pump. Refer to Water Pump Installation.
- Install the left and right exhaust manifolds. Refer to Exhaust Manifold Installation - Left Side and Exhaust Manifold Installation - Right Side.
- Install the oil level indicator tube. Refer to Oil Level Indicator and Tube Installation.
- Install the crankshaft balancer. Refer to Crankshaft Balancer Installation.
- Install the engine assembly. Refer to Engine Replacement.

Notice: Refer to Fastener Notice in the Preface section.

Tighten
Tighten the camshaft sprocket bolts to 25 N·m (18 lb ft).


Tighten
Camshaft Replacement 7.0L
Special Tools
| • | EN-47812 Installer Bolt |
| • | EN-47813 Front Cover Alignment |
Removal Procedure
- Remove the engine assembly. Refer to Engine Replacement.
- Remove the crankshaft balancer. Refer to Crankshaft Balancer Replacement.
- Remove the left and right exhaust manifolds Refer to Exhaust Manifold Removal - Left Side and Exhaust Manifold Removal - Right Side.
- Remove the water pump. Refer to Water Pump Removal.
- Remove the intake manifold. Refer to Intake Manifold Removal.
- Remove the left and right valve rocker arm covers. Refer to Valve Rocker Arm Cover Removal - Left Side and Valve Rocker Arm Cover Removal - Right Side.
- Remove the valve rocker arms and push rods. Refer to Valve Rocker Arm and Push Rod Removal.
- Remove the left and right cylinder heads. Refer to Cylinder Head Removal - Left Side and Cylinder Head Removal - Right Side.
- Remove the valve lifters. Refer to Valve Lifter Removal.
- Remove the oil pan-to-front cover bolts.
- Remove the front cover bolts (501).
- Remove the front cover (502) and gasket (503). Discard the old gasket.
- Rotate the engine in order to align the timing marks (1, 2).
- Remove the camshaft sprocket bolts.
- Remove the timing chain from the camshaft sprocket, and allow the timing chain to rest on the crankshaft sprocket.
- Remove the camshaft. Refer to Camshaft Removal.


Installation Procedure
- Install the camshaft. Refer to Camshaft Installation.
- Align the camshaft sprocket alignment mark in the 6 o'clock position (1).
- Install the camshaft sprocket and timing chain.
- Install the camshaft sprocket bolts.
- Apply a 5 mm (0.2 in) bead of sealant 20 mm (0.8 in) long to the oil pan to engine block junction. Refer to Adhesives, Fluids, Lubricants, and Sealers for the correct part number.
- Install the front cover (502) and a new gasket (503).
- Install the front cover bolts (501) until snug.
- Install the oil pan-to-front cover bolts until snug.
- Install the EN-47812 over the bolt to the crankshaft.
- Install the EN-47813 .
- Insert the tapered surface of the tool into the oil seal bore of the cover EN-47812 washer and nut.
- Remove the tools.
- Install a NEW crankshaft front oil seal. Refer to Crankshaft Front Oil Seal Installation.
- Install the valve lifters. Refer to Valve Lifter Installation.
- Install the right and left cylinder heads. Refer to Cylinder Head Installation - Right Side and Cylinder Head Installation - Left Side.
- Install the valve rocker arms and push rods. Refer to Valve Rocker Arm and Push Rod Installation.
- Install the right and left valve rocker arm covers. Refer to Valve Rocker Arm Cover Installation - Right Side and Valve Rocker Arm Cover Installation - Left Side.
- Install the intake manifold. Refer to Intake Manifold Installation.
- Install the water pump. Refer to Water Pump Installation.
- Install the left and right exhaust manifolds. Refer to Exhaust Manifold Installation - Left Side and Exhaust Manifold Installation - Right Side.
- Install the crankshaft balancer. Refer to Crankshaft Balancer Installation.
- Install the engine assembly. Refer to Engine Replacement.


Recheck the alignment of the timing marks.
Notice: Refer to Fastener Notice in the Preface section.
Tighten
Tighten the camshaft sprocket bolts to 25 N·m (18 lb ft).


Tighten the nut by hand until snug. Do not overtighten.
Tighten
Tighten the engine front cover bolts to 25 N·m (18 lb ft).
