For 1990-2009 cars only
Removal Procedure
- Disable the SIR system. Refer to SIR Disabling and Enabling and to SIR Disabling and Enabling in SIR.
- Disconnect the battery ground cable. Refer to Battery Negative Cable Disconnection and Connection in Engine Electrical.
- Remove the floor console. Refer to Front Floor Console Replacement .
- Remove the closeout insulator panels. Refer to Instrument Panel Insulator Panel Replacement - Left Side and to Instrument Panel Insulator Panel Replacement - Right Side .
- Remove the instrument panel compartment door. Refer to Instrument Panel Compartment Door Replacement .
- Remove the instrument panel compartment lamp. Refer to Instrument Panel Compartment Lamp Replacement in Lighting Systems.
- Remove the instrument panel compartment lamp switch. Refer to Instrument Panel Compartment Lamp Switch Replacement in Lighting Systems.
- Remove the instrument panel lower trim retainer panel. Refer to Instrument Panel Retainer Replacement .
- Remove the instrument panel center trim. Refer to Instrument Panel Center Trim Panel Replacement .
- Remove the instrument panel lower extension. Refer to Instrument Panel Extension Replacement .
- Remove the HVAC manual controls. Refer to Heater and Air Conditioning Control Replacement in HVAC.
- Remove the radio housing bracket. Refer to Radio Housing Bracket Replacement in Entertainment.
- Remove the instrument cluster. Refer to Instrument Cluster Replacement .
- Remove the headlamp switch. Refer to Headlamp Switch Replacement in Lighting Systems.
- Remove the driver information center switch. Refer to Driver Information Display Switch Replacement .
- Remove the instrument panel outer covers. Refer to Instrument Panel Outer Trim Cover Replacement .
- Remove the windshield defroster grilles. Refer to Defroster Grille Replacement .
- Remove the daytime running lamp control module. Refer to Daytime Running Lights (DRL) Control Module Replacement in Lighting Systems.
- Remove the instrument panel speakers. Refer to Radio Front Speaker Replacement in Entertainment.
- Remove the cruise control switch. Refer to Cruise Control Switch Replacement in Cruise Control.
- Remove the wiper washer switch. Refer to Windshield Wiper and Washer Switch Replacement in Wipers/Washer Systems.
- Remove the steering wheel. Refer to Steering Wheel Replacement in Steering Wheel and Column.
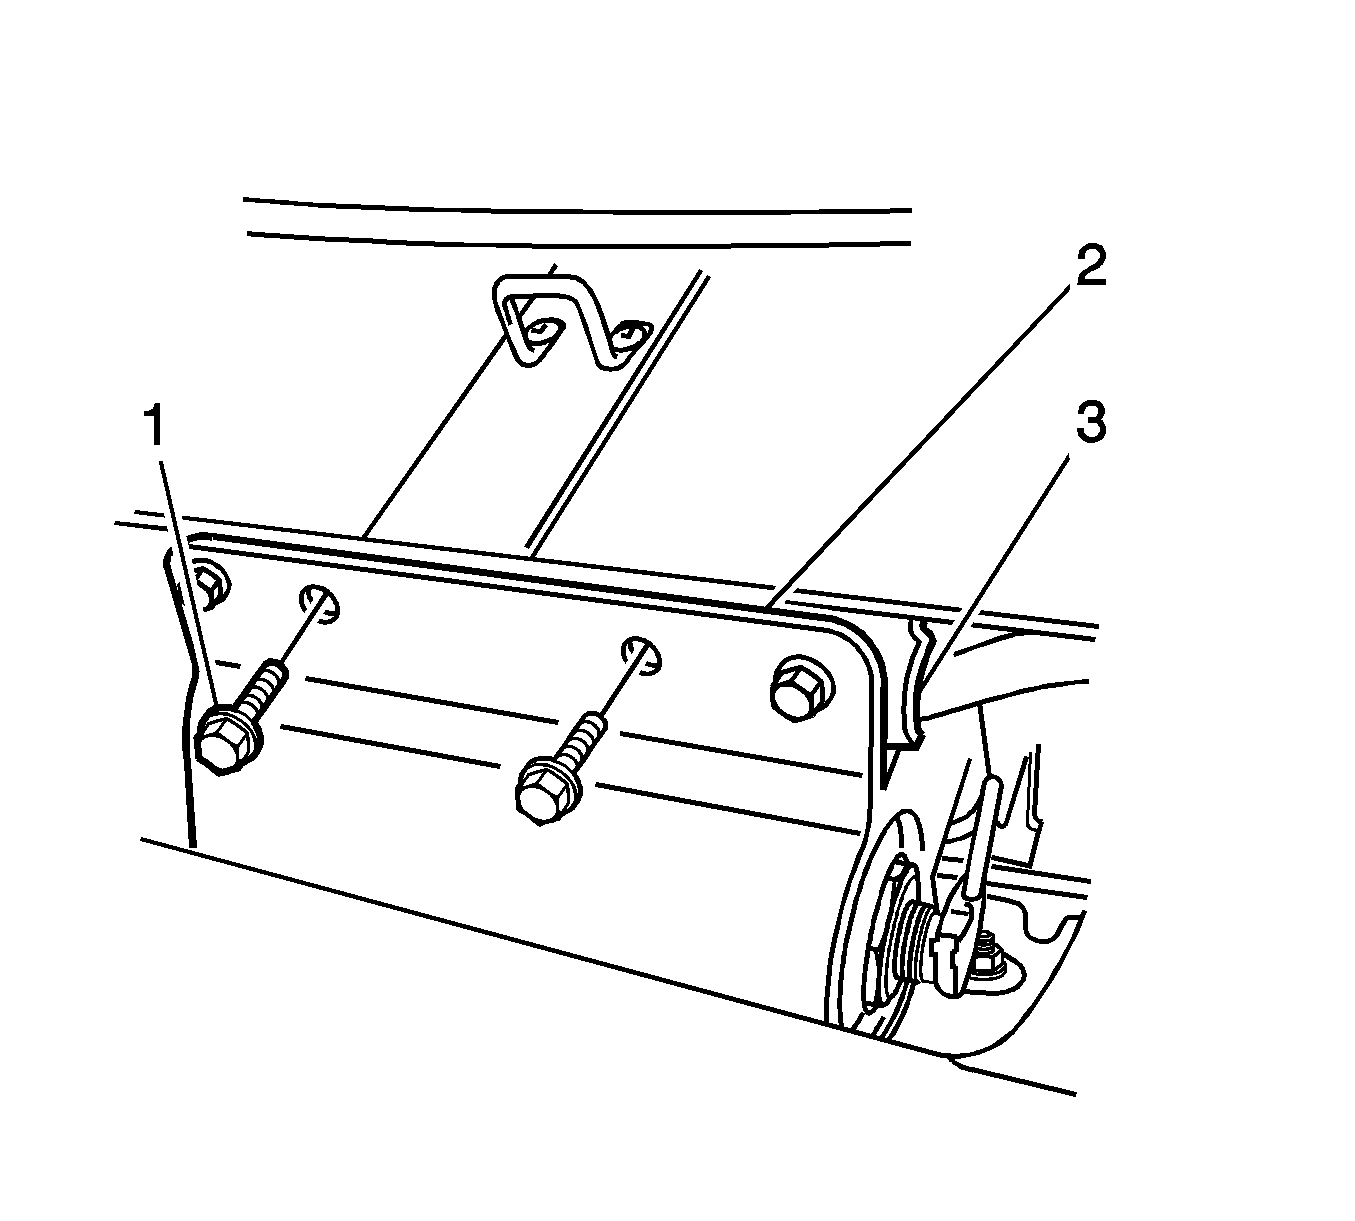
- Remove the 2 inner screws (1) attaching the instrument panel inflatable restraint (2) and instrument panel passenger's bracket and brace assembly (3) to the instrument panel inflatable restraint bracket.
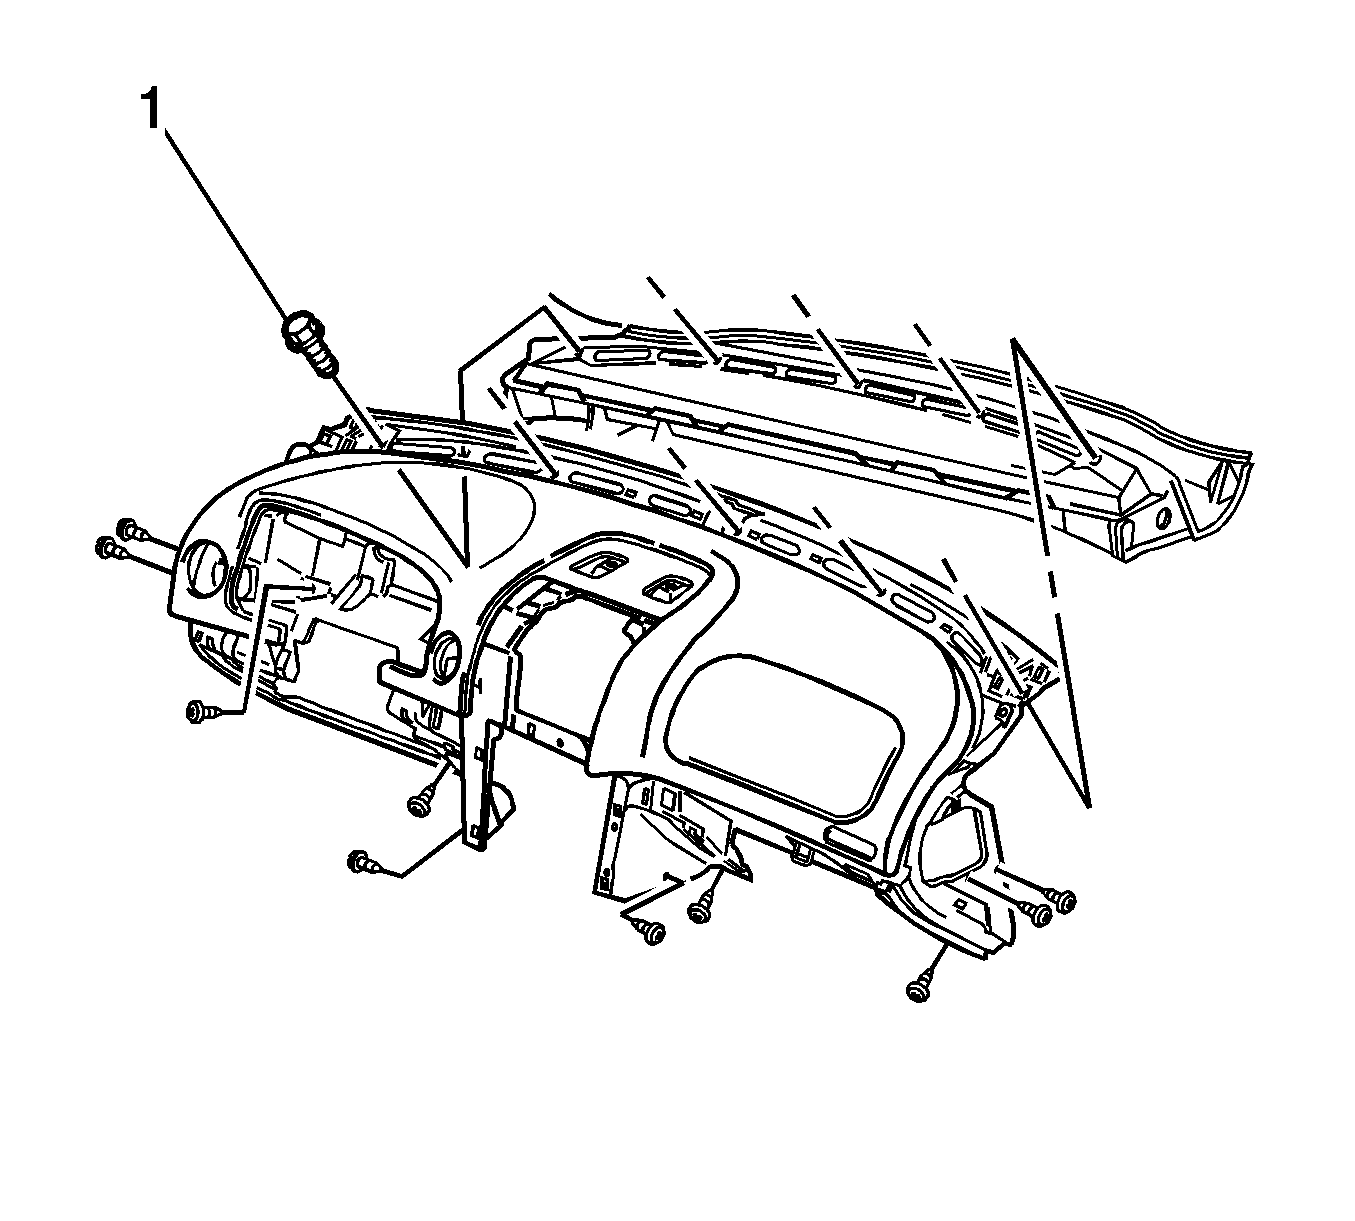
- Remove the 12 lower screws from the instrument panel pad.
- Remove the 5 upper screws (1) from the instrument panel pad.
- Remove the instrument panel pad from the vehicle.
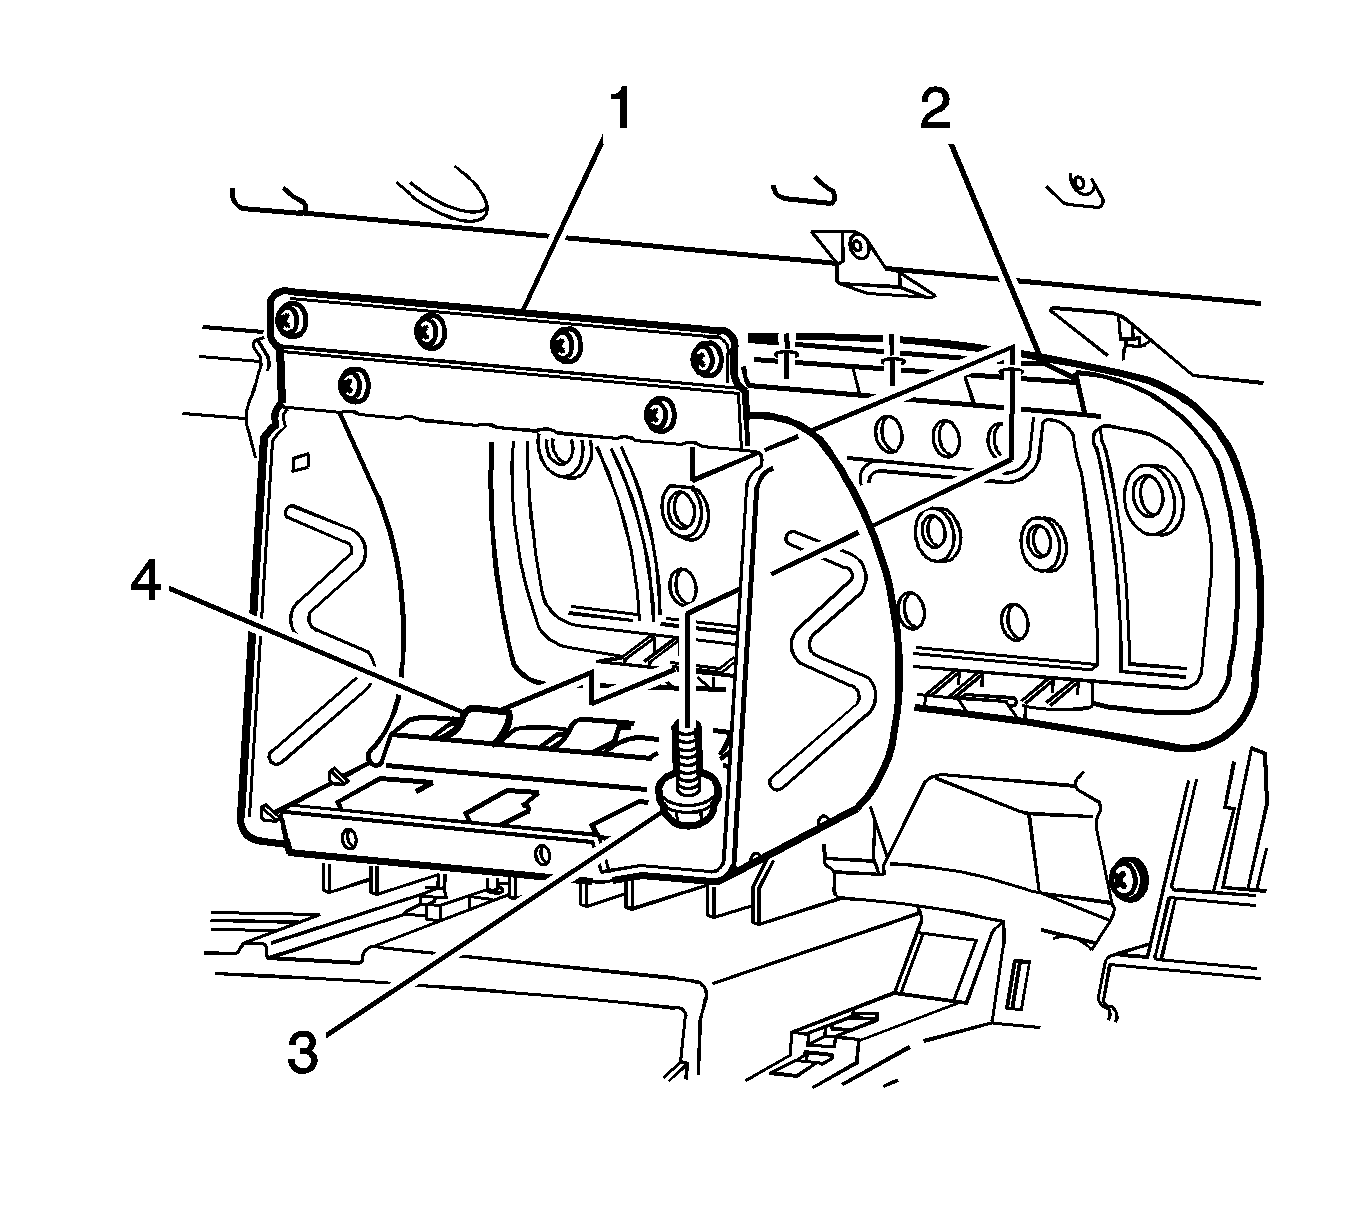
- From the rear side of the instrument panel pad, remove the 4 screws (3) attaching the instrument panel inflatable restraint opening trim cover (2) to the instrument panel inflatable restraint bracket (1).
- While pushing on the trim cover (2), detach the 4 tabs (4) and remove the trim cover (2).
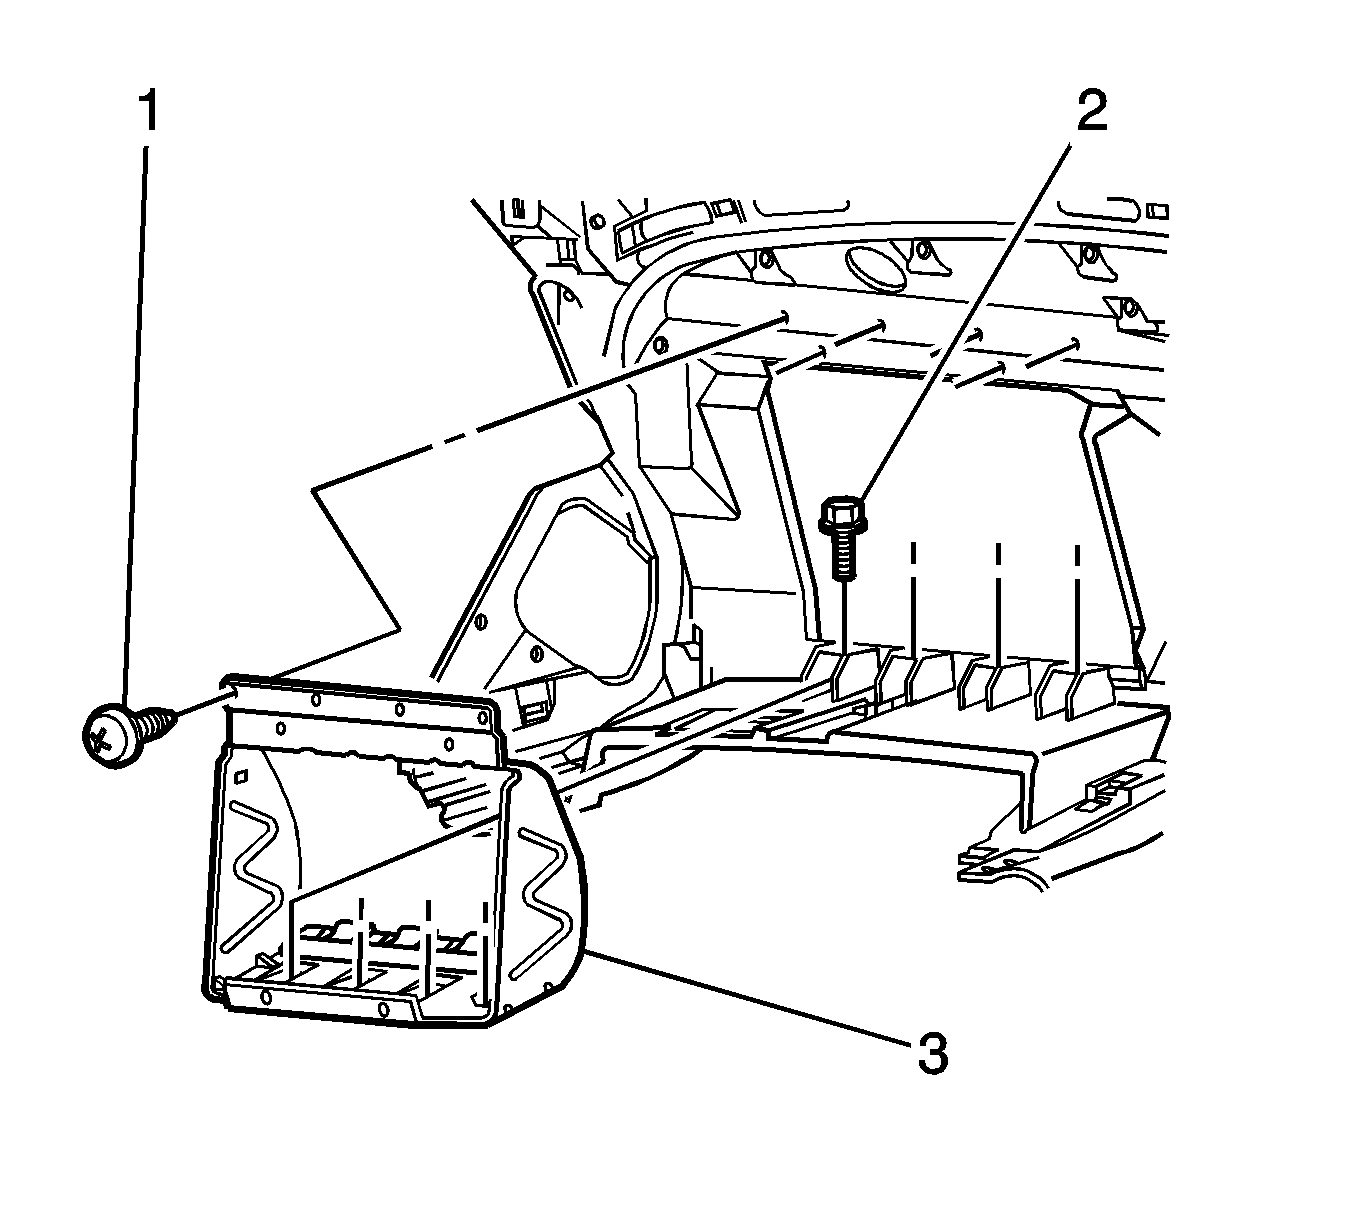
- From the rear of the instrument pad, remove the 4 screws (2), attaching the instrument panel inflatable restraint bracket (3) to the pad assembly.
- Remove the 6 screws (1), and remove the bracket (3) from the pad assembly.
Caution: Refer to SIR Caution in the Preface section.
Caution: Refer to Battery Disconnect Caution in the Preface section.


Installation Procedure
- Fit the bracket (3) in position, ensuring the lower screw hole tabs are positioned in the pad assembly.
- Install the 6 screws (1) attaching the bracket (3) to the pad assembly.
- Install the 4 screws (2), attaching the instrument panel inflatable restraint bracket (3) to the pad assembly.
- Locate the trim cover (2) in the pad assembly opening, and align the trim cover (2) with the 4 tabs (4).
- Install the 4 screws (3) attaching the instrument panel inflatable restraint trim cover (2) to the inflatable restraint bracket (1).
- Install the instrument panel pad to the vehicle.
- Install the 5 upper instrument panel pad screws (1).
- Install the 12 lower instrument pad screws.
- Install the 2 inner screws (1) attaching the instrument panel inflatable restraint (2) and instrument panel passenger's bracket and brace assembly (3) to the instrument panel inflatable restraint bracket.
- Install the steering wheel. Refer to Steering Wheel Replacement in Steering Wheel and Column.
- Install the wiper washer switch. Refer to Windshield Wiper and Washer Switch Replacement in Wipers/Washer Systems.
- Install the cruise control switch. Refer to Cruise Control Switch Replacement in Cruise Control.
- Install the instrument panel speakers. Refer to Radio Front Speaker Replacement in Entertainment.
- Install the daytime running lamp control module. Refer to Daytime Running Lights (DRL) Control Module Replacement in Lighting Systems.
- Install the windshield defroster grilles. Refer to Defroster Grille Replacement .
- Install the instrument panel outer covers. Refer to Instrument Panel Outer Trim Cover Replacement .
- Install the instrument cluster. Refer to Instrument Cluster Replacement .
- Install the driver information center switch. Refer to Driver Information Display Switch Replacement .
- Install the headlamp switch. Refer to Headlamp Switch Replacement in Lighting Systems.
- Install the radio housing bracket. Refer to Radio Housing Bracket Replacement in Entertainment.
- Install the HVAC manual controls. Refer to Heater and Air Conditioning Control Replacement in HVAC.
- Install the instrument panel lower extension. Refer to Instrument Panel Extension Replacement .
- Install the instrument panel center trim. Refer to Instrument Panel Center Trim Panel Replacement .
- Install the instrument panel lower trim retainer panel. Refer to Instrument Panel Retainer Replacement .
- Install the instrument panel compartment lamp switch. Refer to Instrument Panel Compartment Lamp Switch Replacement in Lighting Systems.
- Install the instrument panel compartment lamp. Refer to Instrument Panel Compartment Lamp Replacement in Lighting Systems.
- Install the instrument panel compartment door. Refer to Instrument Panel Compartment Door Replacement .
- Install the closeout insulator panels. Refer to Instrument Panel Insulator Panel Replacement - Left Side and to Instrument Panel Insulator Panel Replacement - Right Side .
- Install the floor console. Refer to Front Floor Console Replacement .
- Connect the battery ground cable. Refer to Battery Negative Cable Disconnection and Connection in Engine Electrical.
- Enable the SIR system. Refer to SIR Disabling and Enabling and to SIR Disabling and Enabling in SIR.

Notice: Refer to Fastener Notice in the Preface section.
Tighten
Tighten the 6 screws to 2 N·m (18 lb in).
Tighten
Tighten the 4 screws to 9 N·m (80 lb in).

Tighten
Tighten the 4 screws to 9 N·m (80 lb in).

Tighten
Tighten the upper pad screws to 9 N·m (80 lb in).
Tighten
Tighten the lower pad screws to 2 N·m (18 lb in).

Tighten
Tighten the inner screws to 9 N·m (80 lb in).
